In this how-to article, we will provide simple explanations and points to explain how to make your WordPress site to be a bilingual/multilingual site when you are using our Fallsky theme and the third-party plugin WPML.
Please note: because WPML is a third-party plugin, so we will only provide links to this plugin’s official documentation. We will not be able to provide details about how to use this plugin, or provide support service for this plugin.
What you will need
- A recent version of the Fallsky theme
- A recent version of WPML, including the String Translation, Translation Management and Media translation add-ons.
Essential Resources
- WPML’s Getting Started Guide will help you in setting up WPML in a few minutes. You will want to refer later to some of its subtopics, such as Theme and Plugin Localization and String Translation. We recommend that you keep this guide open while following this tutorial.
How to Translate
Table of Contents:
- Step 1 – Getting started
- Step 2 – Translating pages and posts
- Step 3 – Translating post categories and tags
- Step 4 – Translating texts coming from the theme & WordPress Core
- Step 5 – Translating Fallsky’s Home Widgets
- Step 6 – Translating Newsletter Signup Form
- Step 7 – Translating Menus
- Step 8 – Translating widgets
- Step 9 – Language Switcher
Step 1 – Getting started
- Install and activate Fallsky theme, the required plugin and recommended plugins.
- Install and activate the main WPML components (Please see WPML Getting Started Guide for complete reference):
- WPML Multilingual CMS (the core plugin)
- String Translation
- Translation Management
- Media Translation
- Set up WPML. When you first activate WPML a Setup Wizard will help you specify the essential settings required to prepare your site for multilingual content. Follow the wizard you can:
- Choose your site’s languages
- Customize and add language switchers to your site
- Register WPML
Step 2 – Translating pages and posts
When you have created some pages and posts on your website, you can translate them into other languages.
For example, if you are going to translate a page. On your website dashboard > “Pages” > in the “All Pages” list, you will see these icons (translation controls) in the “Language” column. Or, you will find the “Language” box when editing the page.
Click on the “+” button of the language you are about to translate the content to. For example, “German”. This creates a new German translation for it. Then enter the content written in German. And publish the page.
If you need to updating the translation of a page or post, please go to “Pages” or “Posts”. For the translated pages or posts, the “+” icon will change to a pencil icon. Click on the pencil icon if you need to modify your translation.
Step 3 – Translating post categories and tags
Translating Post Categories:
- Navigating to Posts > Categories, as an example we will create a category and name it “Vegan”, also upload a category image for it, and click on the Add New Category button. (Please refer to Edit a category.)
- When editing this category, find the Language box, and click on the “add” link to add the translation of the category.
- Fill the Name and Slug fields with the category translation, and also choose the same category image for it, and then click on the Add New Category button.
Translating post tags
Translating post tags is just as same as translating categories. The only difference is you only need to enter tag Name and Slug.
Taxonomy Translation
You can also translate post categories and tags via WPML Taxonomy Translation.
- Navigating to WPML > Taxonomy Translation. Select Tags (or Categories) from the Select the taxonomy to translate drop-down menu. Then click on the “+” icon or the pencil icon to translate a tag (or a category).
- The Term Translation box will pop up. Enter the translation and click on “Save” button.
Step 4 – Translating texts coming from the theme & WordPress Core
The following texts need to be translated on the String Translation screen. (Read more about Theme and Plugin Localization.)
- Theme Strings – They are strings written in the theme code (included in the .pot file), for example, “Join the Conversation” (Comments Section Title) on each single post or page.
- Theme Options Strings – They are strings entered in the theme options (customizer). When customizing your site with Fallsky theme, you will be able to enter many custom text in the customizer. To translate any custom text you entered in the customizer you need to use String Translation screen of WPML.
- Strings entered with WordPress core features – Such as the site title, the tagline, widgets.
By default, WPML doesn’t scan or load these translation files into the database. Because of this, you will not be able to find these strings on the WPML → String Translation page. If you want to translate or edit these strings, you first need to scan the translation files of the related theme or a plugin.
1 – Scanning the theme
To translate texts coming from the theme and plugins, you need to scan them first. Go to the WPML → Theme and plugins localization page and find Strings in the themes box. Select “Fallsky” and click the Scan selected themes for strings button.
2 – Translating the texts
Please navigate to WPML → String translation page. Then you can:
- Select “Fallsky” in the Select string within domain dropdown list.
- If you have imported a demo, or you have changed any settings in the customizer, please select “admin_texts_theme_mods_fallsky” in the Select string within domain dropdown list to find the text added in the customizer.
- Or, you can enter some keywords copied from the texts you want to translate into the Search for: field and search.
For example, let’s translate the “Load More Posts” button. The original text is entered in the customizer.
- Navigate to WPML → String translation. Enter “load more” and search. You will see the search result as shown below, then click on translations.
- Add your translated text. Then choose the Translation is complete option and click Save.
Useful Links:
Step 5 – Translating Fallsky’s Home Widgets
Fallsky theme contains a built-in homepage drag and drop builder in the customizer to create a “Multi-content Homepage”. Please read our documentation to know more details about it: Multi-content Homepage.
When creating a bilingual/multilingual site, you will need to create different home widgets for different languages.
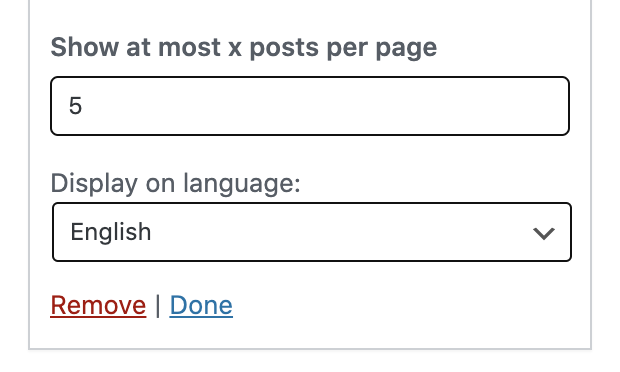
For example, on the homepage, we have a home widget displaying the most viewed posts, this home widget has a title “Most Popular”.
- Expand this home widget, you can find the option “Display on language” at the bottom of its settings panel. Choose “English”.
- Add a new home widget > “Posts”, choose the same options as the home widget “Most Popular”. Change the home widget title to “Am beliebtesten” (“Most Popular” in German).
- Find the option “Display on language” at the bottom of its settings panel. Choose “Deutsch”.
- Save changes and publish.
Step 6 – Translating Newsletter Signup Form
1. Installing an Add-on
Please download and install this add-on: MailChimp for WordPress Multilingual. Please go to WPML and log into your account, then please go to “Download” page to download the MailChimp for WordPress Multilingual add-on. And then upload it to your website, install and activate it just as you would any other WordPress plugin.
2. Translating the form
Please read the WPML Offical Documentation: MailChimp for WordPress Multilingual.
Step 7 – Translating Menus
WPML lets you translate WordPress menus and create different menus per language. You can translate menus manually, or have WPML synchronize menu content. Please check Translating Menus for more details.
Step 8 – Translating widgets
WPML lets you easily translate your Widgets via the String Translation screen. This requires that the WPML String Translation module is installed. The module is available in the Multilingual CMS version.
Besides translating widgets, WPML allows you to display different widgets for different languages.
Useful Links:
Step 9 – Language Switcher
A language switcher allows visitors to select the language in which they want to read your content. WPML lets you add a language switcher in different ways: in a menu, as a widget, or in the site’s footer. You can also use it to show links above or below your posts, offering them in other languages.
To add and customize language switchers, go to WPML → Languages in the WordPress dashboard, then you will find the following settings on this page:
- Language switcher options
- Menu language switcher
- Widget language switcher
- Footer language switcher
- Links to translation of posts
- Custom language switchers
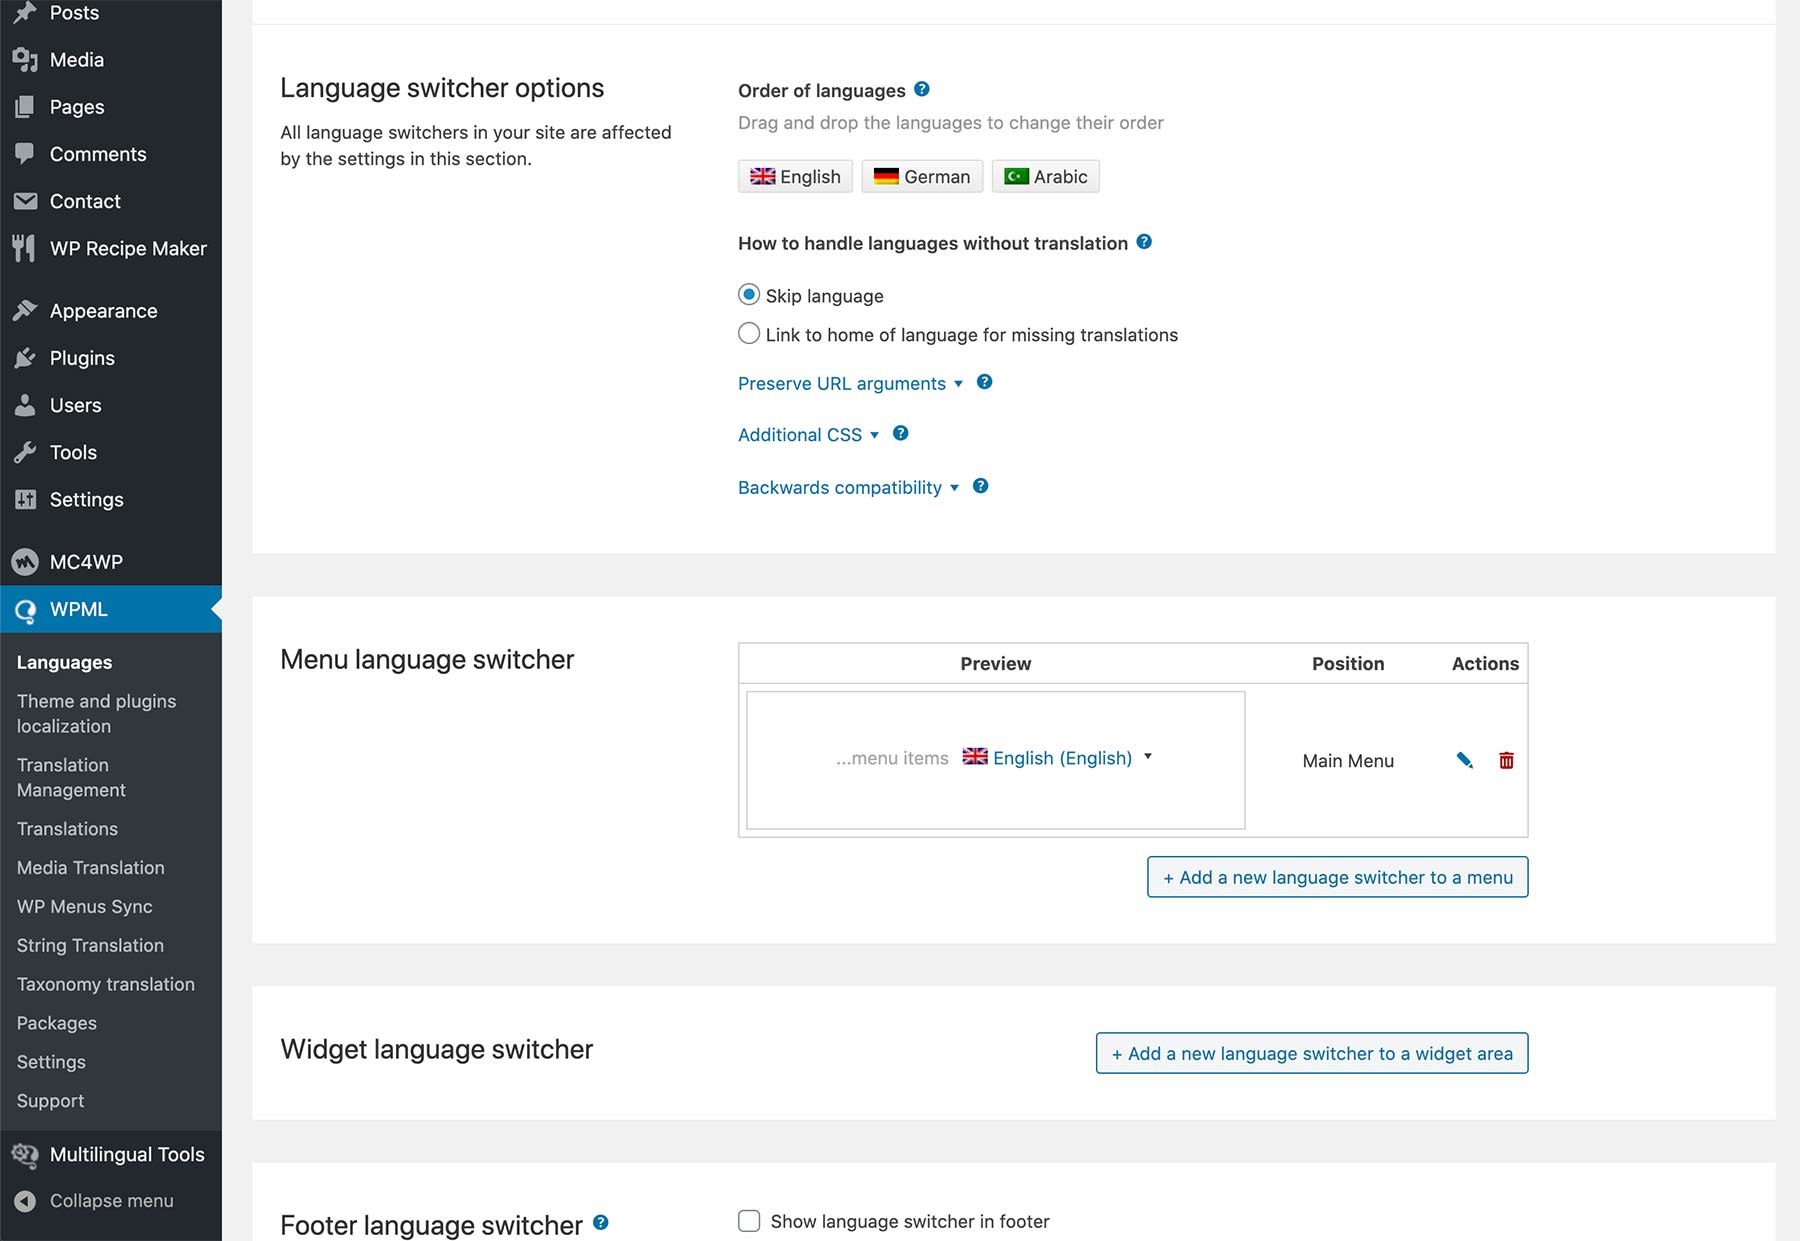
Each language switcher type has its own settings. This allows you full and independent control over what it includes and how it looks. When clicking on the “Pencil” icon, it will show a dialog box with settings for the menu language switcher.
Useful Links:
Need Help for WPML
If you need help with using WPML with Fallsky theme, please head over to WPML technical forum. Before posting about issues, we recommend that you review this quick checklist:
- Make sure you have the latest versions of the theme and of the WPML plugins, and that they are all activated. These include WPML Multilingual CMS, WPML String Translation and WPML Translation Management.
- Check that the problem does not appear if the WPML plugins are deactivated, and it does appear when only the core WPML plugins are activated.
Please always remember to search and read WPML official documentation for more details about how to use WPML.