To install CeraMag theme, first you need a self-hosted WordPress site. Click the link below to go to WordPress download page,
there you will find useful information about installing WordPress.
If you are new to WordPress, we recommend reading some articles about basic knowledge of WordPress before you get started.
WordPress is a powerful system with a lot of features, knowing some basics about it will help you to manage your site easily.
To use CeraMag theme, please make sure your server meets the following requirements:
WordPress 5.0 or higher
PHP 5.6 or higher
mysql 5.2 or higher
Minimum PHP Requirements
If you encounter any issue listed below, it is related to low PHP configuration limits:
Can't upload the theme to your site
Can't import a demo
"Are You Sure You Want to Do This" Error
White screen
and other similar issues
The solution is to increase those PHP configuration limits. Please log into your hosting cPanel and change them.
Or you can try to contact your hosting provider and ask them to increase those limits to a minimum as follows:
max_execution_time
30
max_input_time
60
memory_limit
256M
post_max_size
64M
upload_max_filesize
64M
Detect Your Website Configuration
Since version 2.0, for more friendly user experience, we added a feature to detect your website configuration. If the website does not
meet the minimum requirement to run CeraMag theme, the theme will not be activated, and it will display a warning message, so the user will know what happens,
and what they can do.
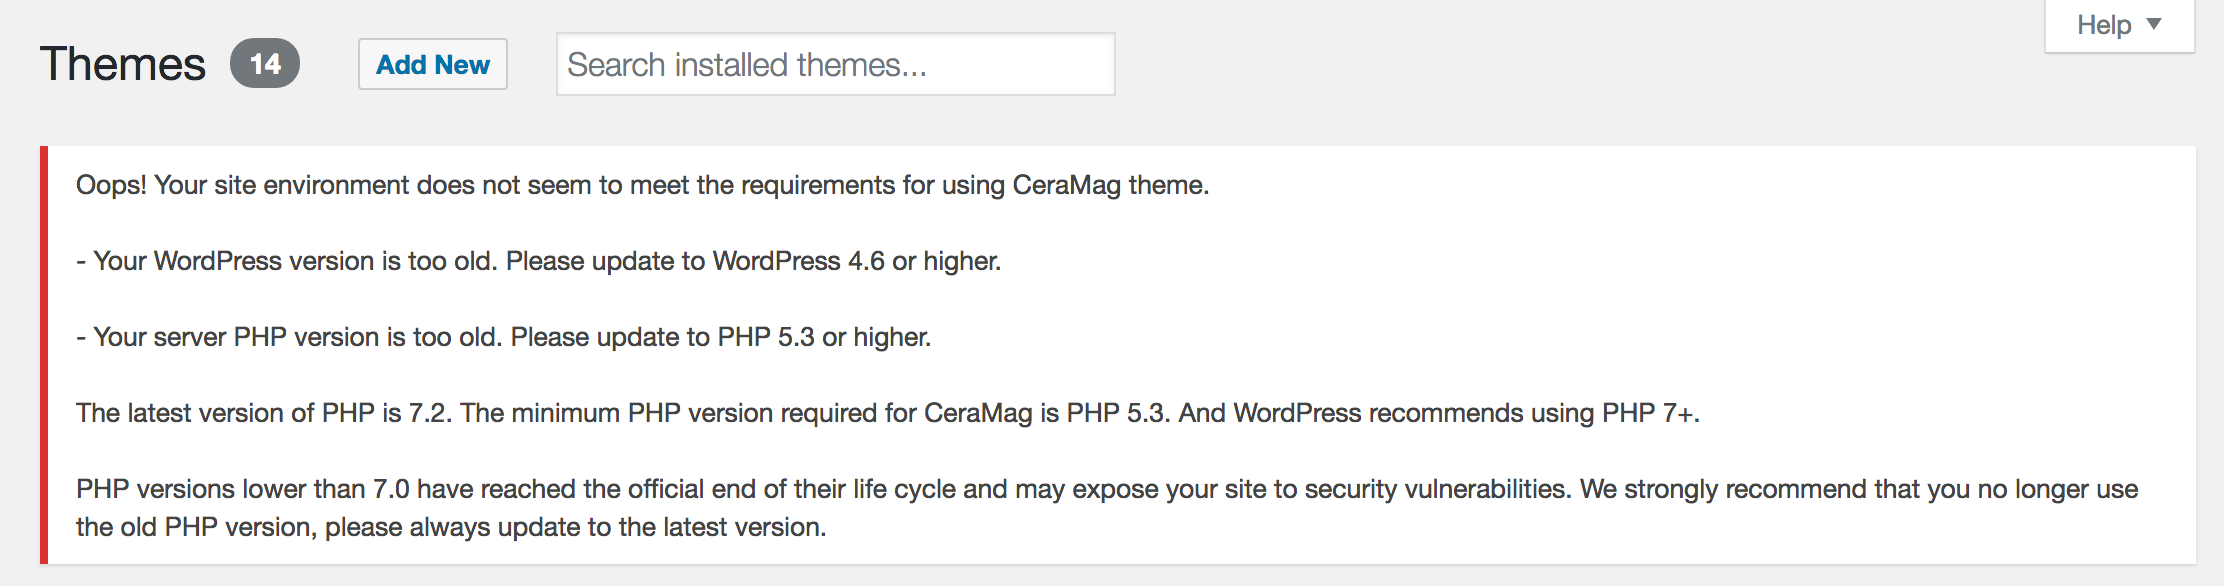
Therefore, after installing and activating CeraMag theme on your website, if you see this warning message:
Website Configuration Warning Message
Then please update your PHP version or the WordPress version.
About PHP:
PHP Version - The latest version of PHP is 7.2. The minimum PHP version required for CeraMag is 5.3, but we recommend using PHP 5.6 or above.
And WordPress recommends using PHP 7+ (please refer to this article: https://wordpress.org/about/requirements/ ).
For your security - PHP versions lower than 7.0 have reached the official end of their life cycle and may expose your site to security vulnerabilities. We strongly recommend that you no longer use the old PHP version,
please always update to the latest version (Supported Versions of PHP).
In most cases you cannot update the PHP version yourself and need to
contact your host about this. The upgrade process is an easy process and should be something your host can do for you without
impacting your website or charging you a fee.
WordPress Version - Although the minimum WordPress version requirement for running CeraMag theme is 4.6,
we recommend always using the latest version of WordPress. There are many reasons why you should keep your WordPress updated (security, new features, bug fixes, speed,
compatibility). You may like to read this article.
2.2 Theme Installation
We assume that you already have a running WordPress site. Now let's install CeraMag.
You need to download the theme zip file from ThemeForest first. Go to Downloads on ThemeForest, and find CeraMag. Download the files and find ceramag.zip
- that's what you need for installation.
If you download the whole package, please unzip it, in the "WordPress Theme" folder, find ceramag.zip.
Or, you can download the Installable WordPress File Only - which is ceramag.zip.
Please do not upload the zip file of the entire package (which contains "All files and documentation") for installation.
Or you will see "The package could not be installed. The theme is missing the style.css stylesheet" error message. If you see
this error message, please unzip the file you tried to upload and then find "ceramag.zip" file in it.
On your website dashboard, go to Appearance > Themes > Add New > Upload Theme.
Choose ceramag.zip you just downloaded.
Install and activate it.
You will see the notice “This theme requires/recommends the following plugins…”, please click on those links and follow instructions to install those plugins.
Done.
Please note: If you are going to write custom code for the theme, then please also upload the ceramag-child.zip file (you will
find it in the folder "WordPress Child Theme" in your download package), then install and activate the child theme. Then you can change code or write your own
custom styles for the theme in the child theme files. Later when you need to update the theme, just update ceramag.zip (the parent theme), so your custom code changes
will not be overwritten (because they are all in the child theme).
2.3 Install Required Plugin
As mentioned above, when installing & activating CeraMag theme, you will see the notice "This theme requires the
following plugin: CeraMag Extension". It is the CeraMag Theme function extensions - including these features: post like, post sharing,
gallery slider, Instagram feed and more.
Why do you need to install the required plugin?
Because of WordPress code standards and ThemeForest requirements: "Themes execute
the presentation and styling of content, while plugins handle content creation and functionality." Therefore, some features must be
included in the required plugin but not included in the theme itself.
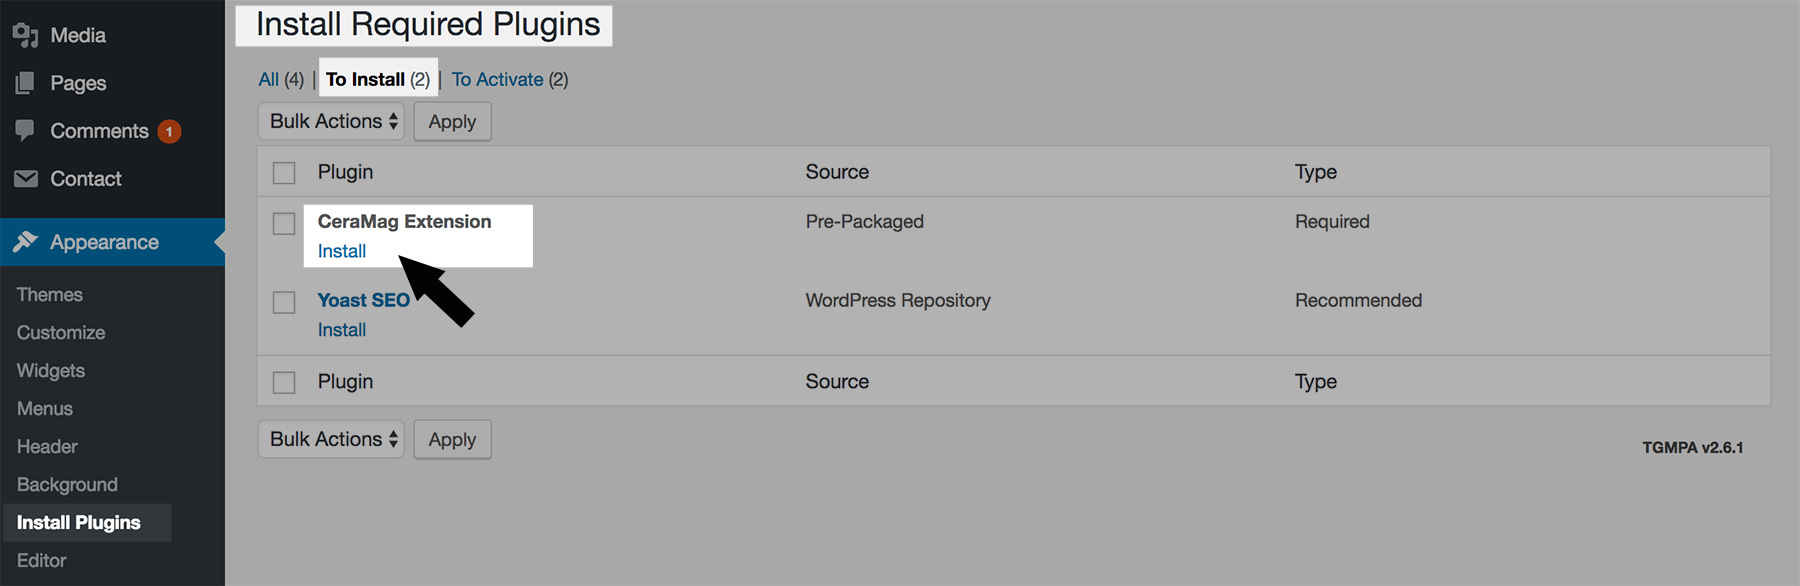
After Installing CeraMag theme, activate it, then you will see a note box, it says: "This theme requires the following plugin:
CeraMag Extension." Click on "Begin installing plugin" to install it.
Begin installing plugin
After clicking on "Begin installing plugin" link, it will go to "Install Required Plugins" page,
then click on "Install" link below "CeraMag Extension".
Install Required Plugins
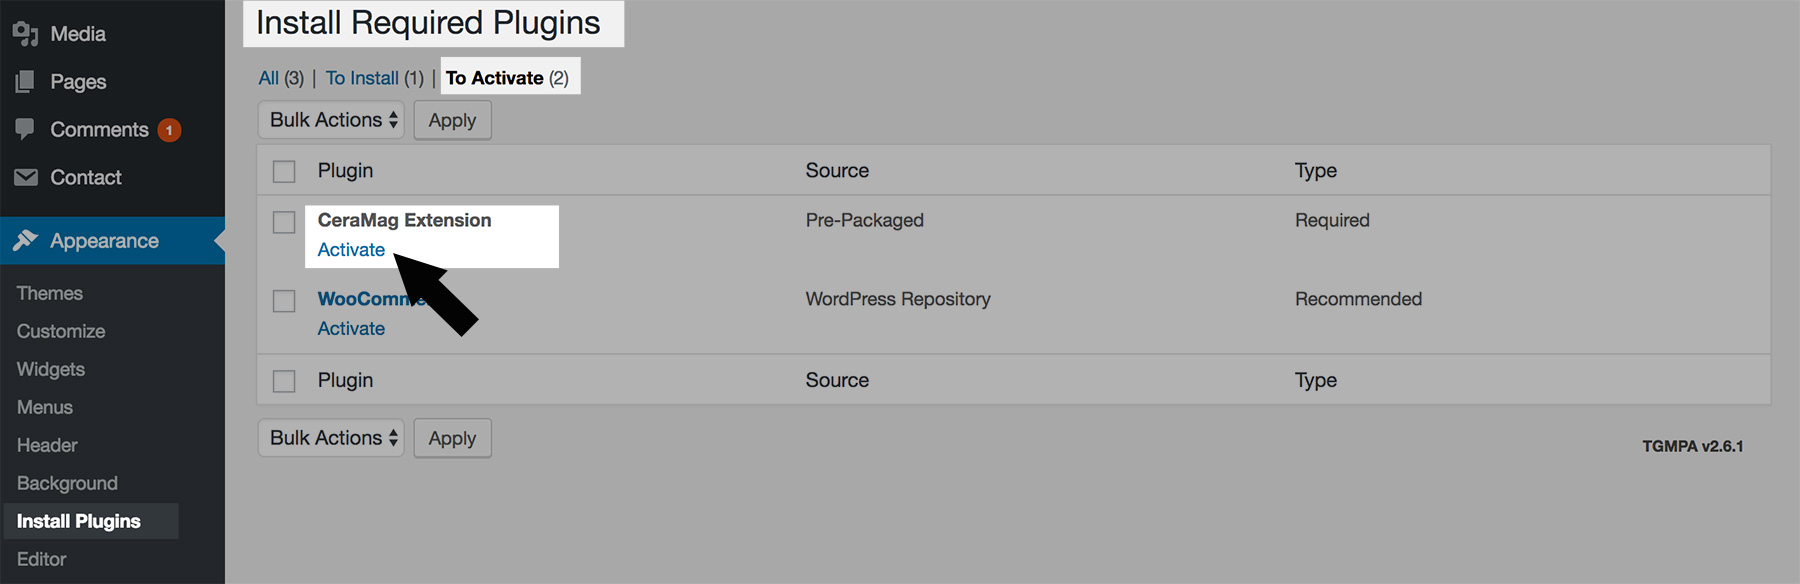
Then don't forget to activate "CeraMag Extension".
Activate Required Plugins
Please note: Before version 2.1, the required plugin "CeraMag Extension" was activated automatically after installation.
But since version 2.1, we cancelled the auto-activation because of the latest Envato WordPress theme requirements.
Therefore, after installing/updating the plugin, please always make sure the plugin is activated.
If you need to find "CeraMag Extension" zip file, please download the entire package (which contains "All files and documentation"),
unzip it to get a folder and open it, then go to "Plugin" folder to find "ceramag-extension.zip".
2.4 Recommended Plugins
As mentioned above, when installing & activating CeraMag theme, you will see the notice "This theme recommends the
following plugins…". Those plugins are not required to use the theme, but will extend the theme basic functionality.
All those plugins are hosted on the official WordPress repository and are made by other authors. You don't need to install
and activate all of them, just choose those you will use on your site.
After Installing CeraMag theme, activate it, then you will see a note box, it says: "This theme recommends the following plugin:
…" Click on "Begin installing plugin" to install it.
Recommended Plugins
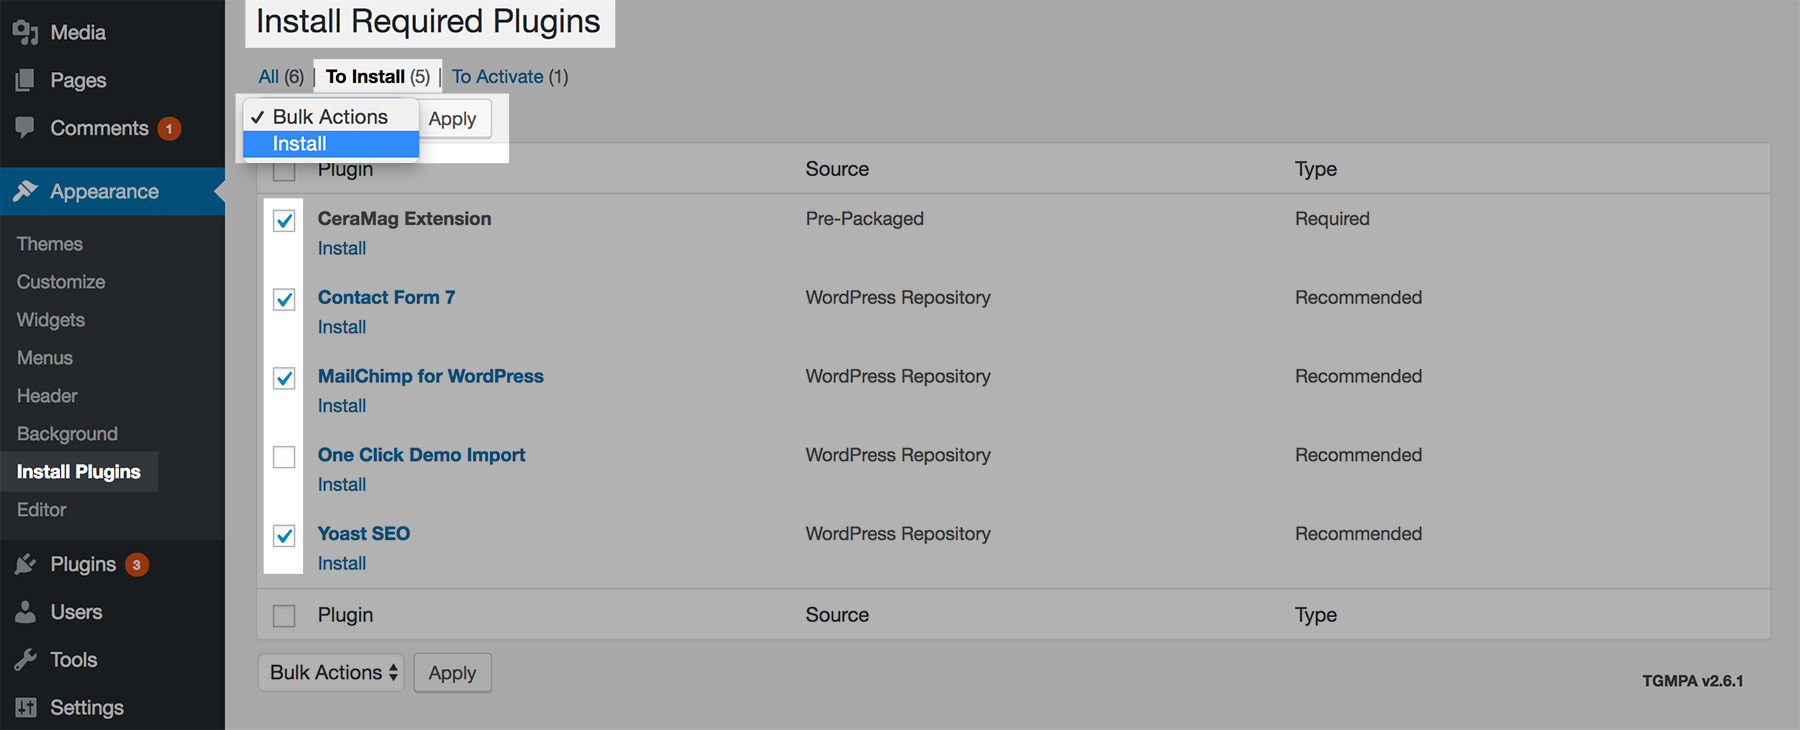
After clicking on "Begin installing plugin" link, it will go to "Install Required Plugins" page,
tick the boxes of the plugins you will need on your site, then choose "Install" from "Bulk Actions"
drop down list and click on "Apply" button. (You can install the required plugin and recommended plugins at one time.)
Install Recommended Plugins
Then don't forget to activate the plugins.
The recommended plugins are:
Contact Form 7 - To create a contact form and add it to your page.
MailChimp for WordPress - To create a subsribe form and can add it to content area, widget areas and site footer.
When updating CeraMag theme, please follow the following 2 steps:
Step 1 - Update the theme first;
Step 2 - Then, please also update the Required Plugin: "CeraMag Extension". (See details here)
3.1 Update CeraMag Theme
Auto Update with Envato Market Plugin
We recommend Envato Market plugin. It can install WordPress themes and plugins purchased from ThemeForest & CodeCanyon by
connecting with the Envato Market API using a secure OAuth personal token. Once your themes & plugins are installed WordPress
will periodically check for updates, so keeping your items up to date is as simple as a few clicks.
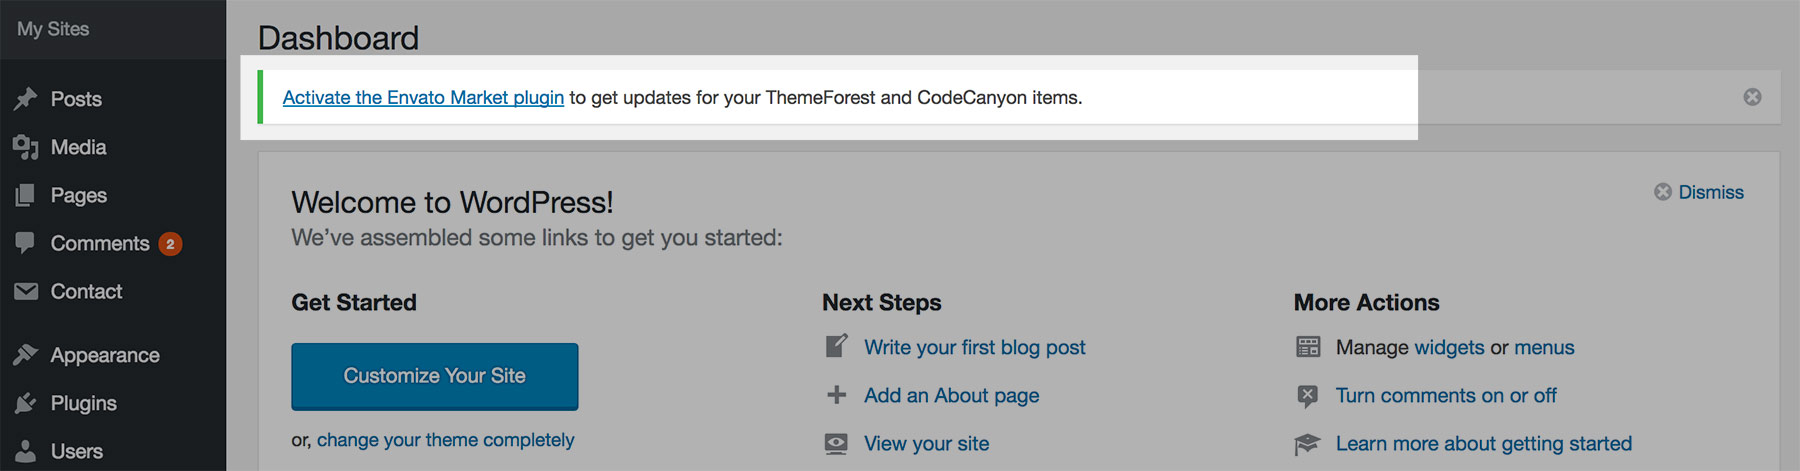
You will see this note while installing CeraMag theme, please click it to install and activate Envato Market plugin.
Activate Envato Market plugin
Or you can download the plugin from its official download page: https://envato.com/market-plugin/. And then upload
it to your site and install it.
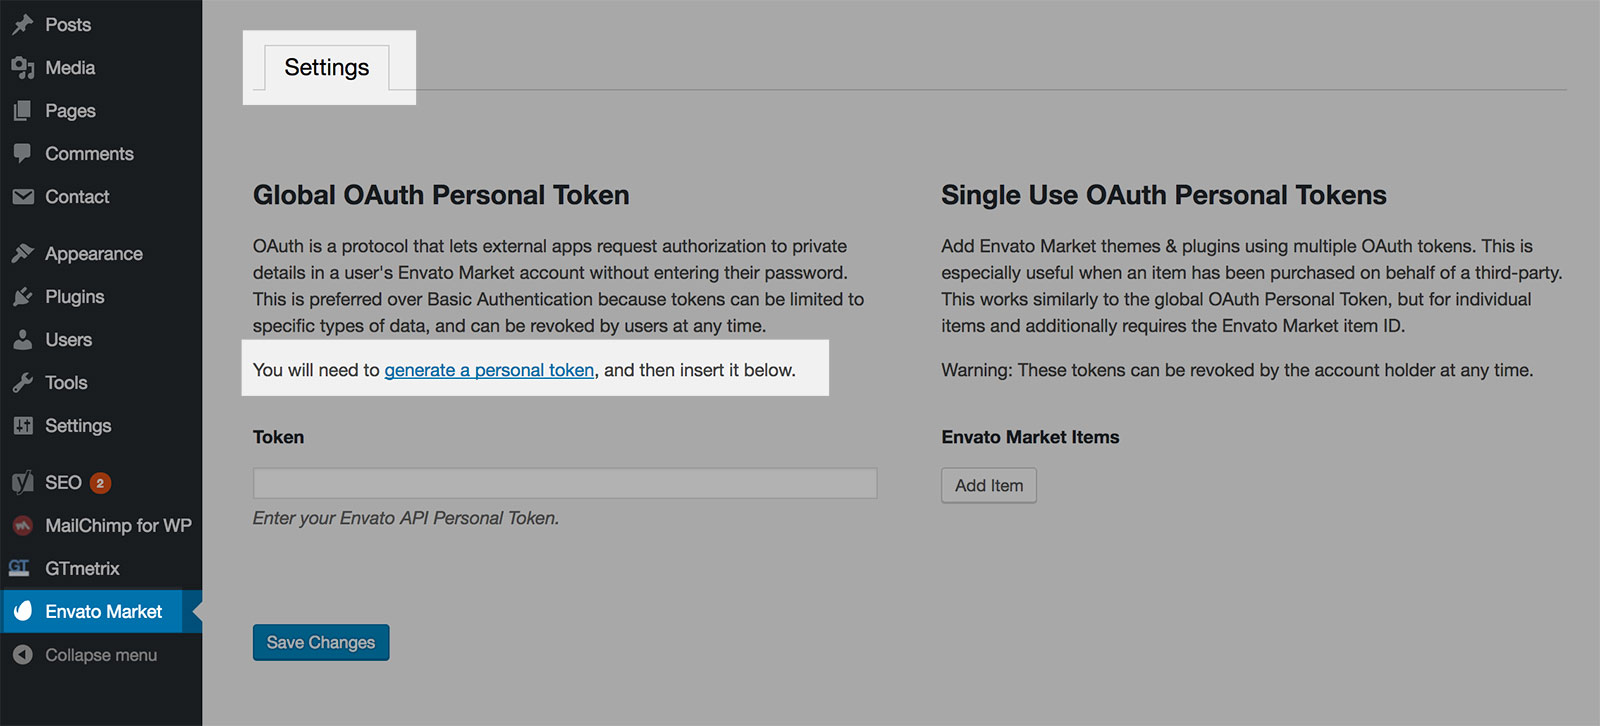
Then go to Envato Market > Settings, click on the link to generate a personal token, and then insert it below,
then save changes.
Click on the link to generate a personal token
When generating your personal token, please use the same Envato account you used when purchased the theme, and make sure you have checked the following 3 permission options:
View and search Envato sites
Download your purchased items
List purchases you’ve made
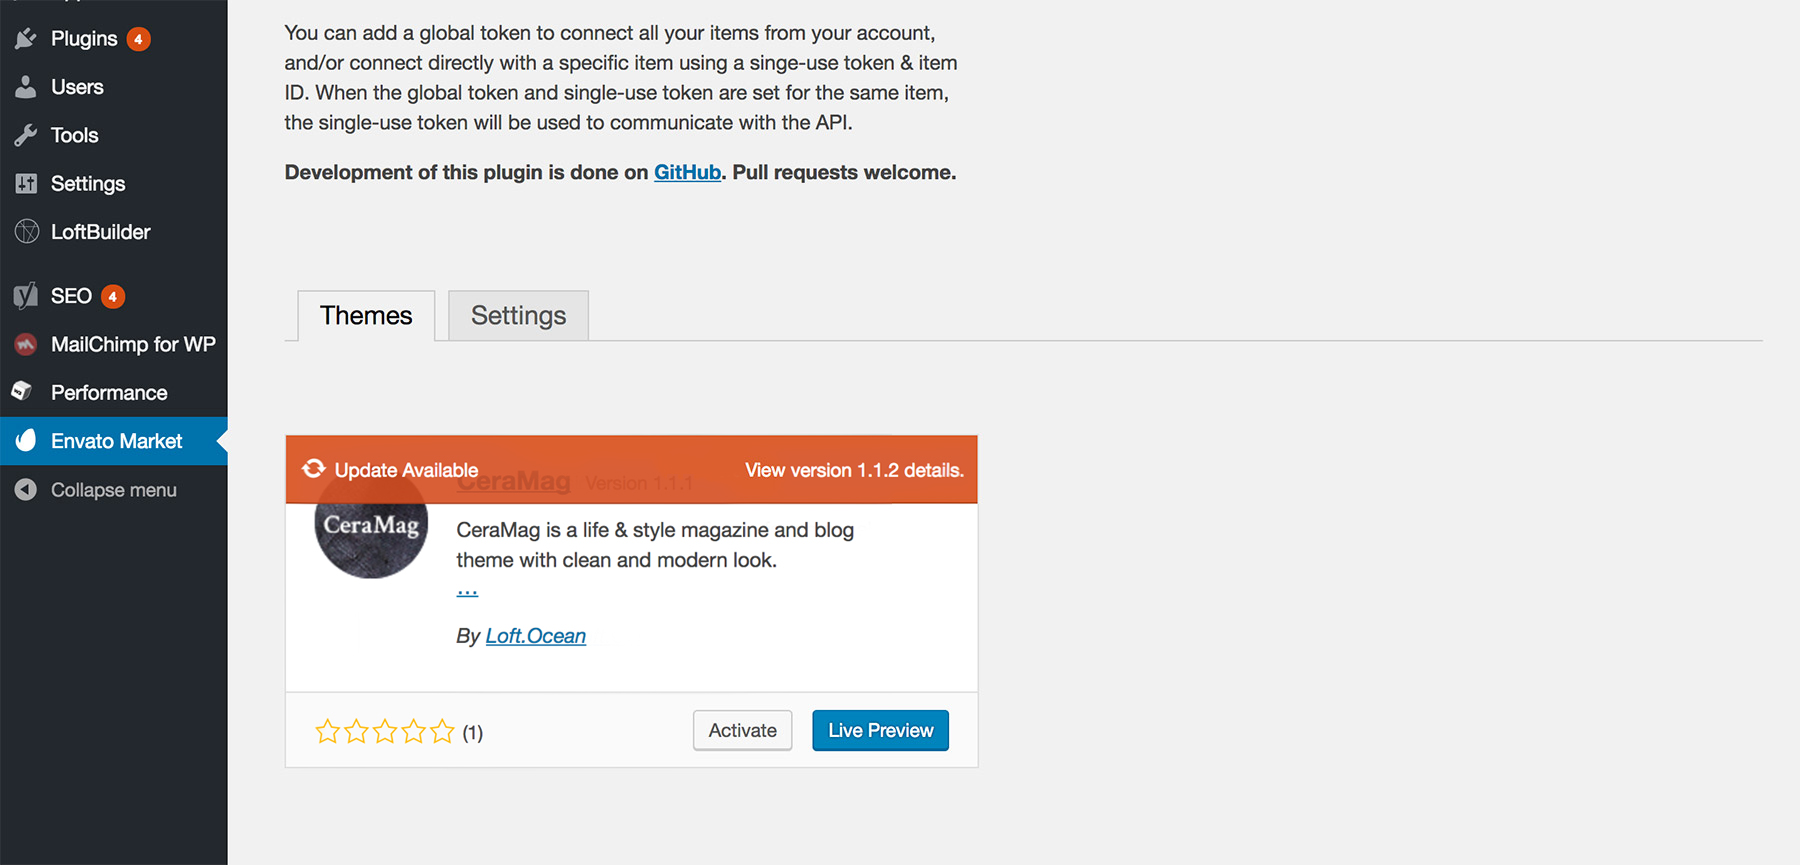
There will show new tabs: Themes & Plugins (if you have purchased both themes & plugins from Envato).
As you can see in the screenshot below: if there is a newer version for a theme or a plugin,
it will show the notice, and you can update the item by clicking on the link Update Available.
When an item can be updated
Update Manually
Please follow steps below when you need to update CeraMag theme manually on your site:
Download the zip file of the latest version of CeraMag from ThemeForest.
Extract the zip file and find ceramag.zip.
Extract ceramag.zip and locate the ceramag folder
Log into your website via FTP, get into the theme folder (wp-content/themes/ceramag), and upload the contents of the local ceramag folder
to replace the old content in the ceramag folder on your website.
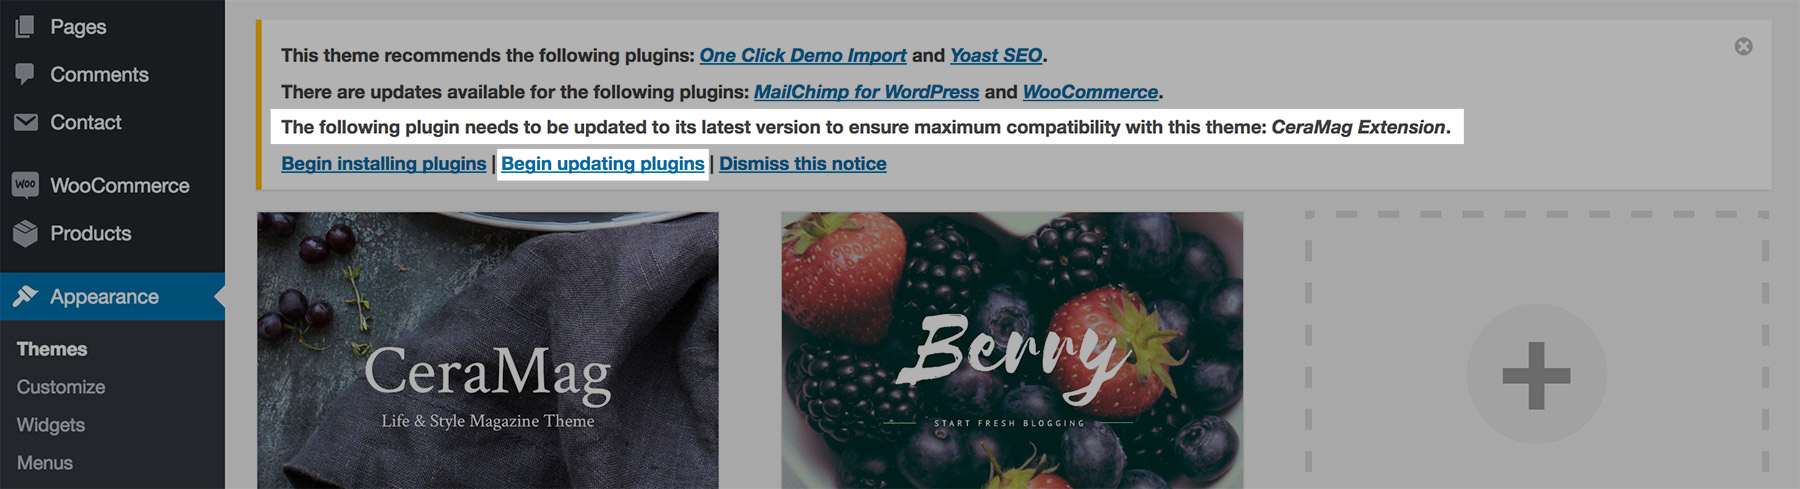
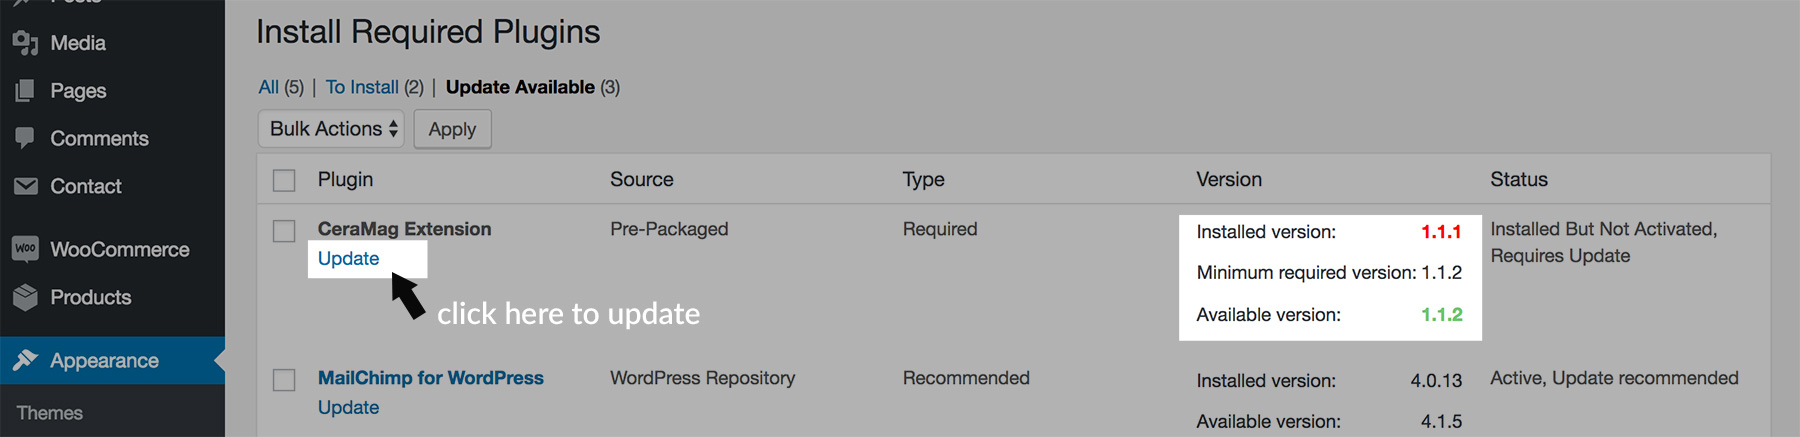
3.2 Update Required Plugin
When updating CeraMag theme, if you also see this note: "The following plugin needs to be updated to its latest version to ensure maximum
compatibility with this theme: CeraMag Extension." Please click on "Begin updating plugin" link to update the CeraMag Extension plugin as well.
Begin updating CeraMag ExtensionClick "Update" link to update CeraMag Extension
Once you have updated the required plugin, please make sure this plugin is activated. If the required plugin is not activated, some features will not be available.
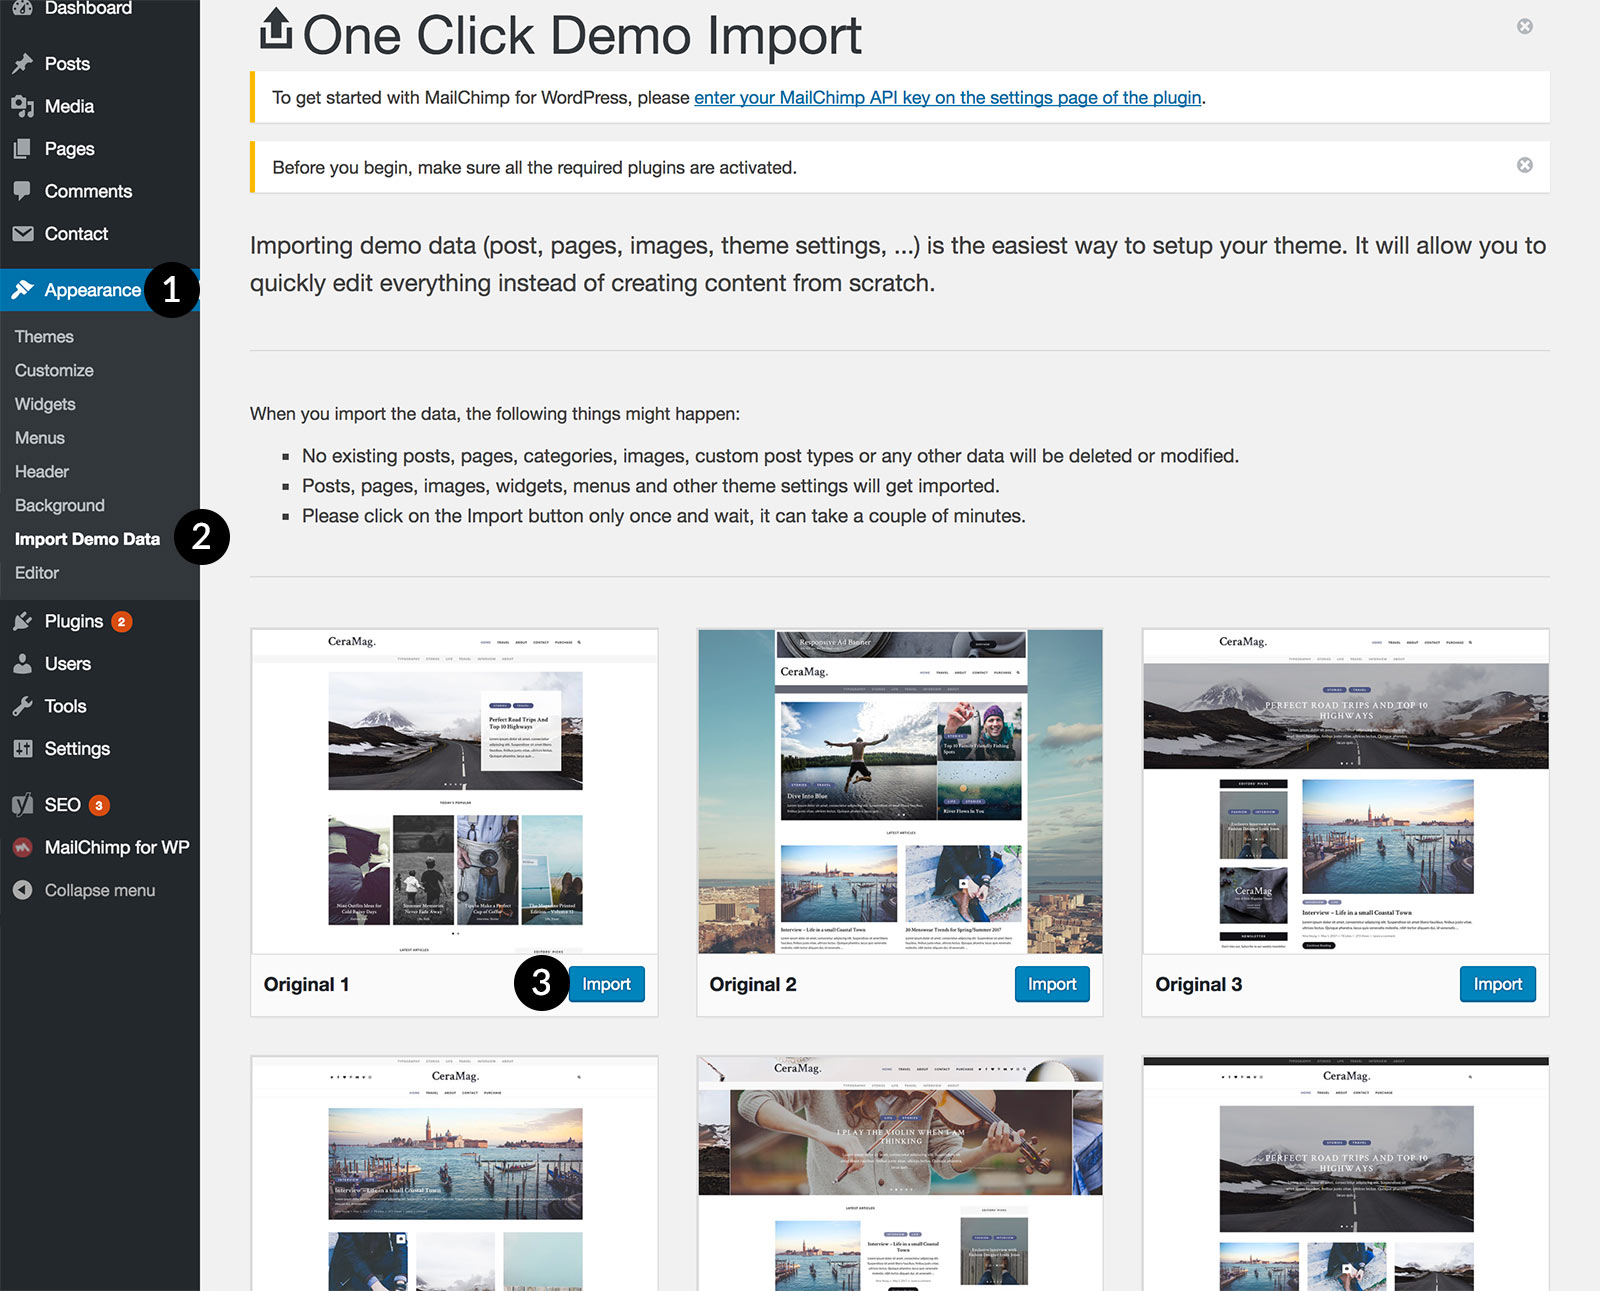
Importing a demo to your site is optional for using CeraMag theme. It is for easy start - when you have a fresh WordPress installation,
you can import some dummy content and predesigned layouts & styles to your site, then you can replace with your own content, and tweak some layouts and colors.
To import the demo content, please make sure you have installed the recommended plugin One Click Demo Import while installing CeraMag theme.
After installing CeraMag and required/recommended plugins, refresh the page, you will see Import Demo Data under Appearance in the left sidebar.
Click it, then you will see 12 demos' screenshots. Choose one demo, click on the Import button. It can take a couple of minutes,
please wait.
Please note: Don't import multiple demos to the same site, it will create duplicate data.
One Click Demo Import
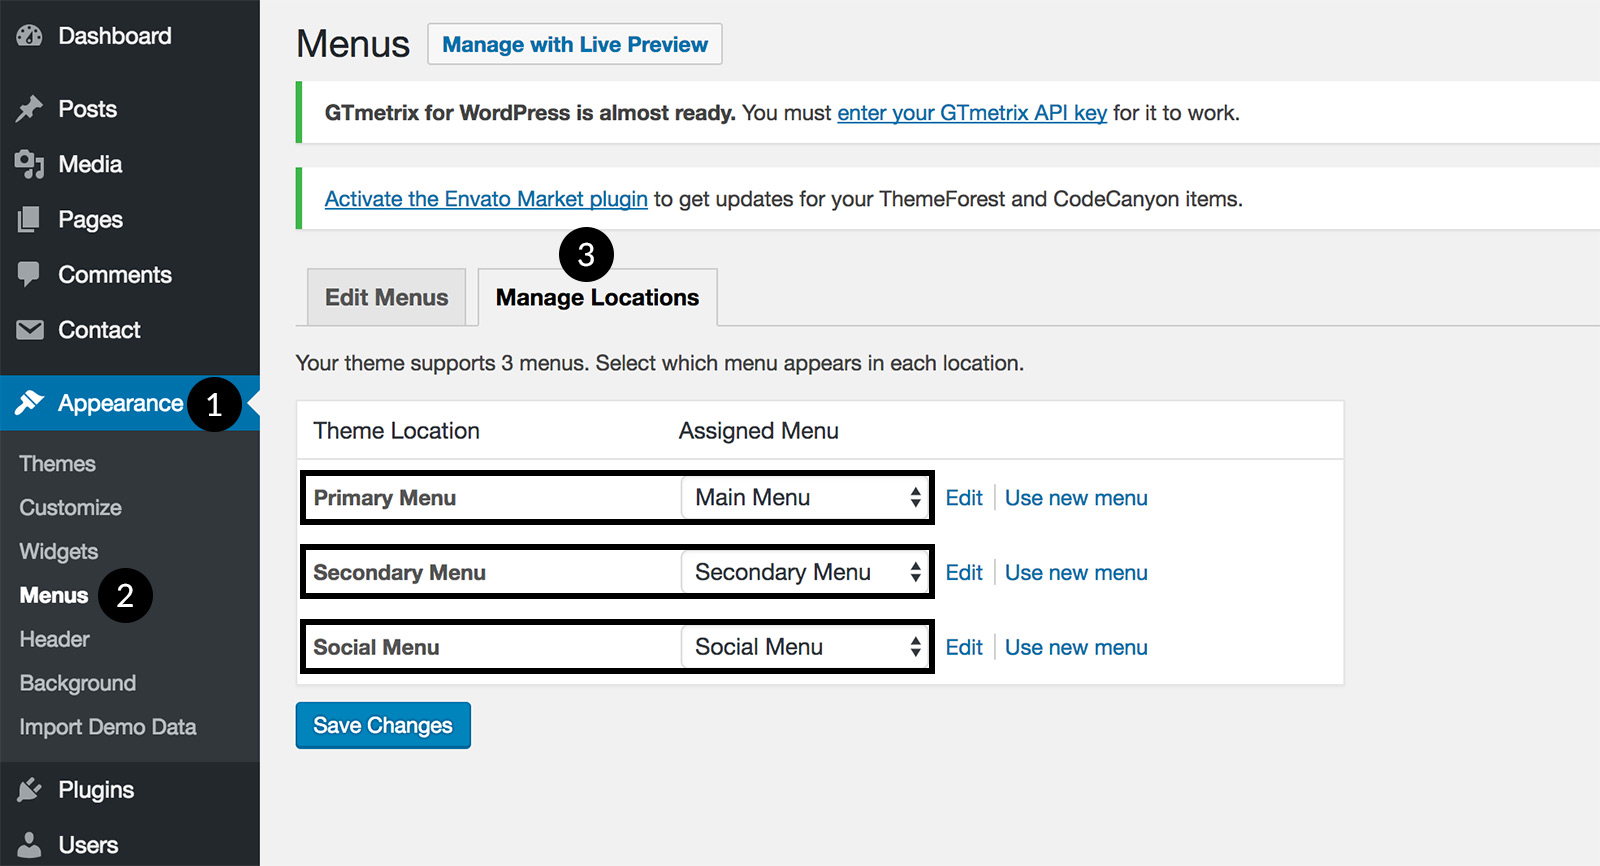
When importing finished, please follow the steps below:
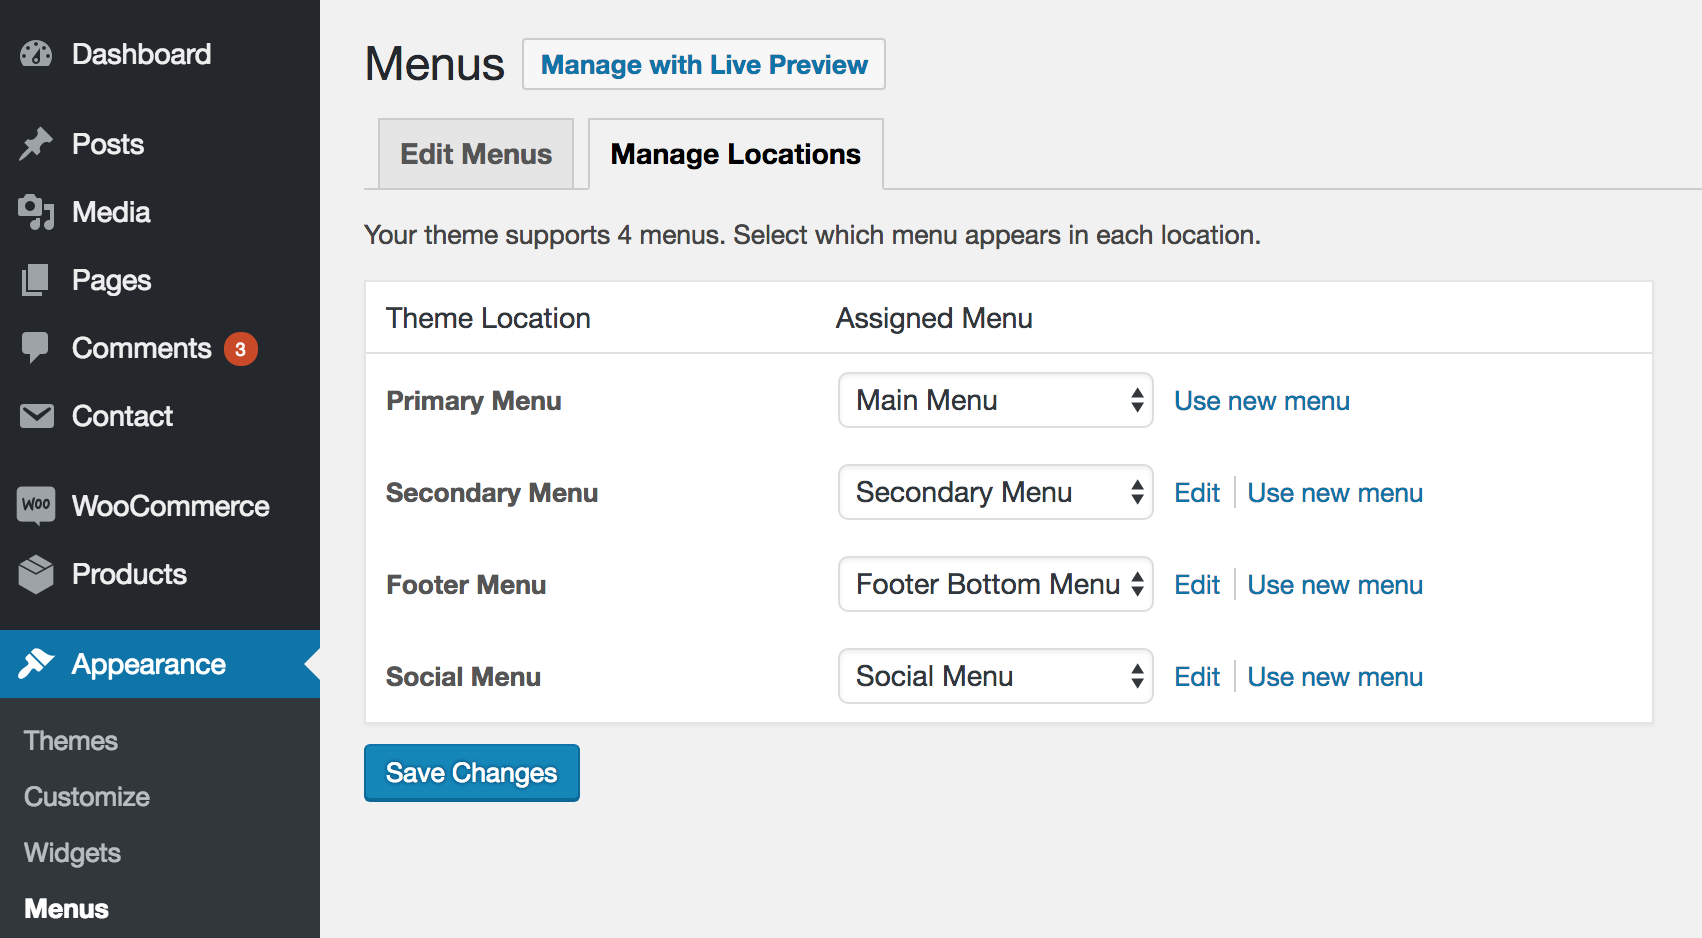
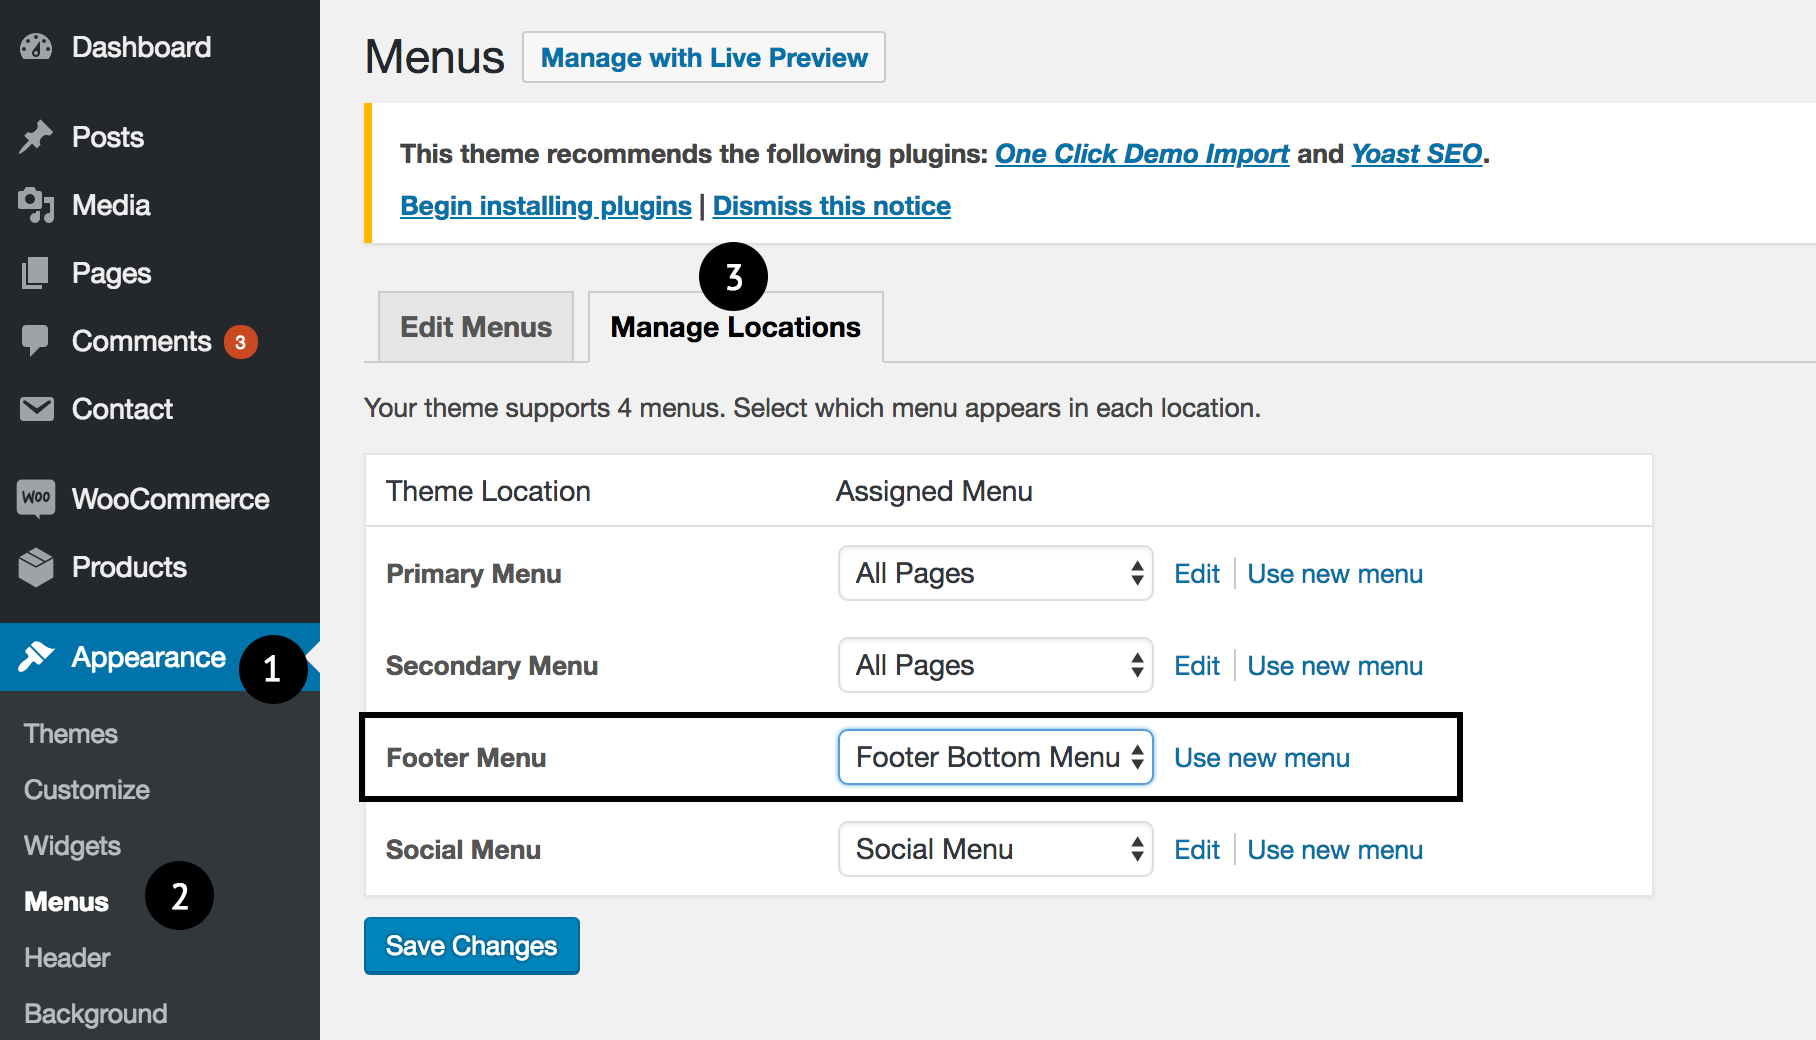
Menus have been imported, but you will need to tell WordPress where to use the menus. Go to Appearance > Menus, click on the "Manage Locations" tab.
Then click on the dropdown select list for each location, choose the correct menu for each one. And save changes.
Menu Locations
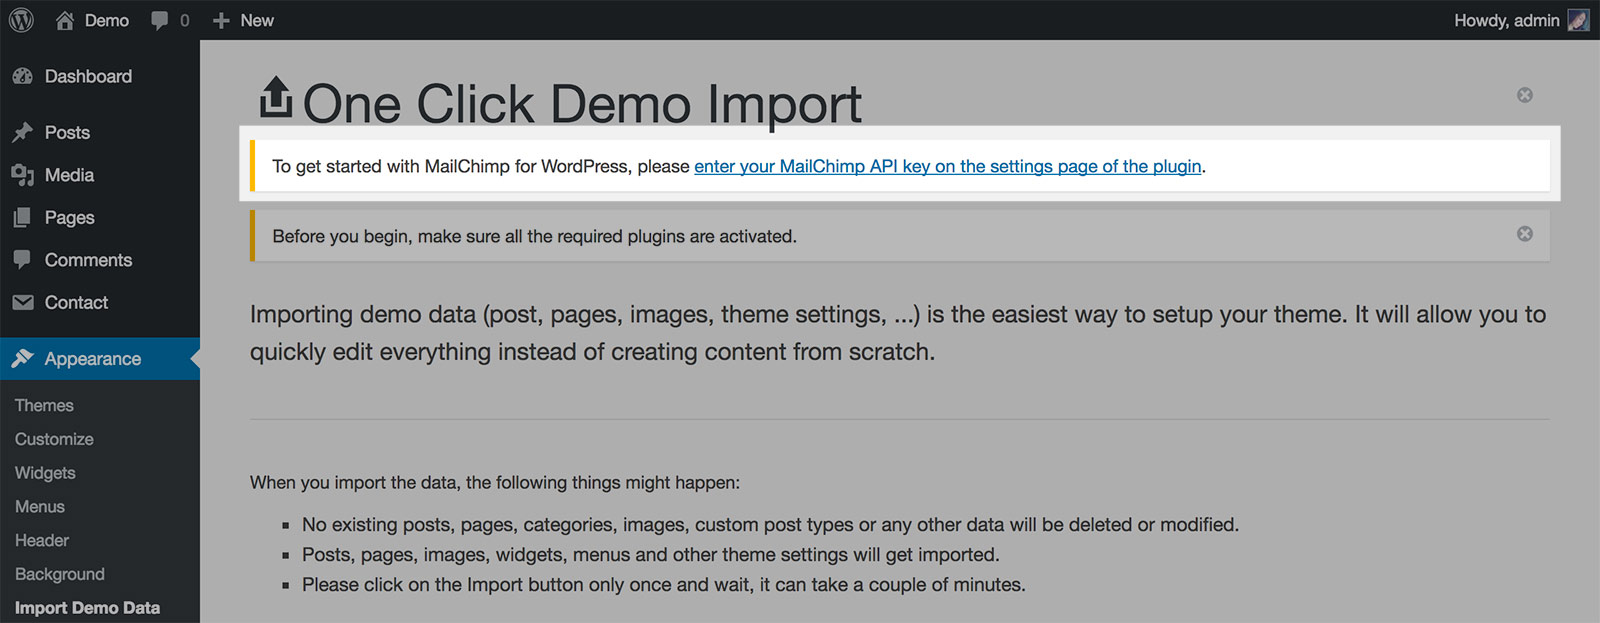
On the demo import page, you will see there is a note:
Demo Import - Setup MailChimp for WordPress
If you want to build the subscription form with the plugin MailChimp for WordPress, click on the link to get to the settings page of the plugin, then enter your MailChimp API key.
Read more in Chapter 5 - Setup Subscribe Form.
If you encounter issues while importing a demo
It happens rarely, but if you have issues while importing a demo, please check the documentation Import Issues
written by the author of the plugin One Click Demo Import (which we are using for demo importing feature in CeraMag theme).
Error: Internal Server Error (500)
If you see this error message after clicking on import button, this usually indicates a poor server configuration, usually on a cheap shared hosting
(low values for PHP settings, missing PHP modules, and so on). Please see this article
to know how to fix it.
Import Demo Manually
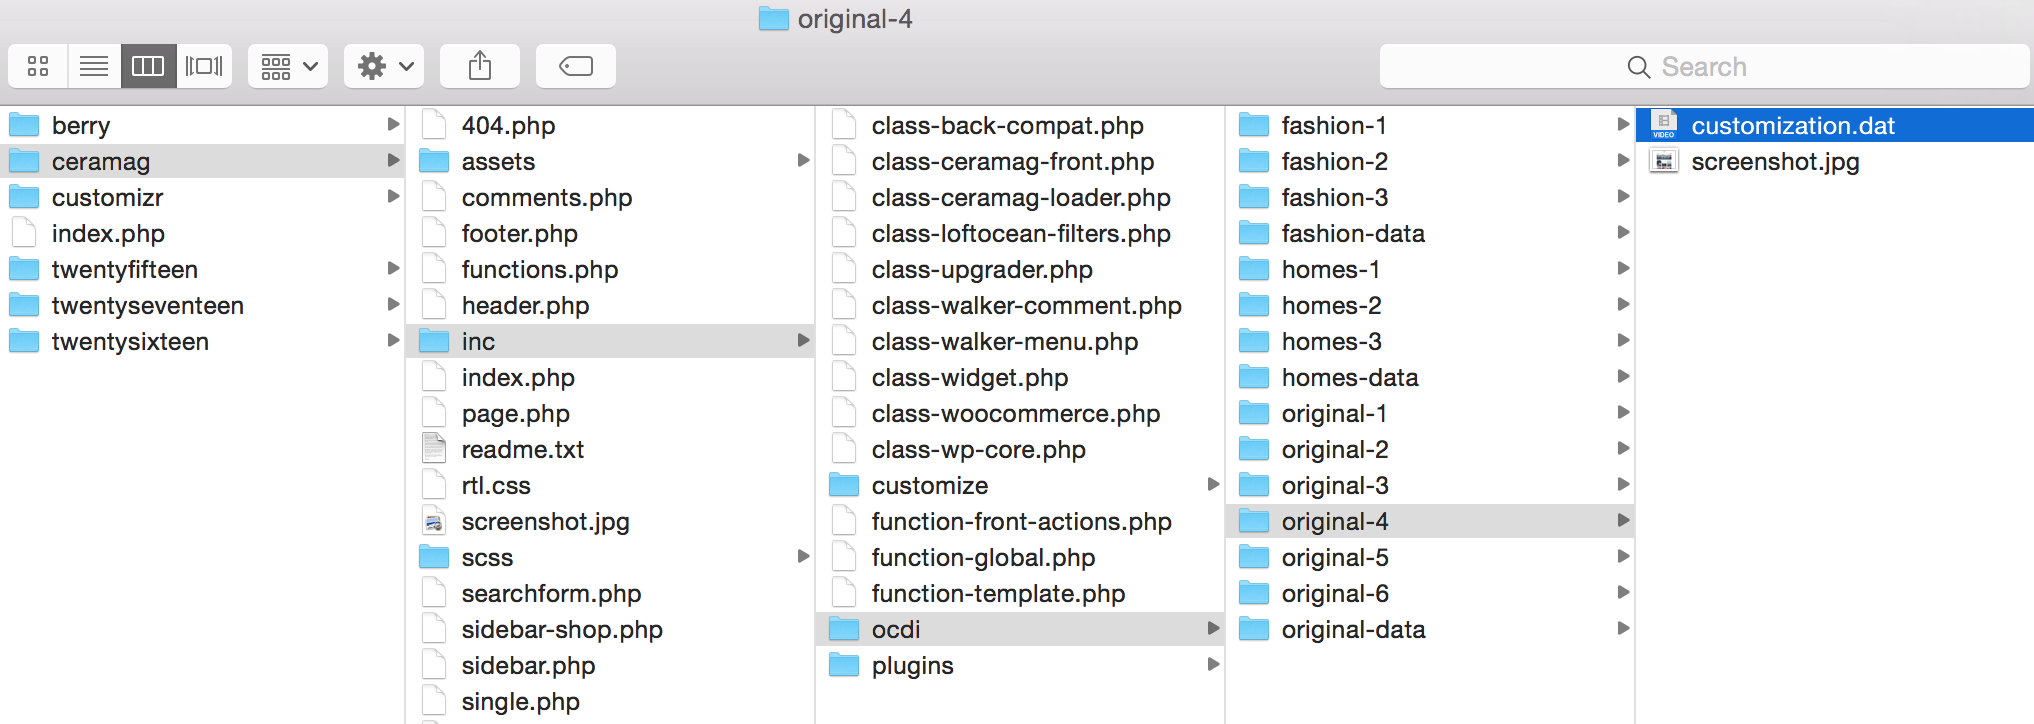
If you don't want to import everything of a demo, you can choose any one of them and import manually. Demo files are located in the CeraMag theme folder > inc > ocdi.
Import Content Only
In the ocdi folder, find the folder: original-data .
Open the folder, there is the file "content.xml" in it. It is the demo content data file.
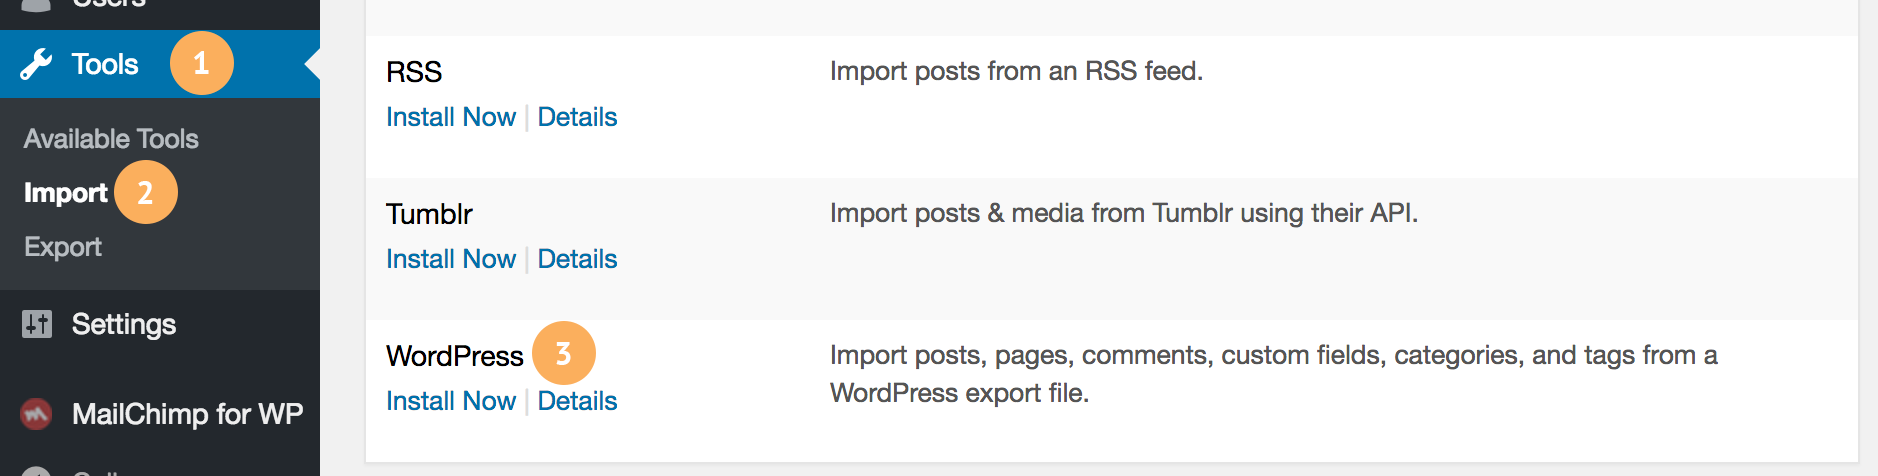
On your site dashboard, please go to Tools > Import, choose WordPress and install it.
Install WordPress Import Tool
After installing, click on "Run Importer", choose "content.xml", upload and import.
Import Widgets Only
In the ocdi folder, find the folder: original-data .
Open the folder, there is the file "widgets.wie" in it. It is the widgets data file.
Please install this free plugin: Widget Importer & Exporter. Install and activate this plugin,
then go to Tools > Widget Importer & Exporter, choose "widgets.wie", upload and import.
Import Customizer Settings Only
In the ocdi folder, you can see the 6 folders: original-1, original-2, ... , original-6.
Open any one of those folders, you can find the file "customization.dat" in it, that's the customizer data of that demo.
Please install this free plugin: Customizer Export/Import. Install and activate this plugin,
then go to Appearance > Customize > Export/Import > Import,
choose "customization.dat", upload and import.
Find the file customization.dat
5. Setup Subscribe Form
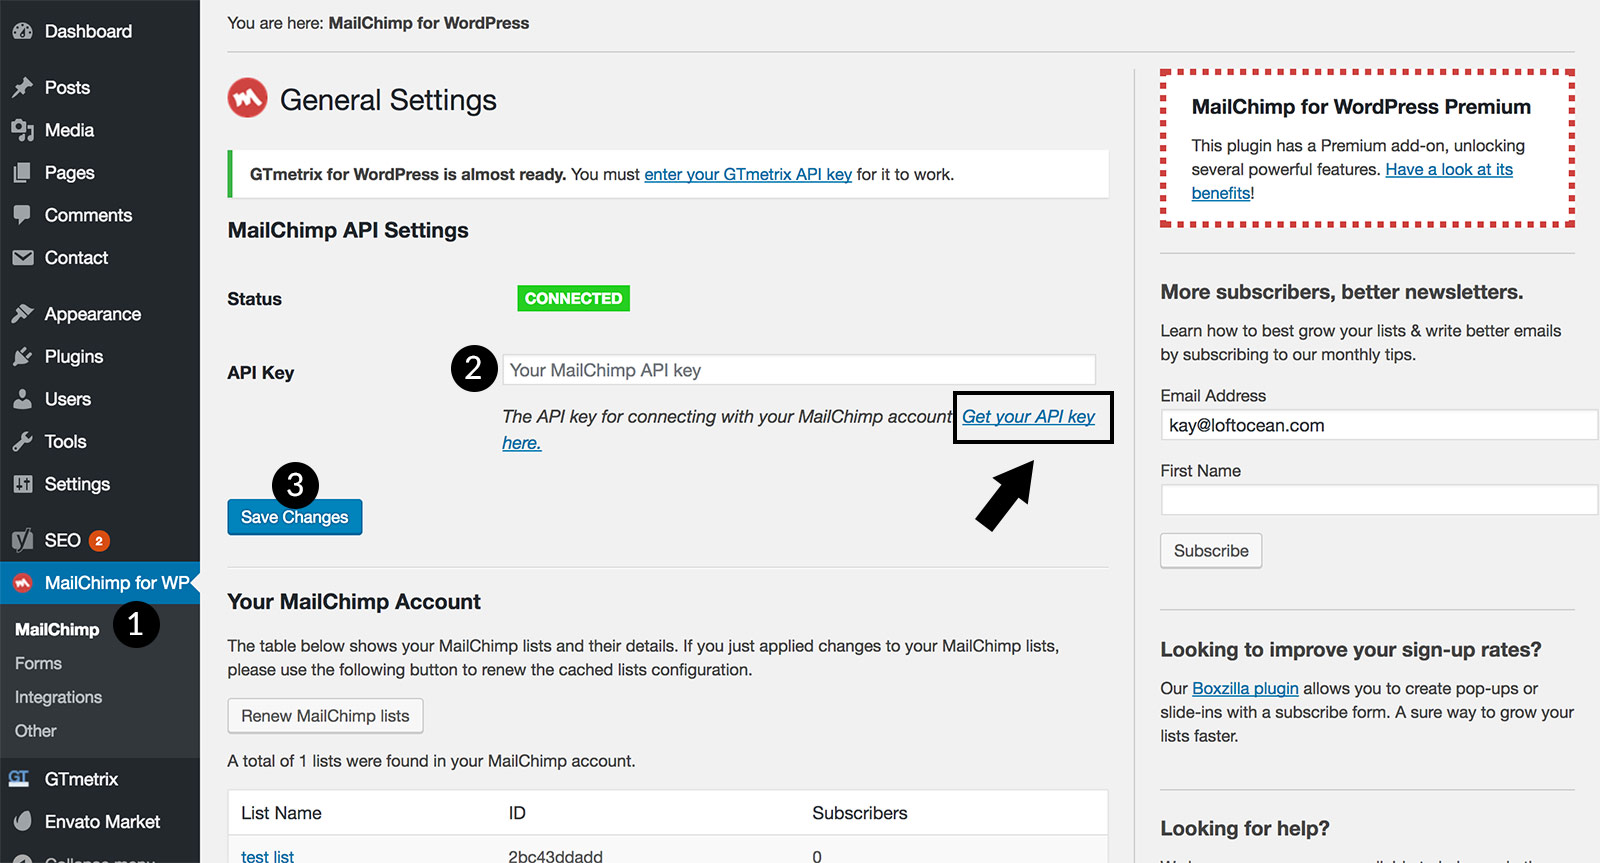
CeraMag supports creating subscribe form with the plugin MailChimp for WordPress. It is one of our recommended plugins when installing the theme.
Enter MailChimp API
Please make sure you have installed and activated the plugin. Then get to the settings page of the plugin, and enter your MailChimp API key.
Enter MailChimp API
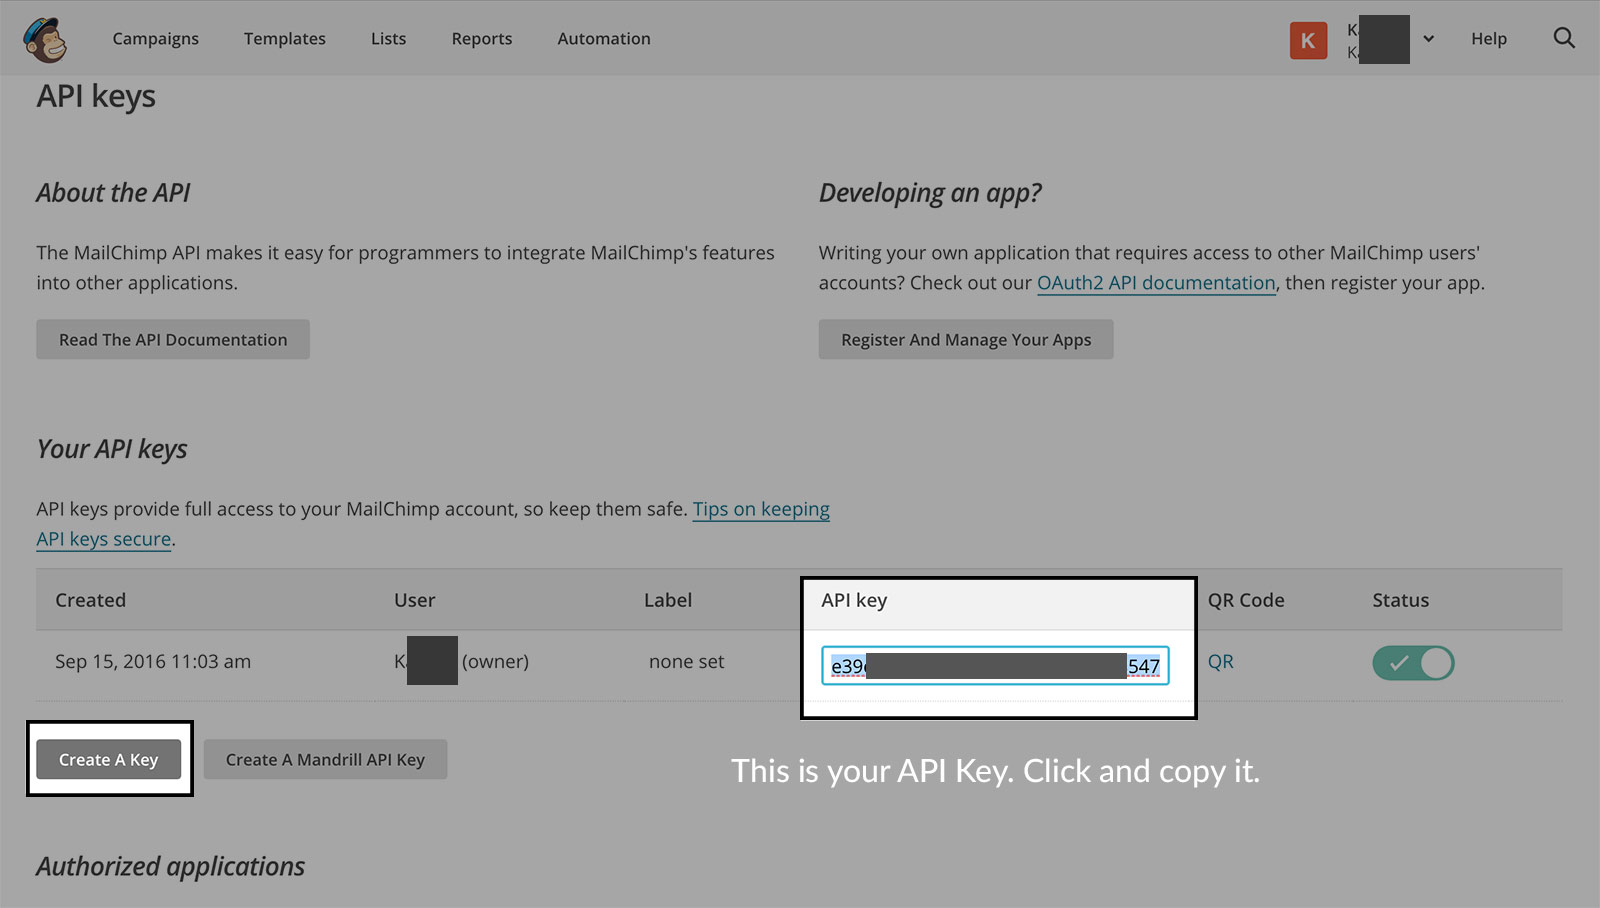
To get your MailChimp API key, you can click on the link "Get your API key here" to get to MailChimp site, log into your MailChimp account, and create a key.
Get MailChimp API Key
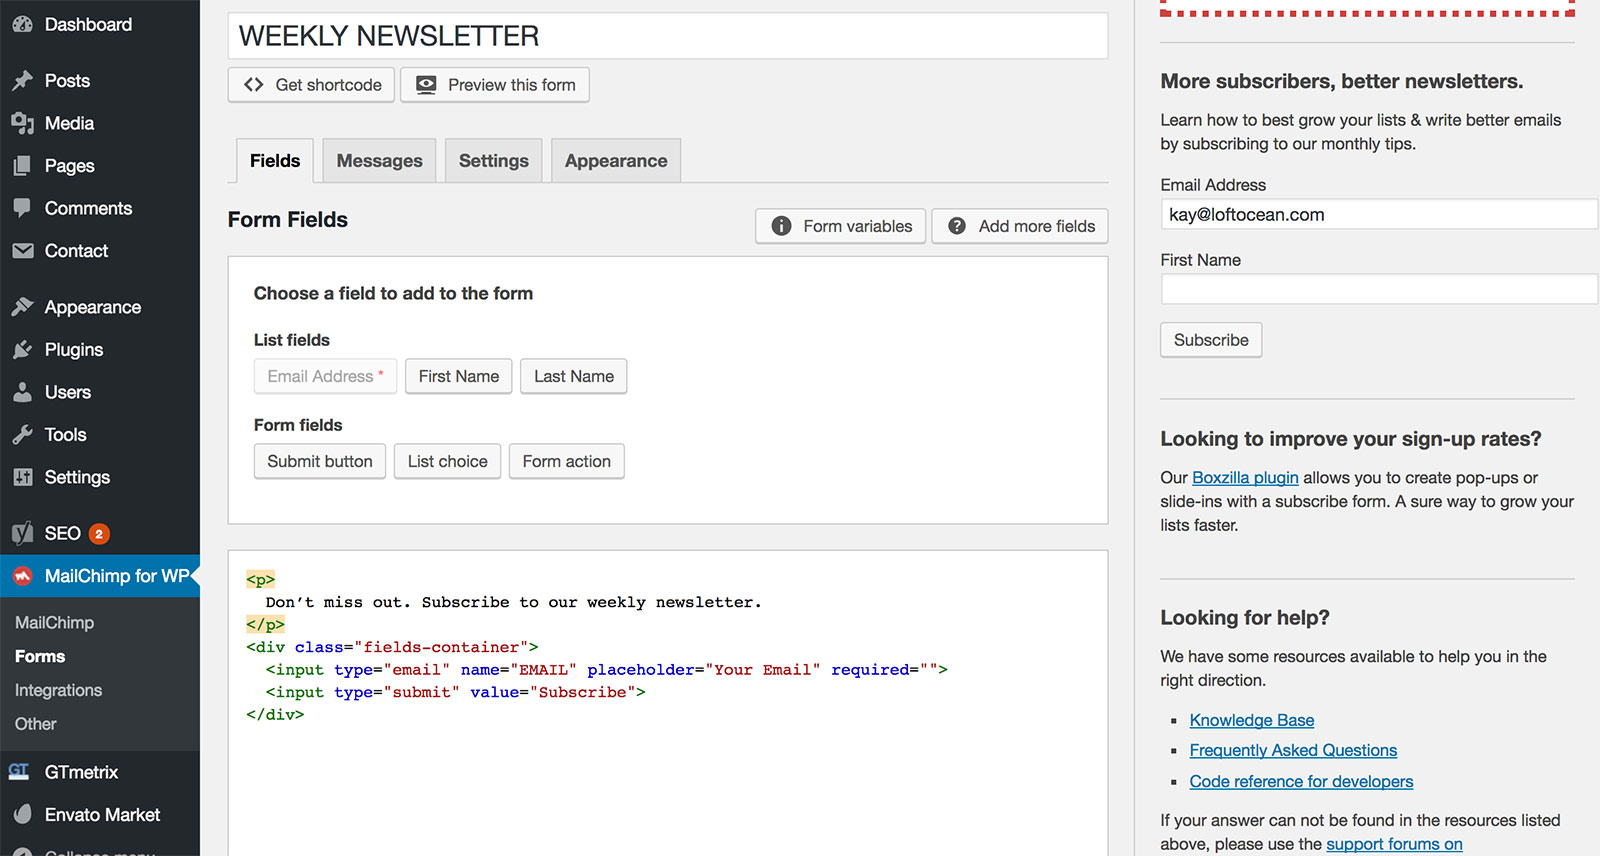
Create the subscribe form
Please copy and paste the code below into the box. Use this markup can make same style of subscribe from on our demo site. For example,
CeraMag provides 2 different styles of subscribe form in site footer: Block and Strip. Use this code will allow the theme style the
form correctly for each style.
Upon installation, WooCommerce creates the following 4 new pages via its Onboarding Wizard:
Shop – No content required.
Cart – Contains [woocommerce_cart] shortcode and shows the cart contents
Checkout – Contains [woocommerce_checkout] shortcode and shows information such as shipping and payment options
My Account – Contains [woocommerce_my_account] shortcode and shows each customer information related to their account, orders, etc.
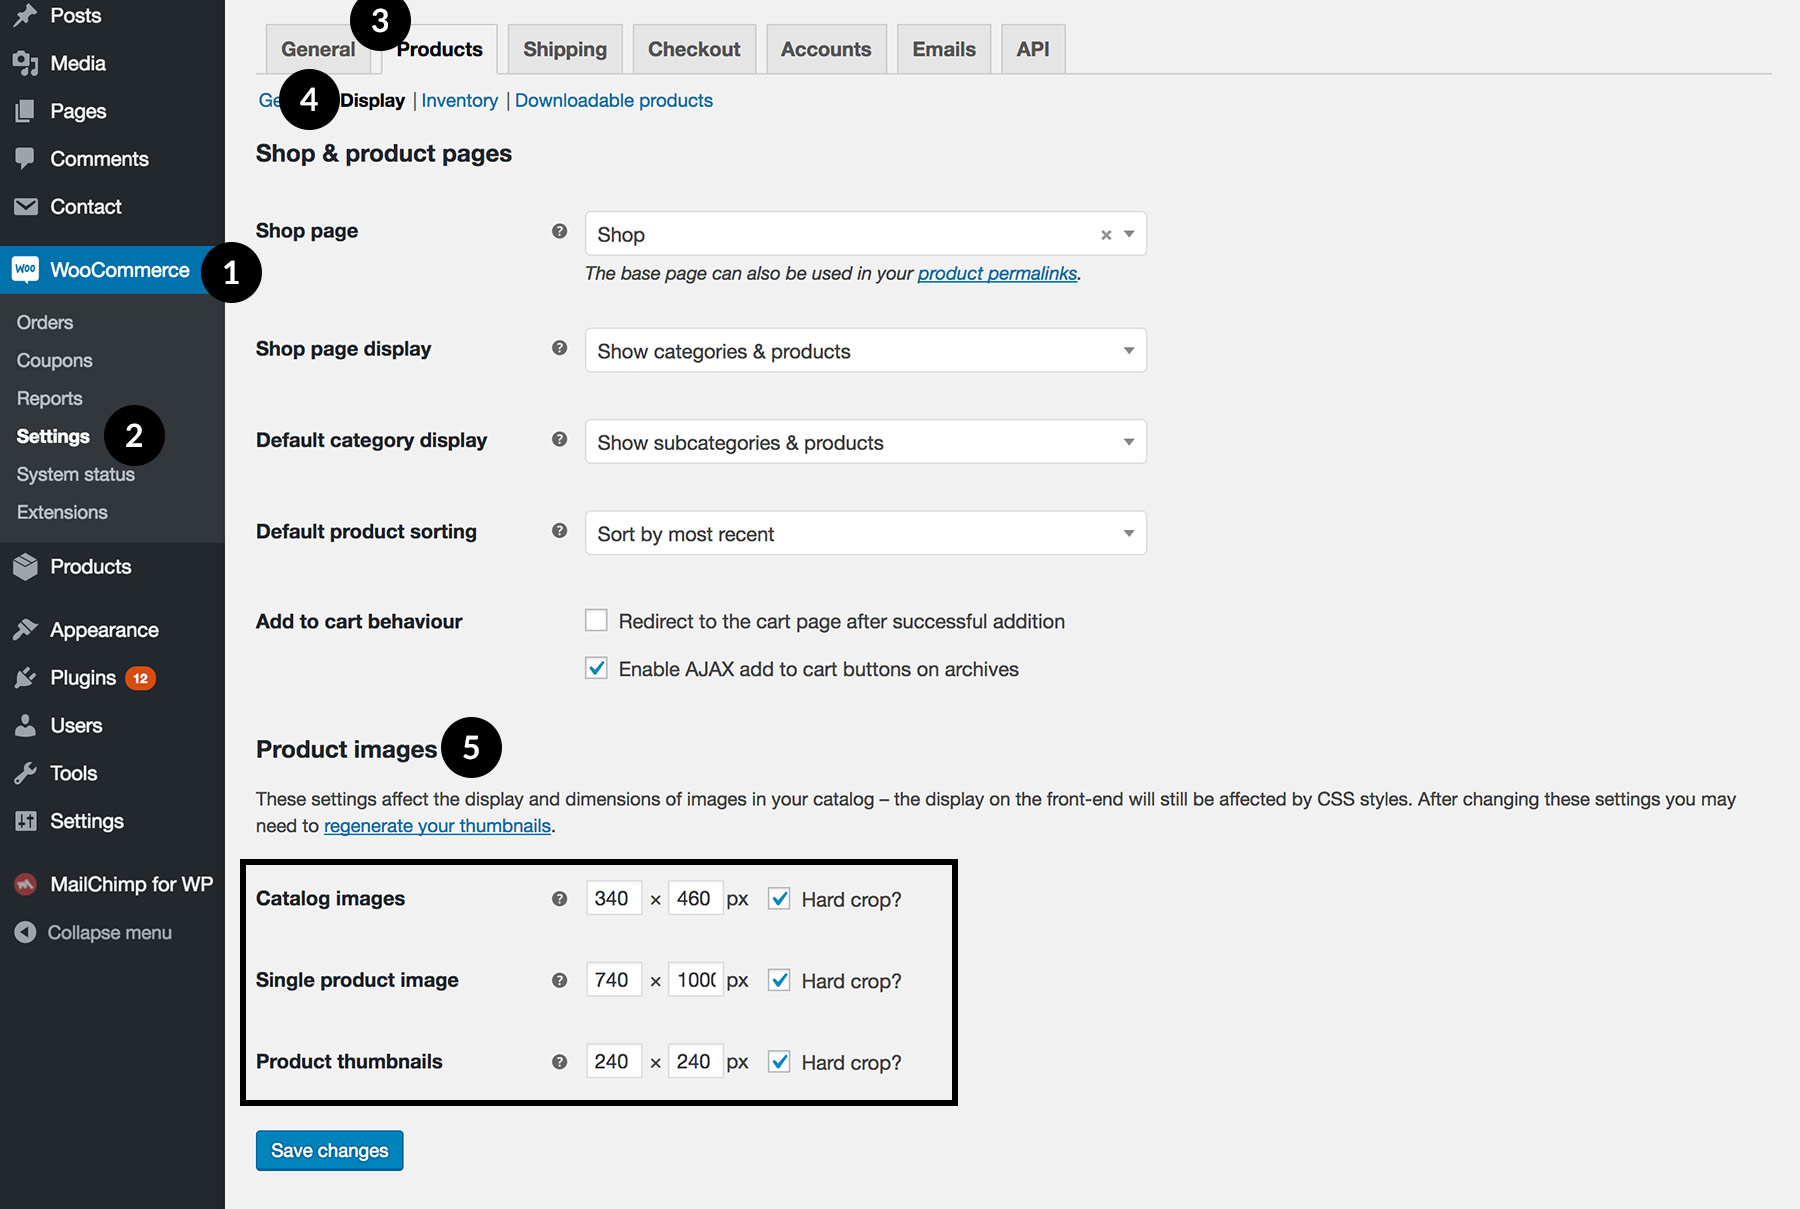
To set up the shop page, on your site dashboard, please go to WooCommerce > Settings > Products tab > Display tab, there you
can find the option Shop Page, select what page you want to be the default shop page (you can choose the shop page created by
WooCommerce, or create a new page and choose it). Please check WooCommerce official documentation Configuring WooCommerce Settings
about this part.
Import WooCommerce Dummy Content
Right after installing WooCommerce you may find you have an empty store. There are no products, orders, reviews, and more by default.
You can start to create your own products, or perhaps you’d like to see what sample orders and products look like, then you can choose to
import some dummy content. Please check this article Importing WooCommerce Dummy Data
to know details.
Customize your shop & product pages
After you have set up your online store and created some products, you can tweak the layout of the shop index page and single product page
via WordPress customizer. Please read the sub chapter Theme Customizer > Shop of CeraMag documentation to find out more.
And to setup your product image dimensions, please go to WooCommerce > Settings > Products > Display. And after changing image sizes, please don't
forget to regenerate your thumbnails.
Product Image Size
7. Theme Customizer
Go to Appearance > Customize, there you can customise and personalise your theme layout and styles.
Open Customizer
7.1 Site Identity
You will find the following options in this section:
Logo – Upload your custom brand image then display it as site logo in the site header. Supports SVG logo.
When upload a SVG logo, please always click "Skip Cropping" button.
Logo Width – To keep your custom brand image look sharp on retina devices, we recommend upload an image with 2x size and give 1x size. For example, upload an image which is 200 x 200 px, and enter 100 px as the image width value.
Site Title – Enter your site title and it will show in the site header below the logo image.
Tagline – Input the brief description of your site.
Display Site Title and Tagline – Uncheck it to hide site title and tagline so only show the logo image.
Site Icon – Upload a square image to use it as a browser and app icon (the favicon) for your site.
Logo Position – You can choose to place the logo image on the left side of the site title and tagline (New feature added since v2.0).
New Logo PositionPlease note: Tagline will be hidden on small screens
7.2 General
In this section you can set your site general layout, style and colors.
7.2.1 Site Layout
Site Layout – Fullwidth / Boxed.
Boxed Layout Options – These options will show will choose "Boxed" above. There you can set site content max width, and customize
the outer area background color and image.
7.2.2 Scroll To Top
Scroll To Top – Hide or show the "Scroll to top" button.
7.2.3 Page Background Image
Page Background Image – Set background image for the site page (content area if choose "Boxed Layout").
7.2.4 General Colors
Set the general colors of your site.
Page Background Color – It’s the site page (content area if choose "Boxed Layout") background color. Default is #FFFFFF (white).
Primary Color – This color will be used for links, buttons, highlighted elements and more.
Text Color – It’s your site all text color.
7.2.5 Posts General Options
Options for all posts archive.
Read More Button text – There you can change the text display on the read more button after each post.
Pagination Style – Nav/Prev Links / With Page Numbers / Load More Button.
Post List Background Image Size – Default / Original.
Hide Post Like Button – Tick the box to hide the Post Like (heart) button on featured images in Posts List.
Hide Pinterest Button – Tick the box to hide the Pinterest button on featured images in Posts List.
Load Post Meta ( Like Count & View Count ) Dynamically with AJAX - Recommend enabling this option if any caching plugins are used on your site. (New feature added in version 2.7.0)
7.2.6 Buttons
Change buttons' color and shape.
Background Color – Choose background color for buttons.
Text Color – Choose text color for buttons.
Background Color on hover – Choose button background color on hover state. You can choose to use the primary color or select another custom color.
Text Color on hover – Choose button text color on hover state.
Button Shape – Rounded Corner / Rectangle.
7.3 Header
Customizer - Site Header.
In this section you can choose site header style and colors, show or hide elements in site header.
Header Style – Default / Centered.
Enable Hamburger Menu – Check to hide site main menu and display a hamburger menu button (click it to show the off-canvas side menu). New feature since v1.1.4.
Center Primary Menu – Check to center (unfolded) site main menu for Default Header Style.
Enable Sticky Header – Check to make the site header/main navigation bar always sticks to the browser top, so it’s always visible when scroll the page.
Display Social Icons – Check to show your social menu in the site header.
Enable Search – Check to show the search field in the site header.
Search Screen Style – You can the fullscreen popup search screen's style.
Default – It shows search field, all categories, tags and authors. And shows search results instantly while entering keywords.
Please note: it will not display authors/categories/tags with no posts.
Simple – Only shows the search field. And need to press "Enter" key to show all search results.
Show at most x categories/tags/authors – You can limit the categories/tags/authors numbers on Default Search Screen.
Remove the space between site header and main content
Mega Menu
Display selected post meta (for posts in mega menu) – Allows you to display at most one post meta: None / Categories /
Author / Publish Date.
Header Colors – Set the colors of your site header.
Background Color – Choose any color as the site header background color. Default is #FFFFFF (white).
Text Color – Set site header's text color.
Dropdown Menu Color Scheme – Light / Dark.
This is for the child menu which shows when hovering on its parent menu item.
Primary Menu Background Color – For "Centered Header" only.
Primary Menu Link Color – For "Centered Header" only.
Secondary Menu Background Color
Secondary Menu Link Color
Header Background Image – Upload a background image for your site header.
7.4 Footer
In this section you can choose to show or hide elements in site footer, and set its layout.
Subscribe Form – You can display a subscribe form in the site footer. Please note:
you need to install and activate "MailChimp for WordPress" plugin and create a form first.
Display Subscribe Form – Tick to show the subscribe form.
Choose a form – Choose one from multiple subscribe forms (if there are more than one form)
Color Scheme – Light / Dark.
Style – Block / Strip.
Subscribe Form Background Image – Upload a background image.
Instagram
Please connect your website with your Instagram account first. Please click here to know how to set up your Instagram.
After that, you can check it to enable this feature.
Enter a title (it's optional) for the feed, for example, "Follow Me on Instagram".
If you want to link the title to your Instagram account page, please enter your Instagram account username.
You can choose to display the latest 5 to 8 pictures from the Instagram account in a full-width row at the top of the site footer.
Please note: your Instagram account needs to be public to show feed on your site.
Footer Bottom – 2 options for Footer Bottom area.
Display Social Icons – Check to show your social menu in the site footer bottom.
Footer Text – Here you can add copyright and more text content. It supports HTML tags. So you can use < h1 > to < h6 >
tags, and < p >, < ul > tags to style the content..
Footer Colors – Set the colors of your site footer.
7.5 Sidebar
In this section you can change settings of the sidebar.
Enable Sticky Sidebar – Check to enable sticky sidebar. Only works when sidebar is shorter than content area and when screen width is larger than 1120 px.
Sidebar Colors – There you can change the background color and text color of widget titles in the sidebar.
7.6 Home Page
In this section you can control the layout and posts style for the latest posts page of your site. It might be:
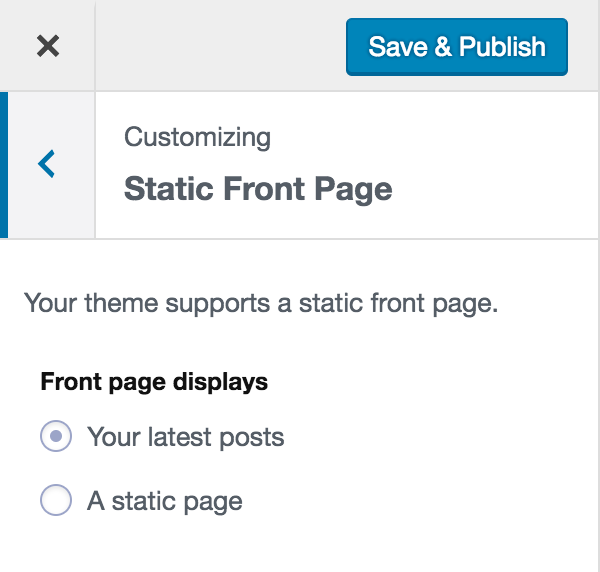
Home Page – When choose "Front Page displays your latest posts".
Front Page displays your latest posts.
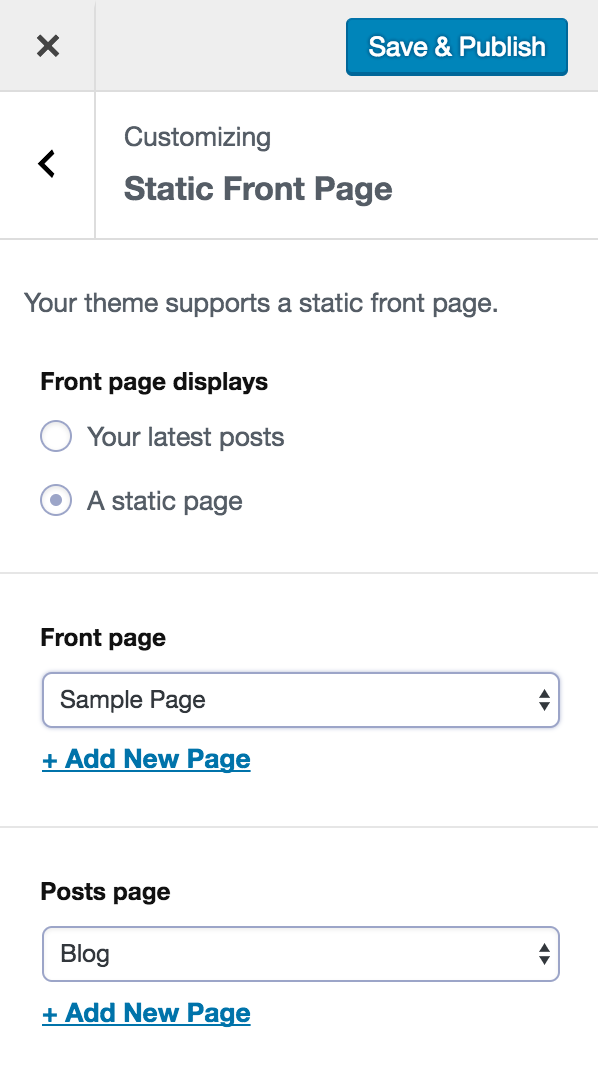
Blog Page – When choose "Front Page displays a static page", and choose a page (might be named as "Blog" or "News") as Posts Page.
Front Page displays a static page.
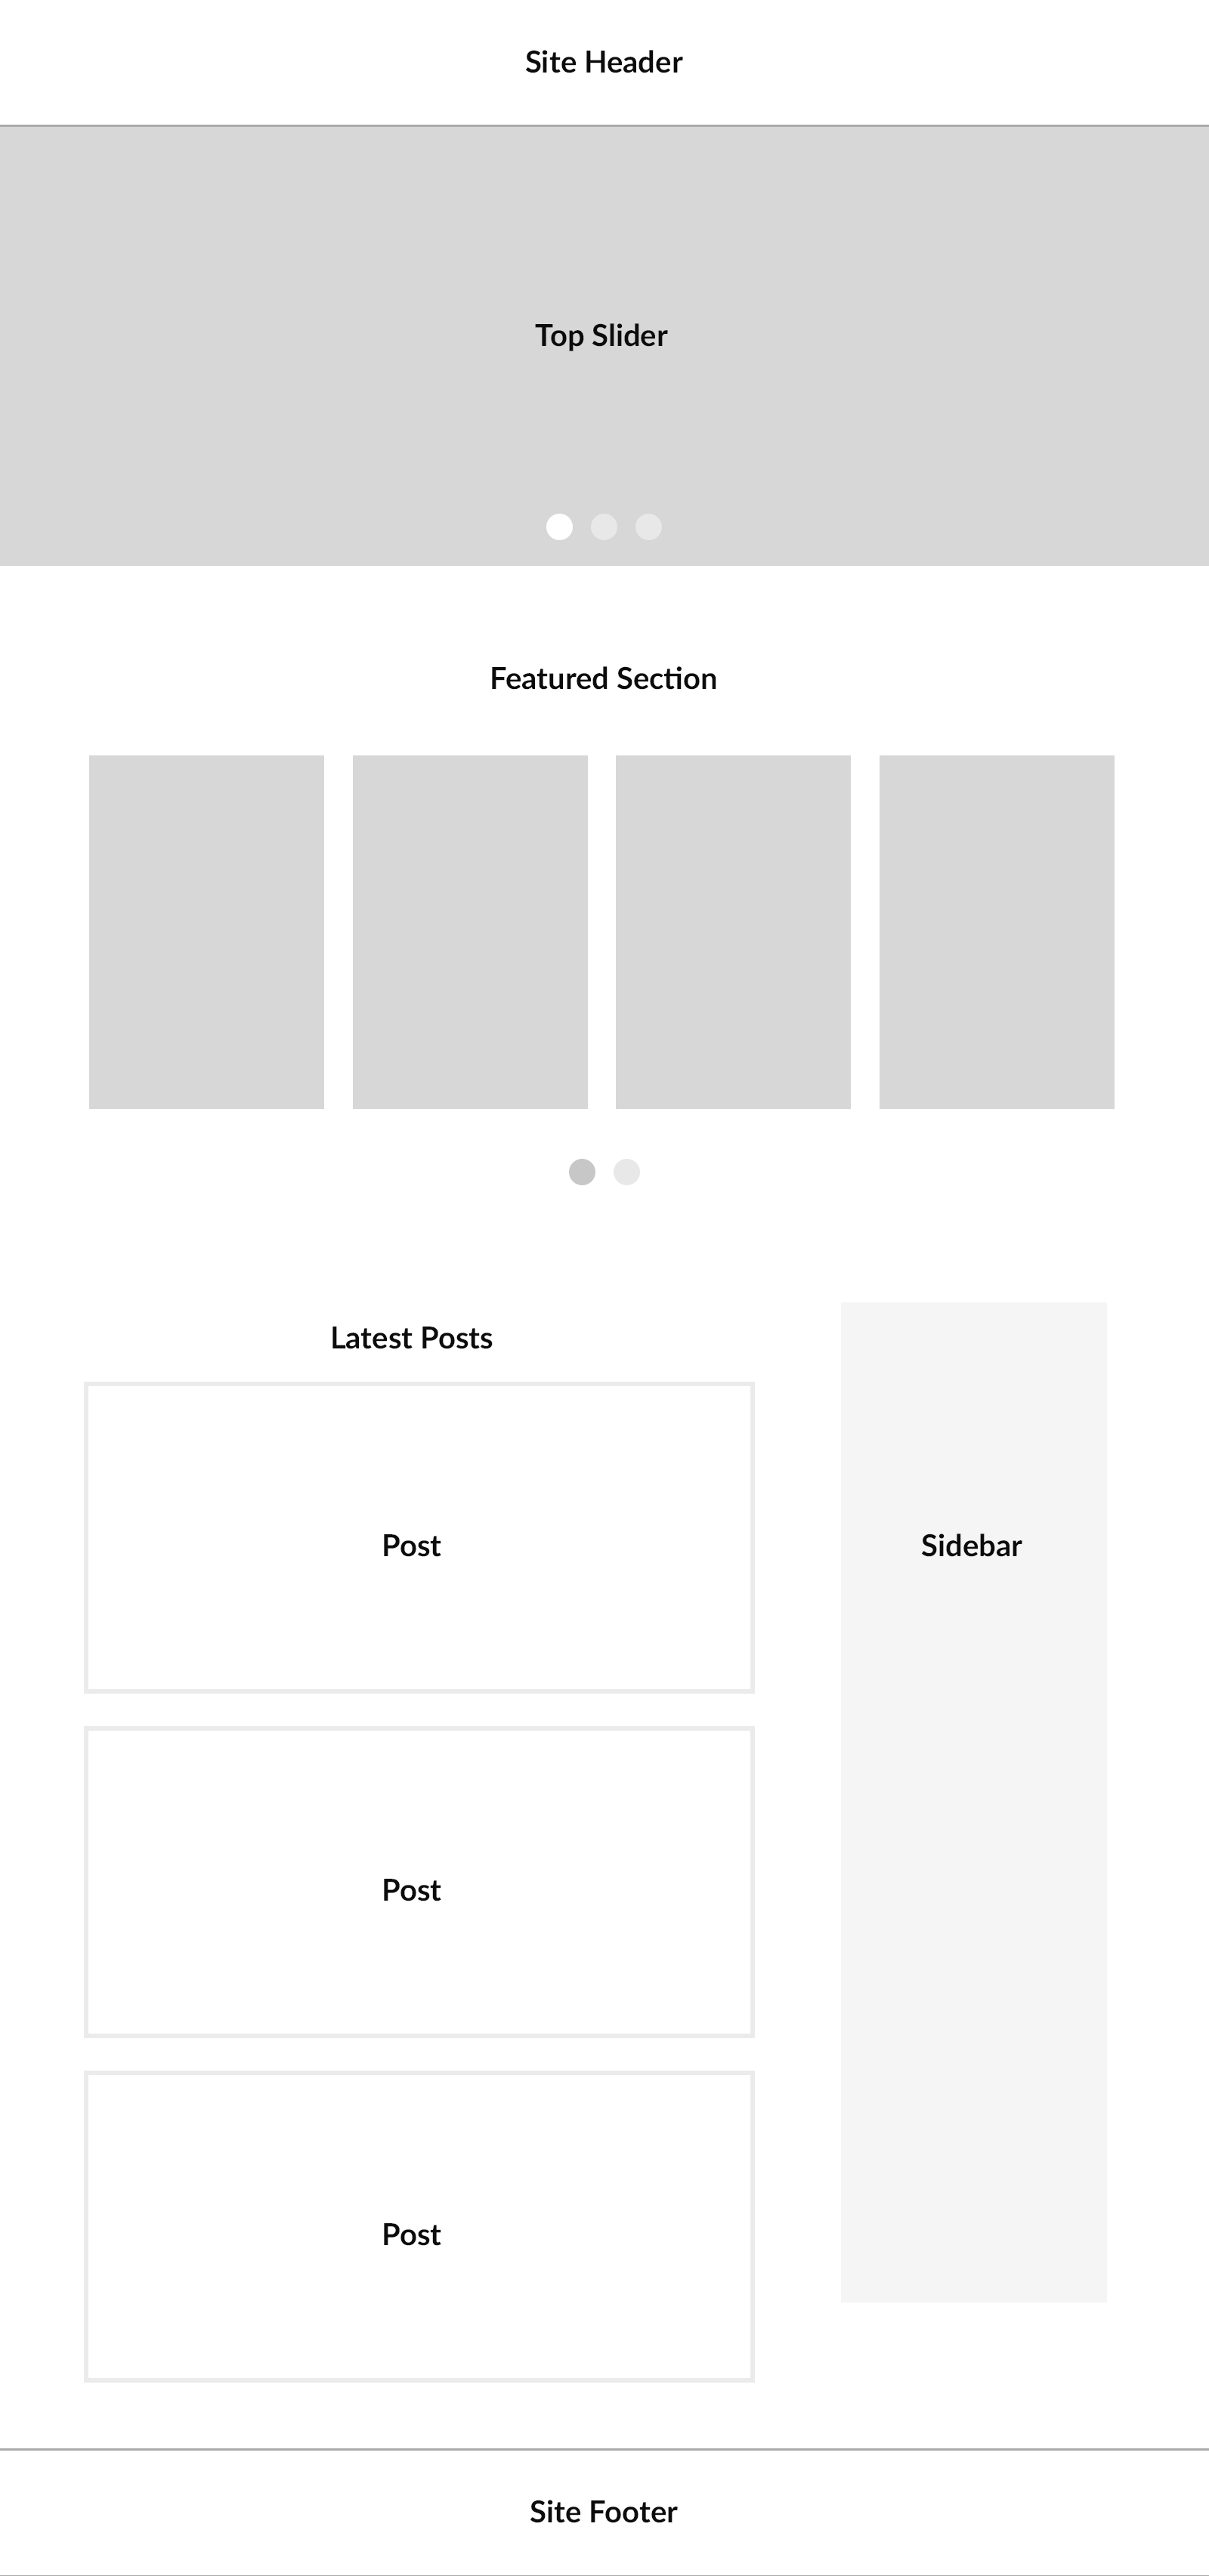
The page is consisted with 3 sections:
Top Slider / Hero Image
Featured Section
Latest Posts
Home page/posts page structure
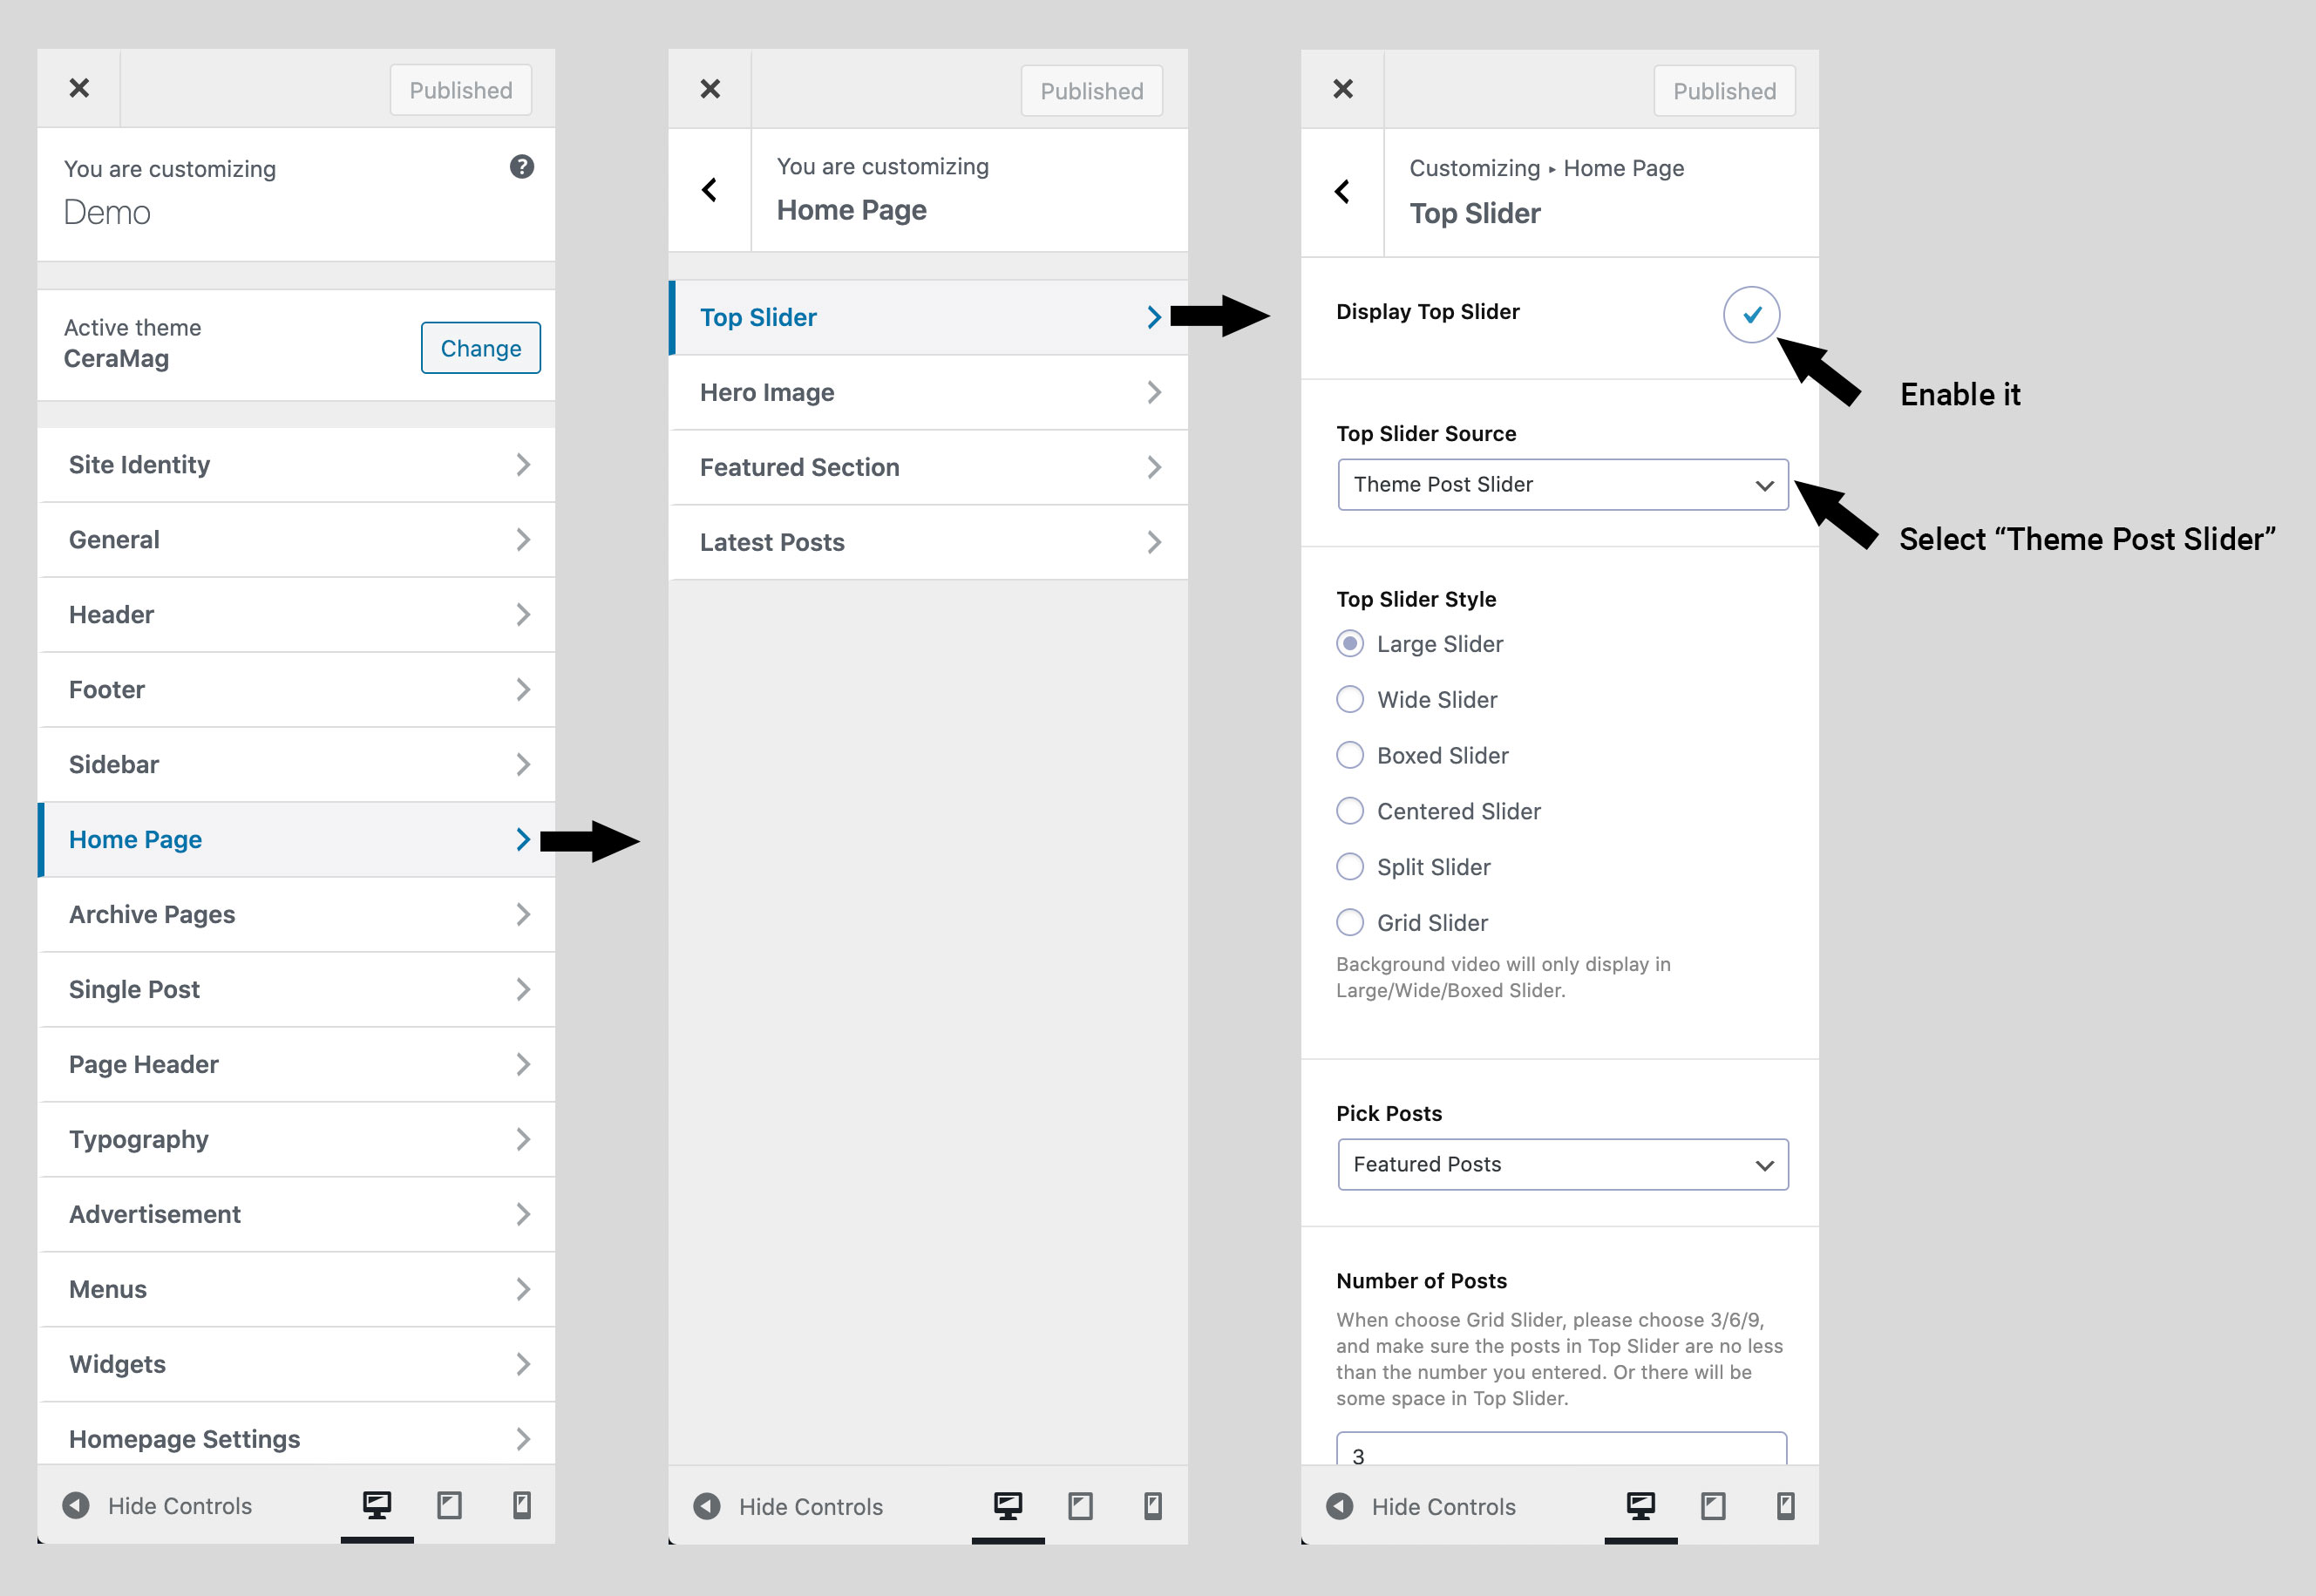
7.6.1 Top Slider
Check to show a slider of some posts at the top of the post archive. And more options for it will show:
Options for Home Page Top Slider
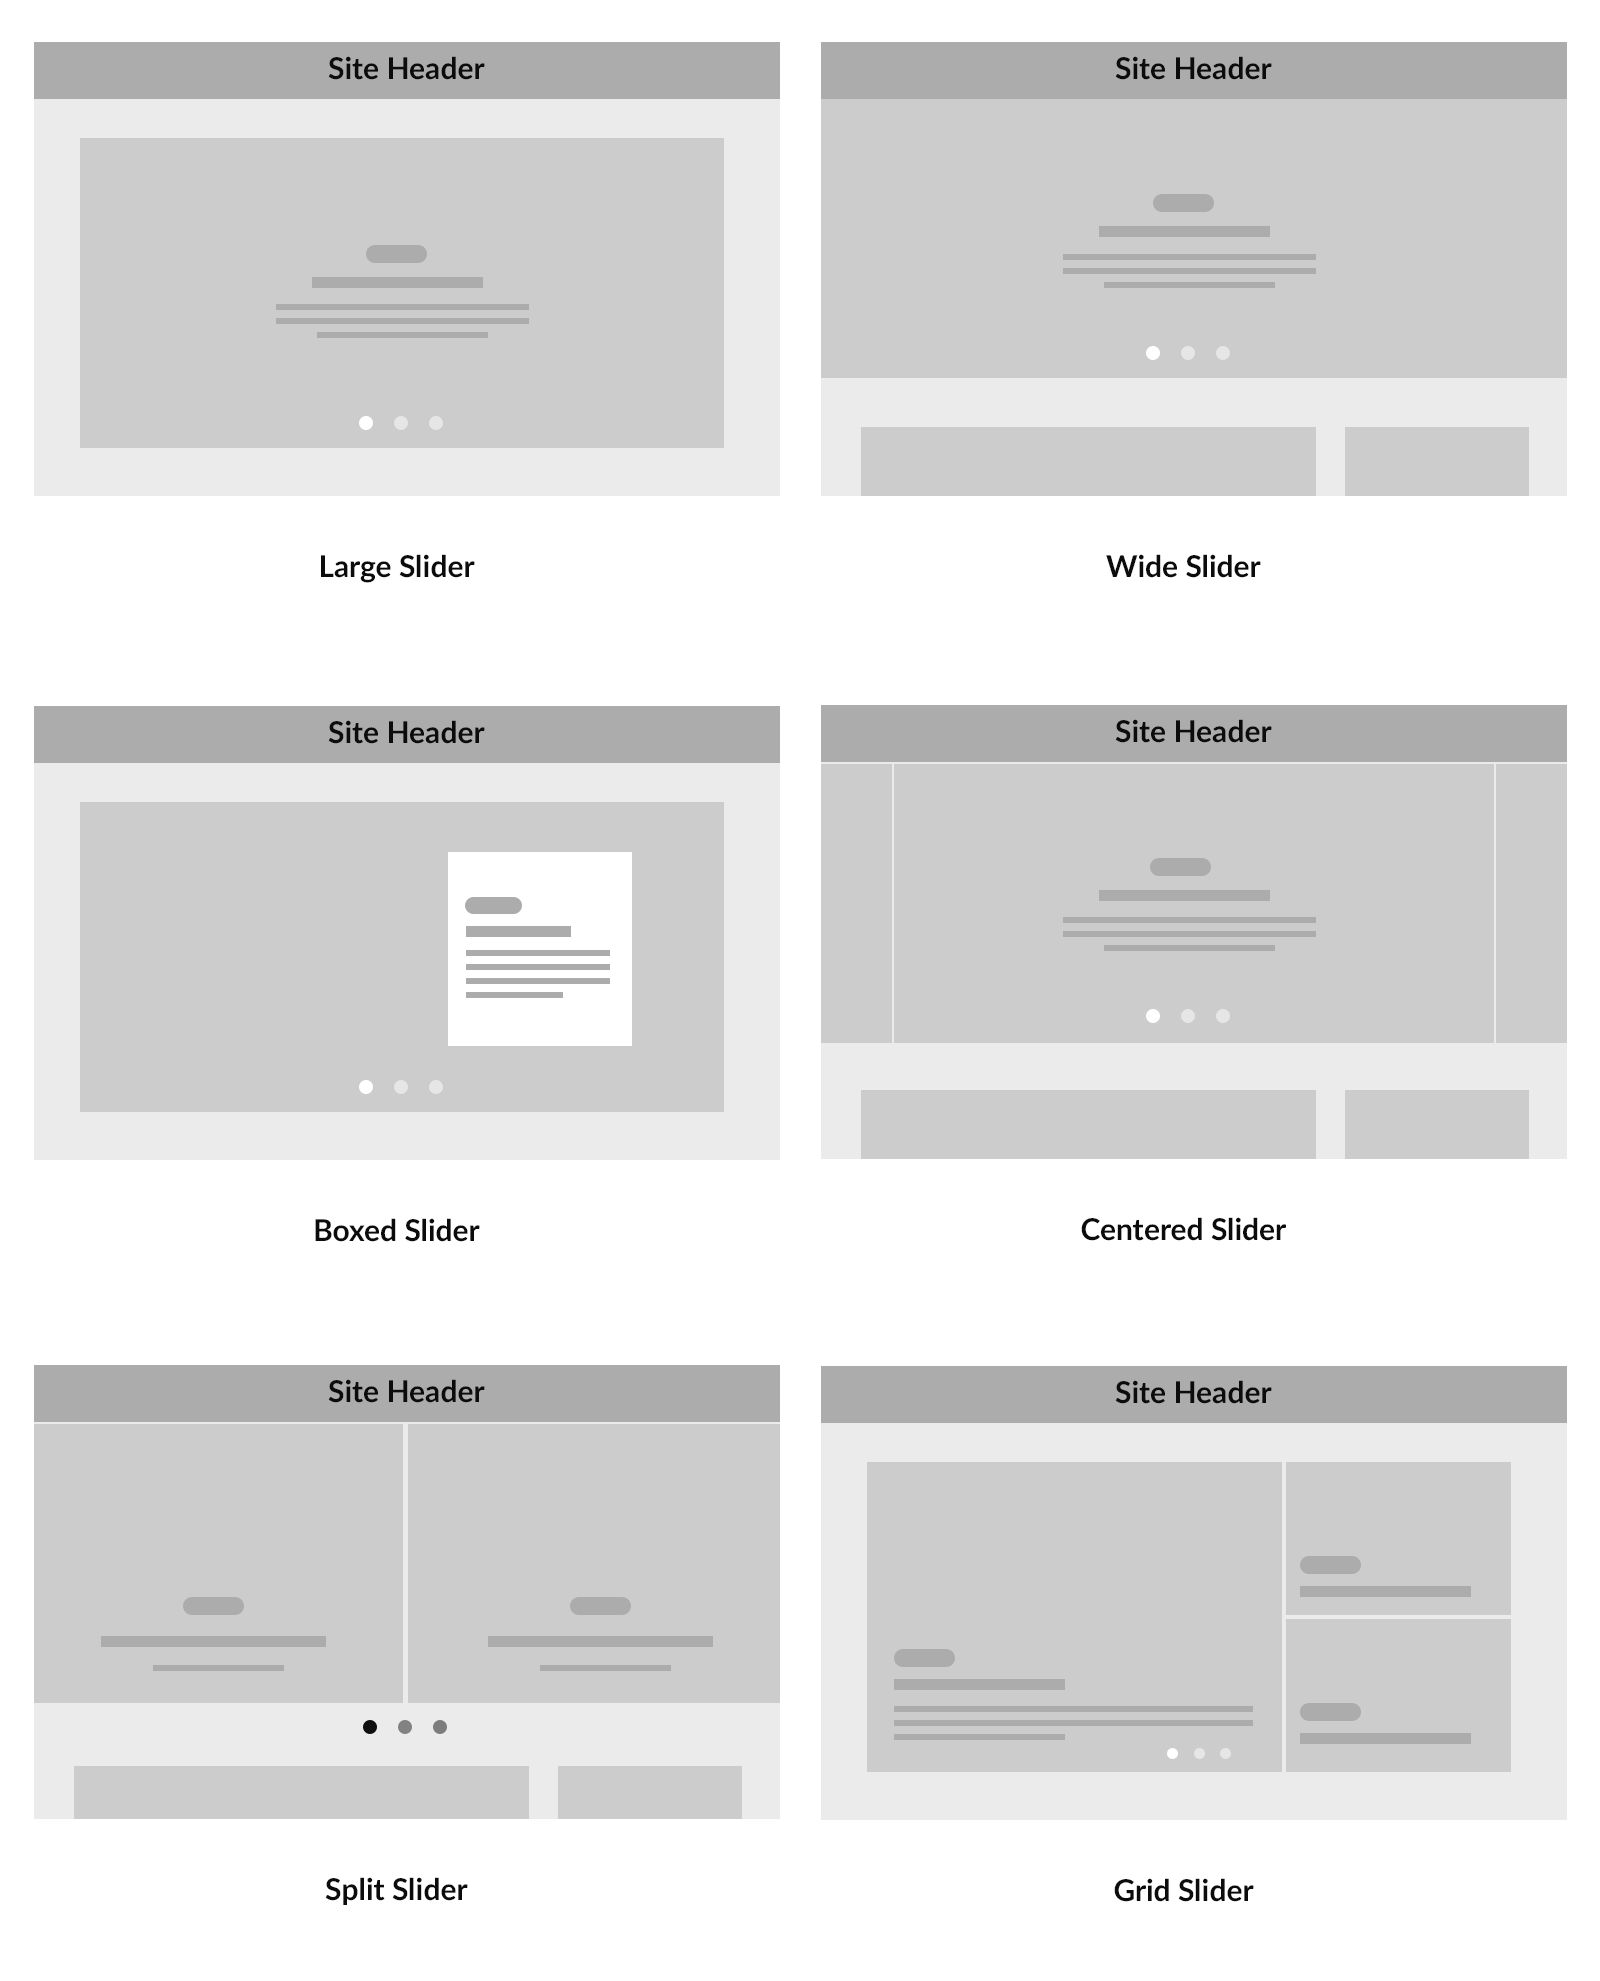
Top Slider Style - There are 6 different slider styles:
When choose By Category or By Tag, you will be able to select one or multiple categories/tags. Please hold the CTRL key (PC) or COMMAND key (Mac) to select multiple items.
Number of Posts - Enter a number to decide how many posts will be show in the slider. 1 to 9.
Post Meta - You can choose to show or hide category and (or) excerpt for posts.
You can choose to remove these posts from Latest Posts Archive.
Enable Auto Play - The top slider will be auto-played. Then the 3 options below will show:
Pause Duration - Short / Medium / Long
Transition Speed - Fast / Normal / Slow
When choose Wide Slider, you can choose stretch the slider's height to screen height.
7.6.2 Slider from 3rd-party plugins
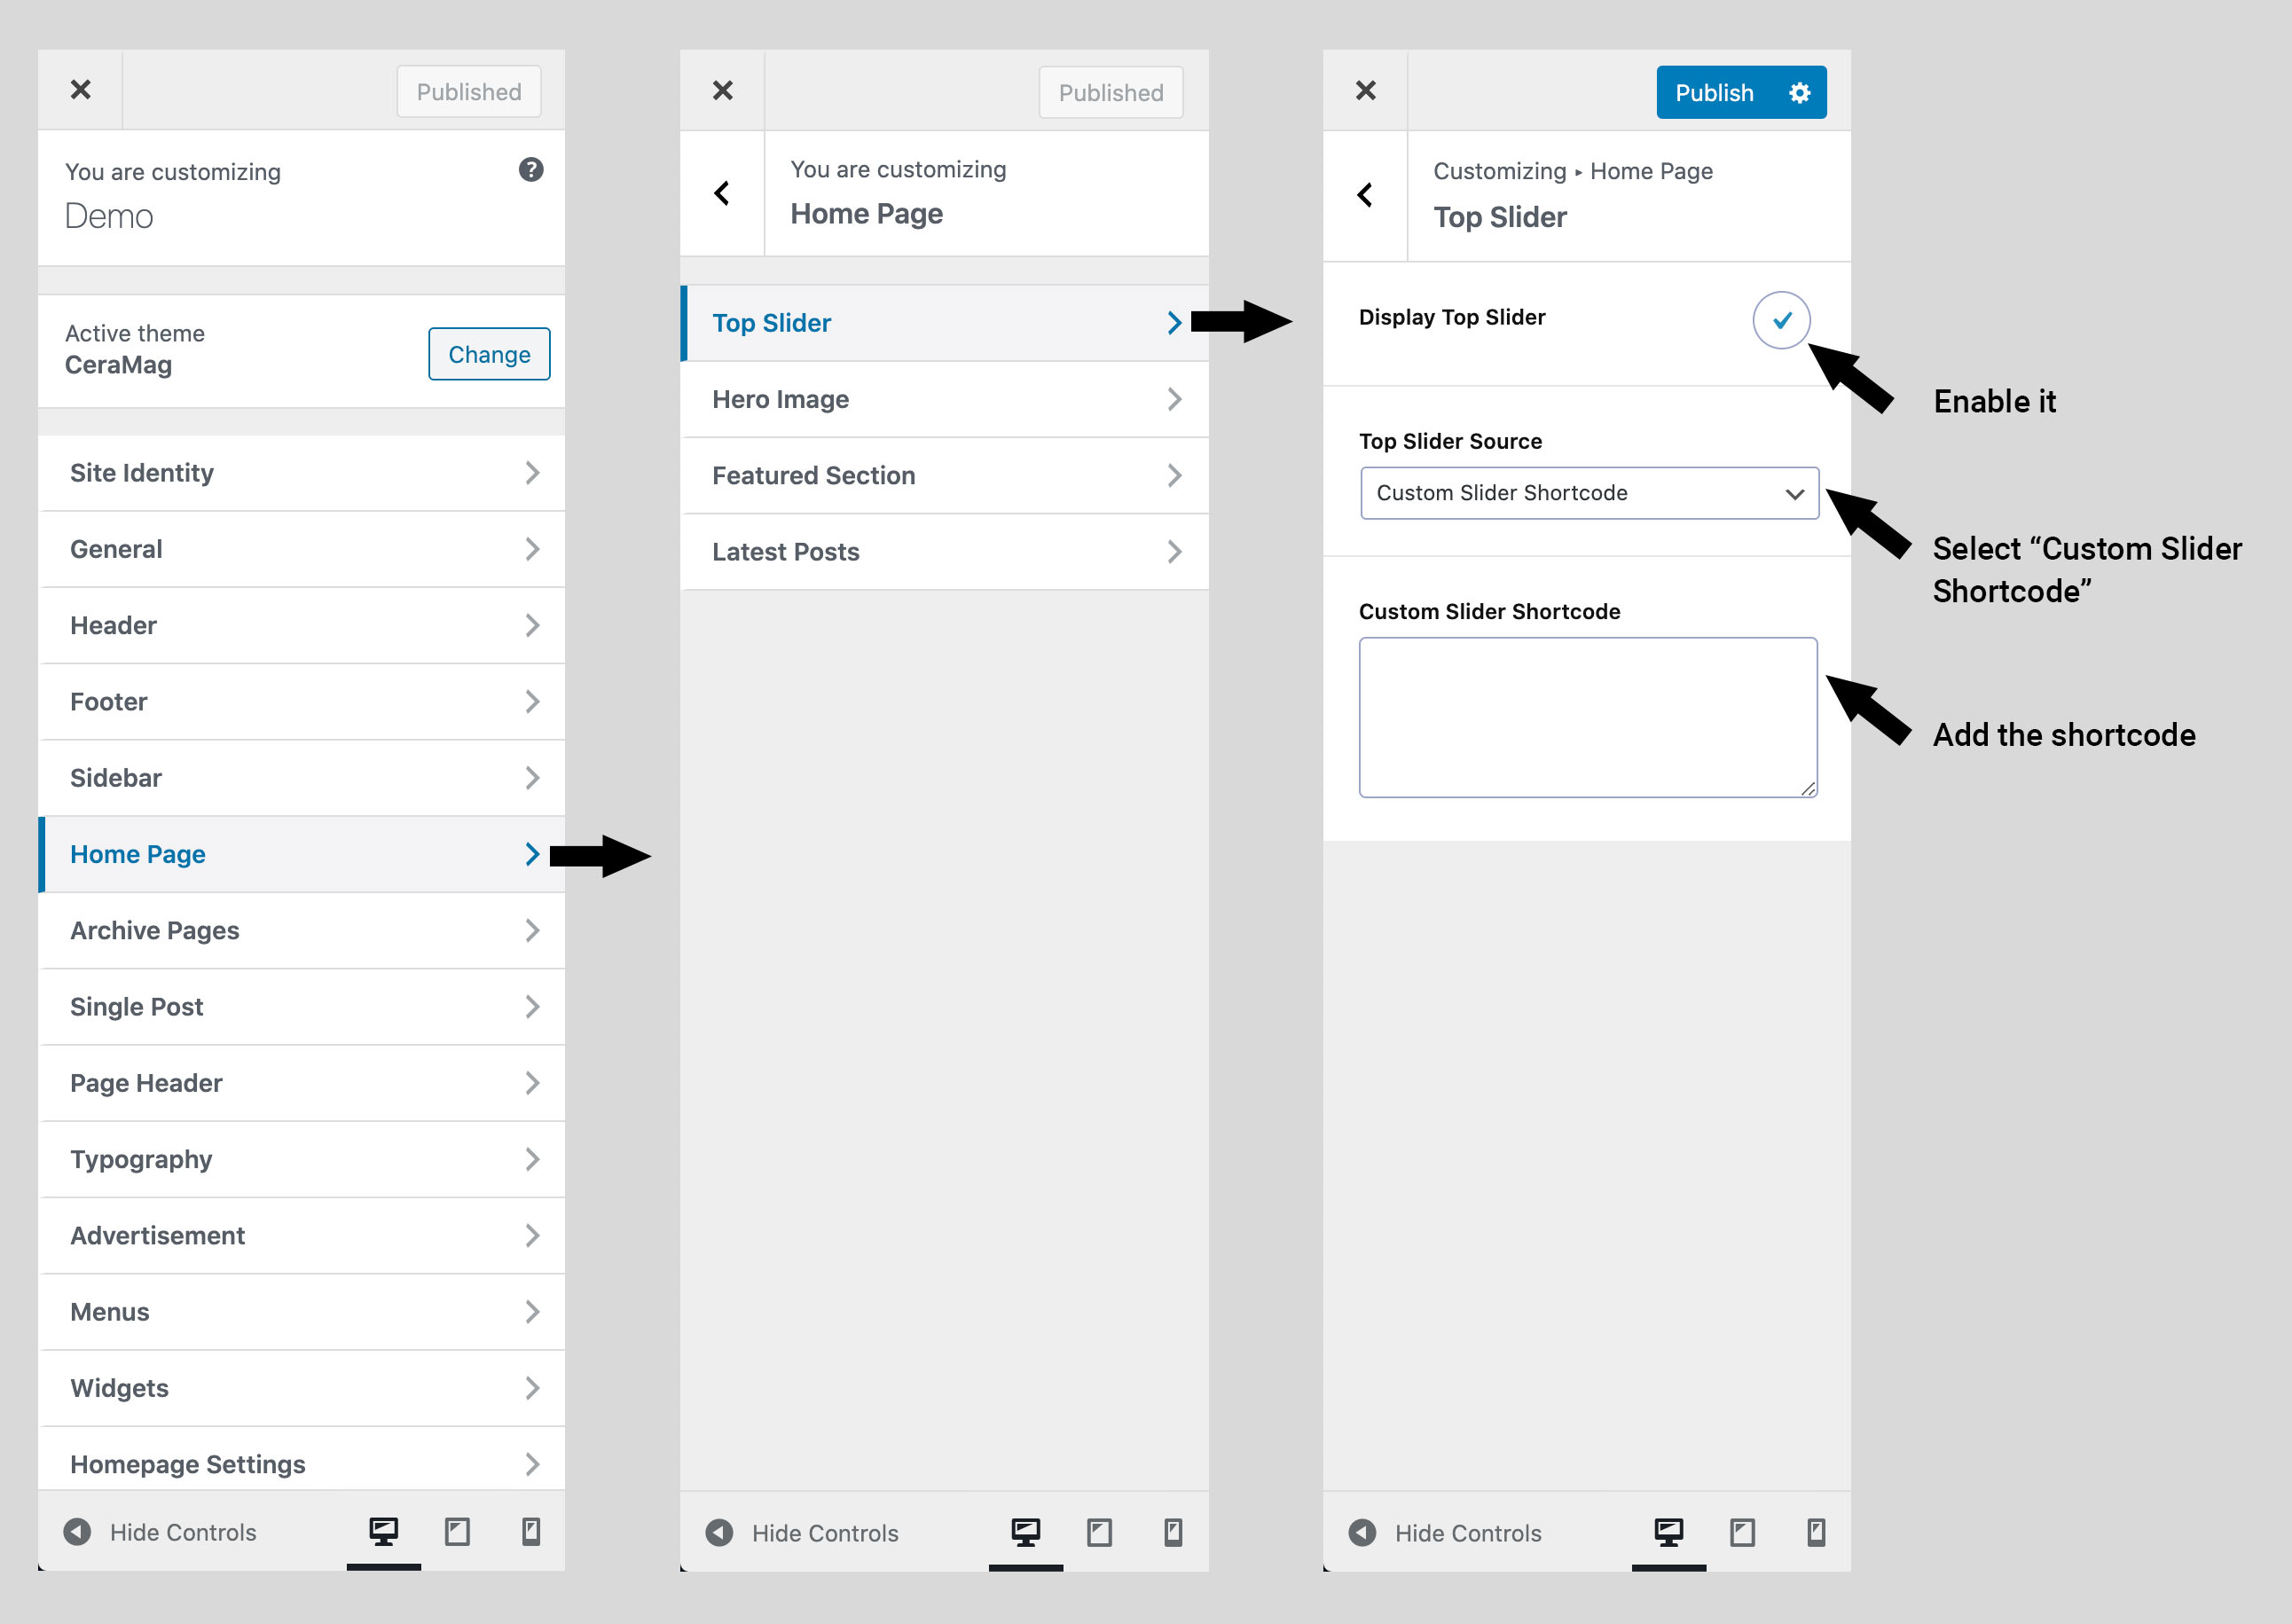
Since v2.4.0, we added an option to replace the Home Page Top Slider with shortcode of third-party plugins. So you can install a slider plugin, create your own slider,
and add the shortcode to the homepage to replace the Top Slider of the theme.
Add shortcode to replace the Theme Top Slider
7.6.3 Hero Image
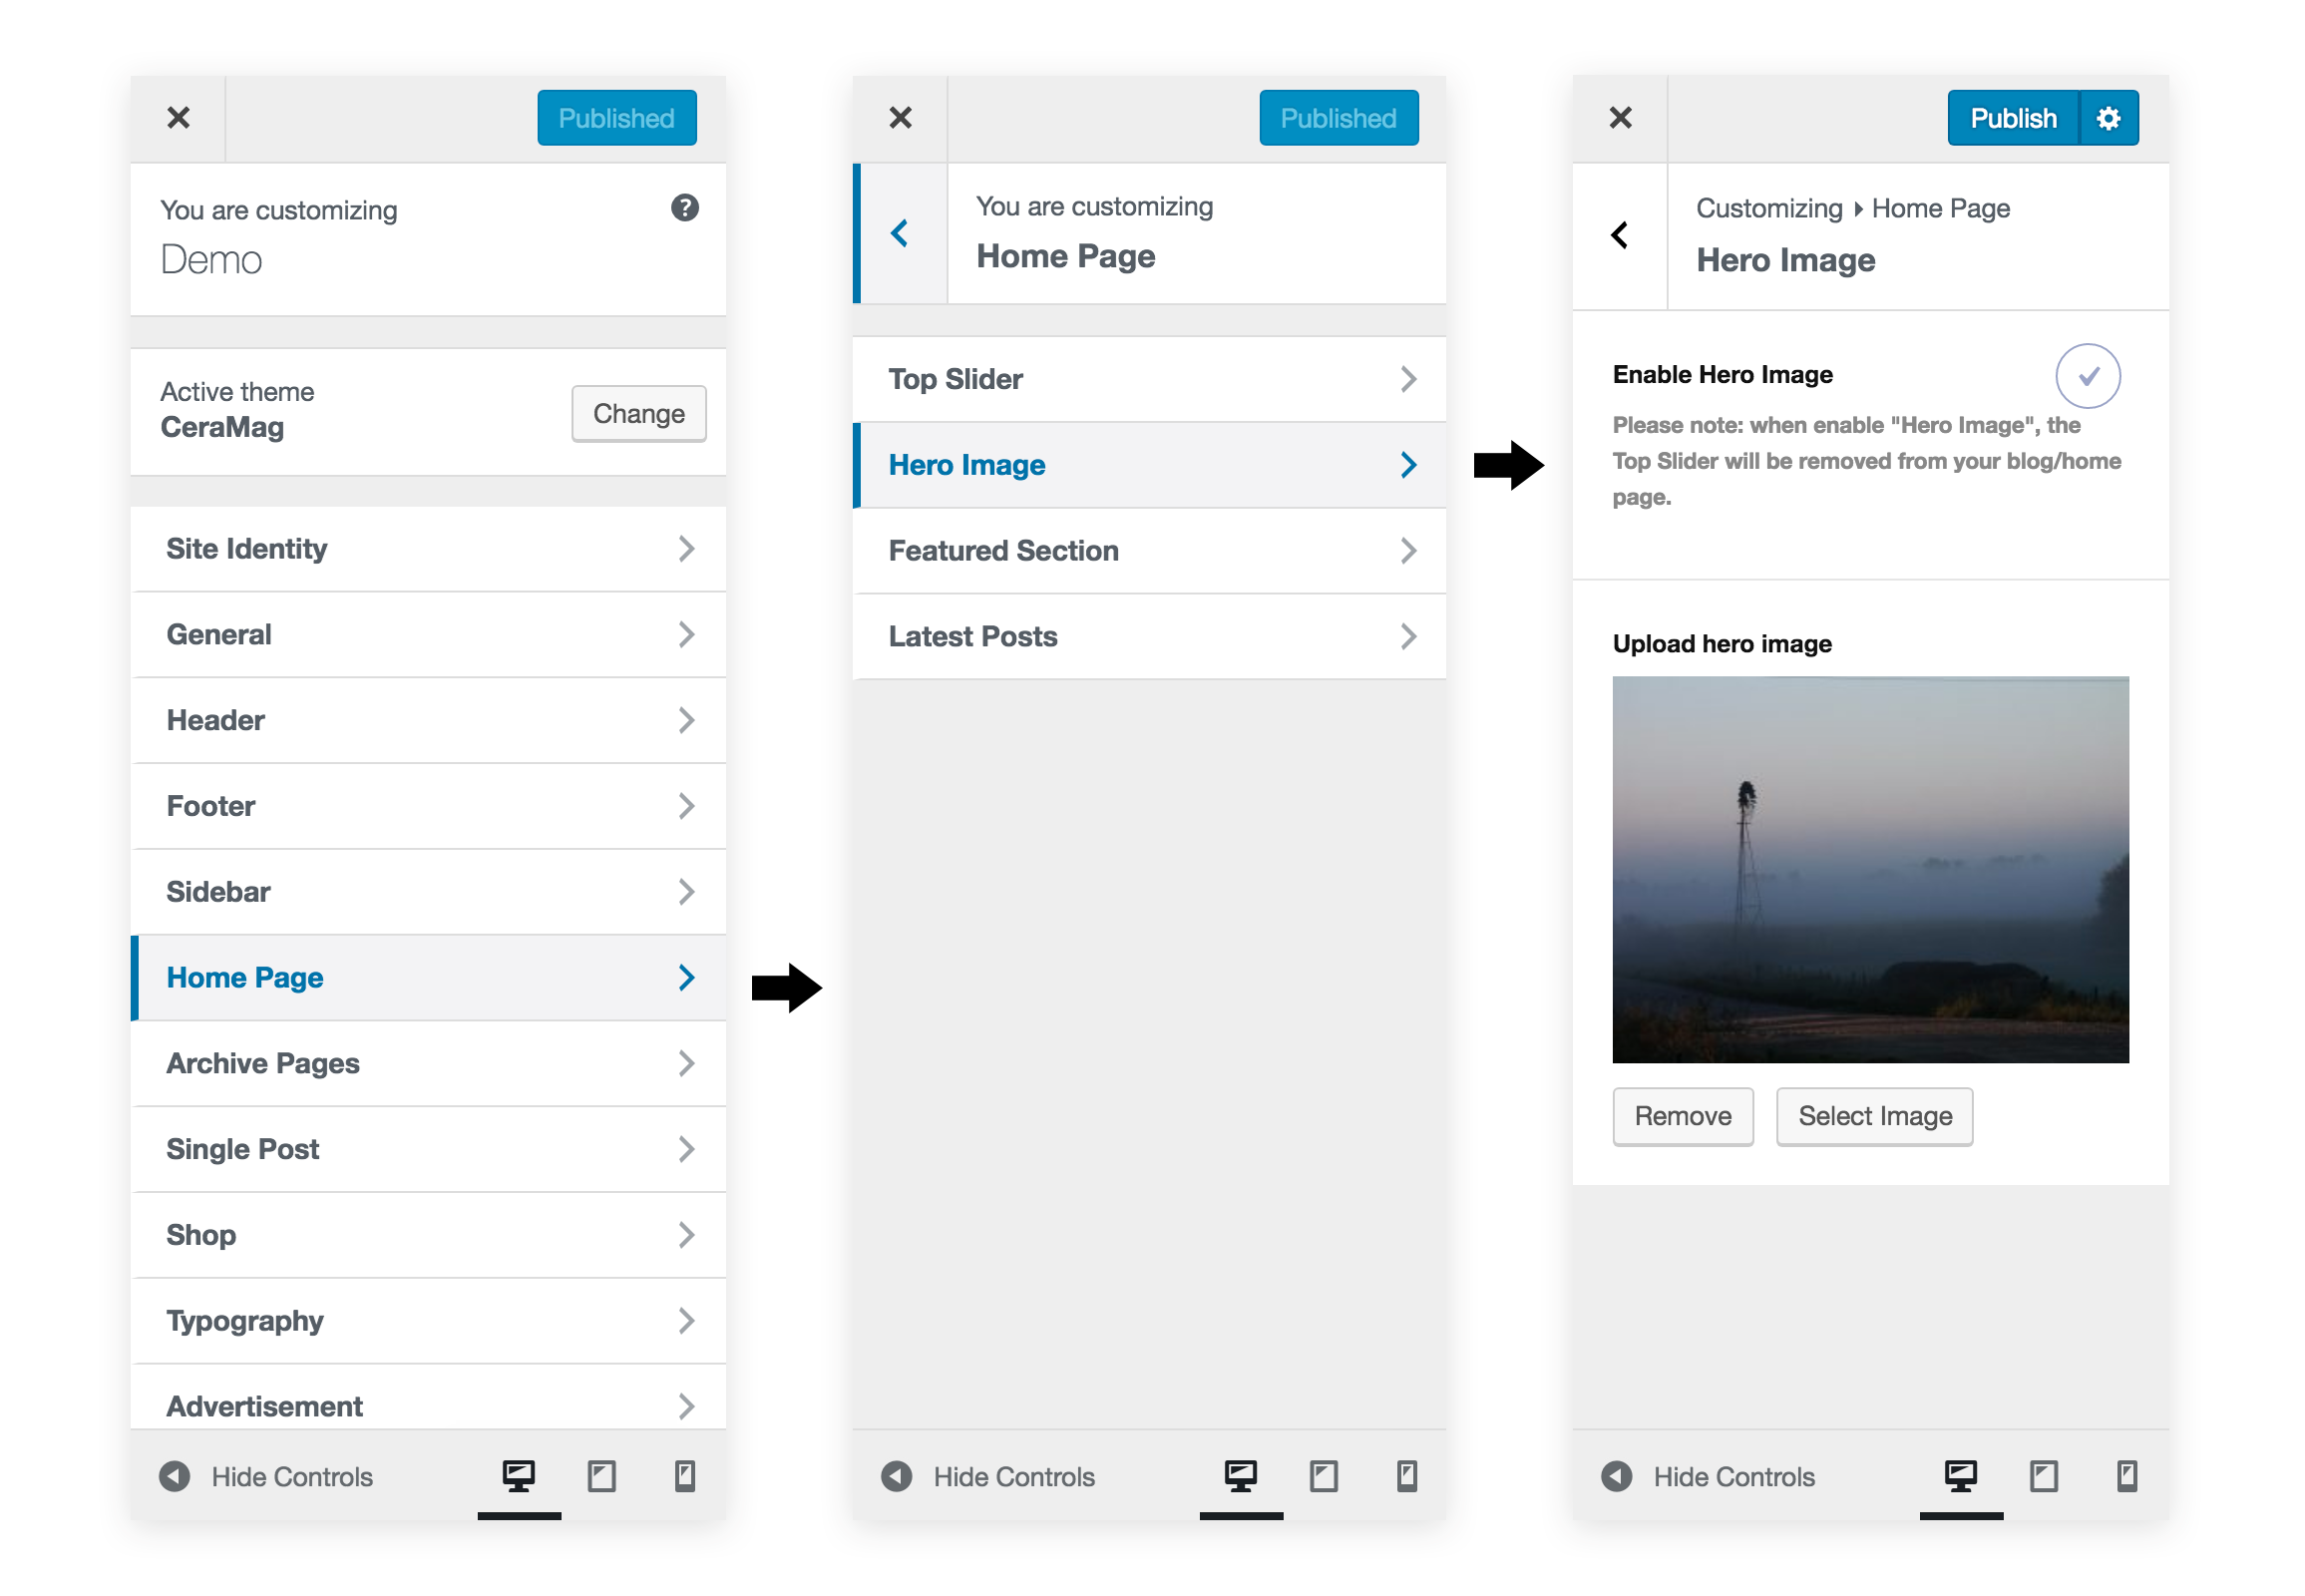
Since v1.2.0, users can display a custom hero image instead of the Top Slider.
In customizer, please go to Home Page > Hero Image. Enable the option, then upload your custom hero image.
Please note: when enable "Hero Image", the Top Slider will be removed from the page.
Display hero image instead of Top Slider
7.6.4 Featured Section
You can display the featured posts or most viewed/liked posts as a carousel in this section (How to choose Featured Posts).
This section is placed between Top Slider and Latest Posts.
Display Featured Section – Check it to display Featured Section.
Section Title – It's optional. You can enter a title for this section. For example: Editors' Picks.
Pick Posts – You can choose to display Featured Posts or
Most Viewed Posts or Most Liked Posts here.
Number of Posts - Enter a number to decide how many posts will be show in the carousel. 1 to 9.
Hide Categories – Tick the box to hide categories of posts.
You can choose to remove these posts from Latest Posts Archive.
Background Image Size – Default / Large. If you think the "Default" sized images look blurry and
want to use larger images, please select "Large" for this option.
7.6.5 Latest Posts
Here you can control the latest posts archive layout.
Sidebar Layout
No Sidebar
Left Sidebar
Right Sidebar
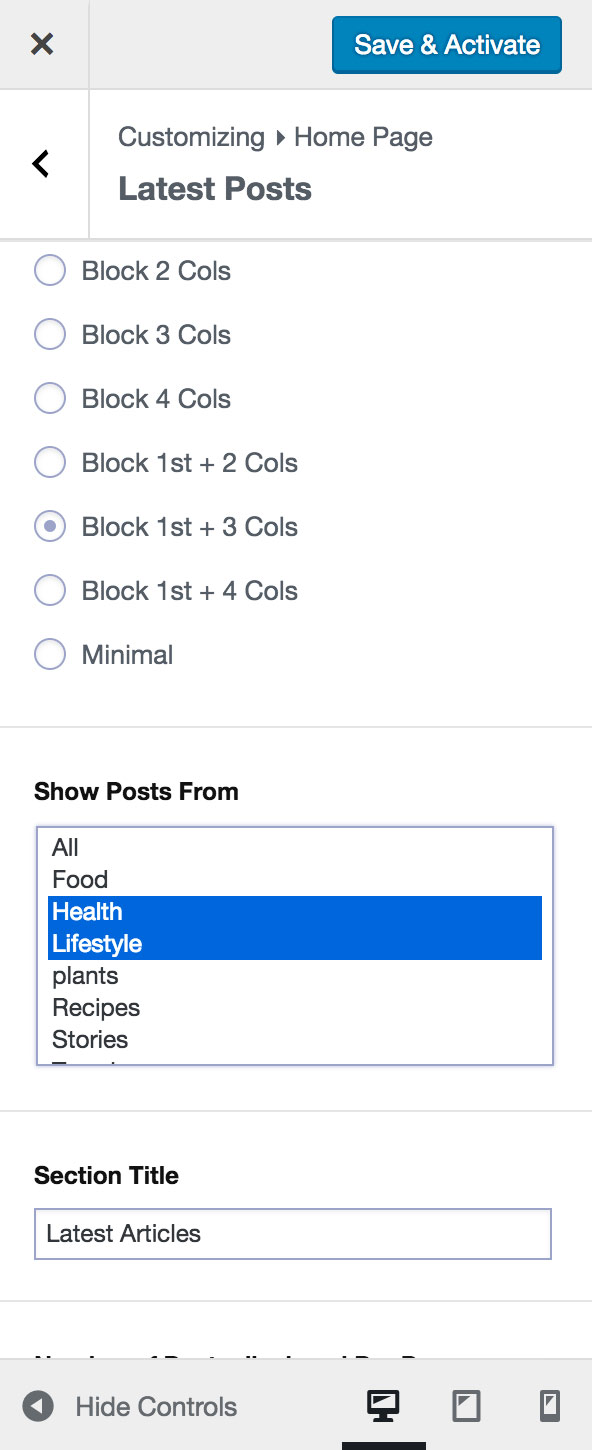
Posts Layout - There are 17 layouts:
Classic
Grid 2 Cols
Grid 3 Cols
Grid 4 Cols
1st Classic + Grid 2 Cols
1st Classic + Grid 3 Cols
1st Classic + Grid 4 Cols
List
Zigzag
Zigzag 2 Cols
Block 2 Cols
Block 3 Cols
Block 4 Cols
Block 1st + 2 Cols
Block 1st + 3 Cols
Block 1st + 4 Cols
Minimal
Show Posts From - You can choose "all" to show latest posts from all categories, or choose to only display posts from one or more categories.
To select multiple items, please hold down the Command key then click the items.
Show Posts From selected categories
Section Title – It's optional. You can enter a title for this section. For example: Latest Articles.
Number of Posts displayed Per Page – Enter a number to decide how many posts show per page. It’s the same feature as WordPress dashboard > Settings >
Reading > Blog pages show at most x posts.
Post Meta – You can choose which post meta to show in Latest Posts archive. Please note: some post meta (excerpt, like count, view count, etc) will always be
hidden for some posts layouts. For example, when choose Grid 4 Cols as Post Layout, all of the post meta will be hidden except categories. And post tile can't be hidden.
Grid Featured Image Orientation – Landscape/Square/Portrait. Please note: This option only shows when choose "Grid" layout. And the setting will only be applied to "Grid Layout Posts".
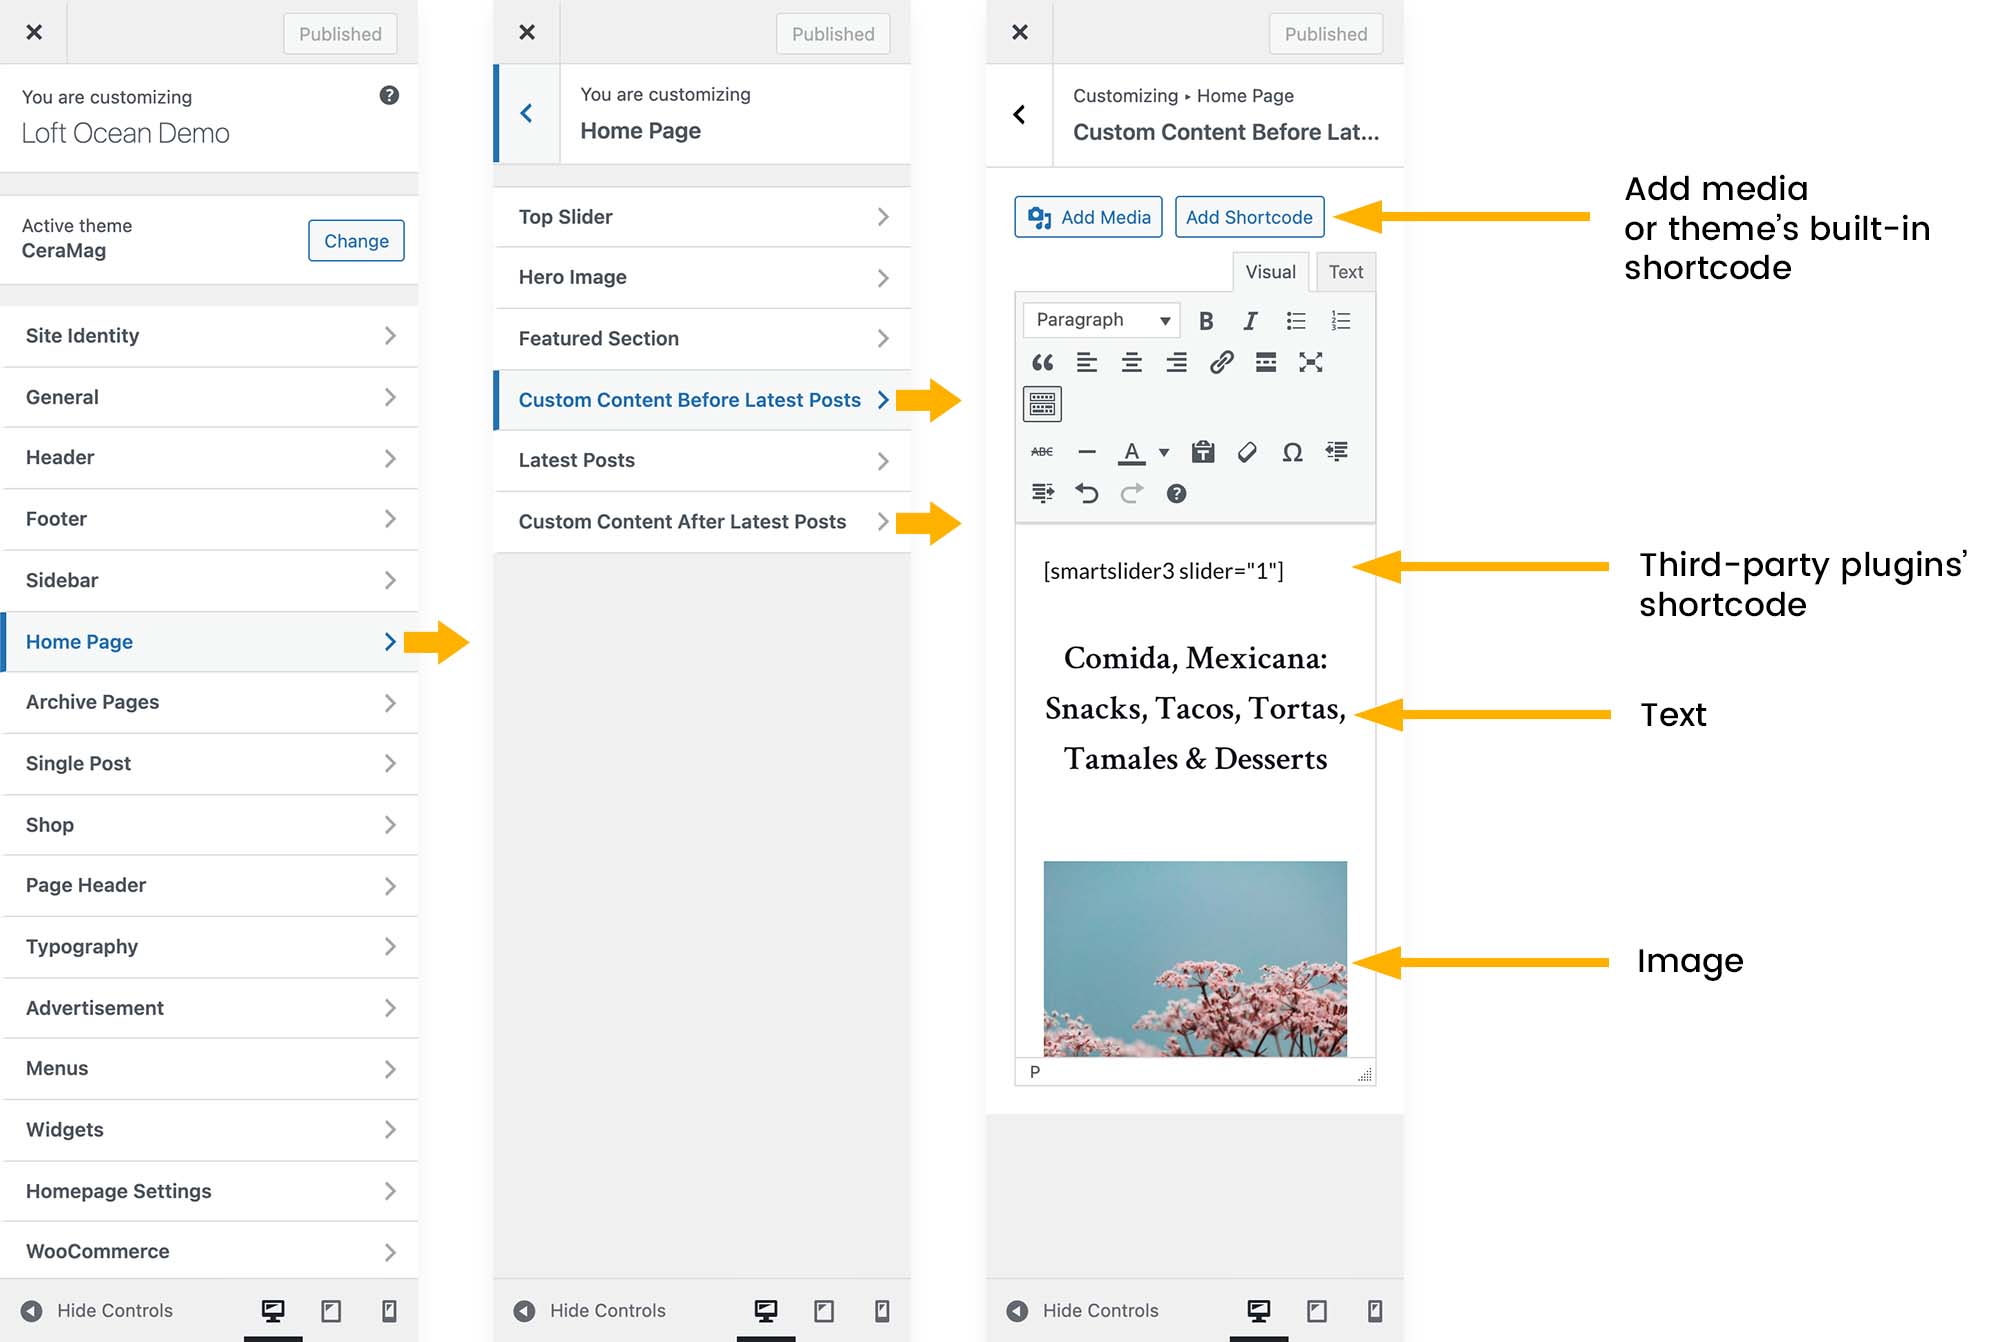
7.6.6 Custom Content Areas
Since version 2.7.0, we added 2 extra Custom Content Areas on the home page, before and after the Latest Posts section. So that users can
add any content into these 2 areas, such as: Text, Images (and other media), Shortcode (theme built-in shortcode, or third-party plugins' shortcode), HTML code (e.g. Google AdSense Code), etc.
Custom Content Areas on Home Page
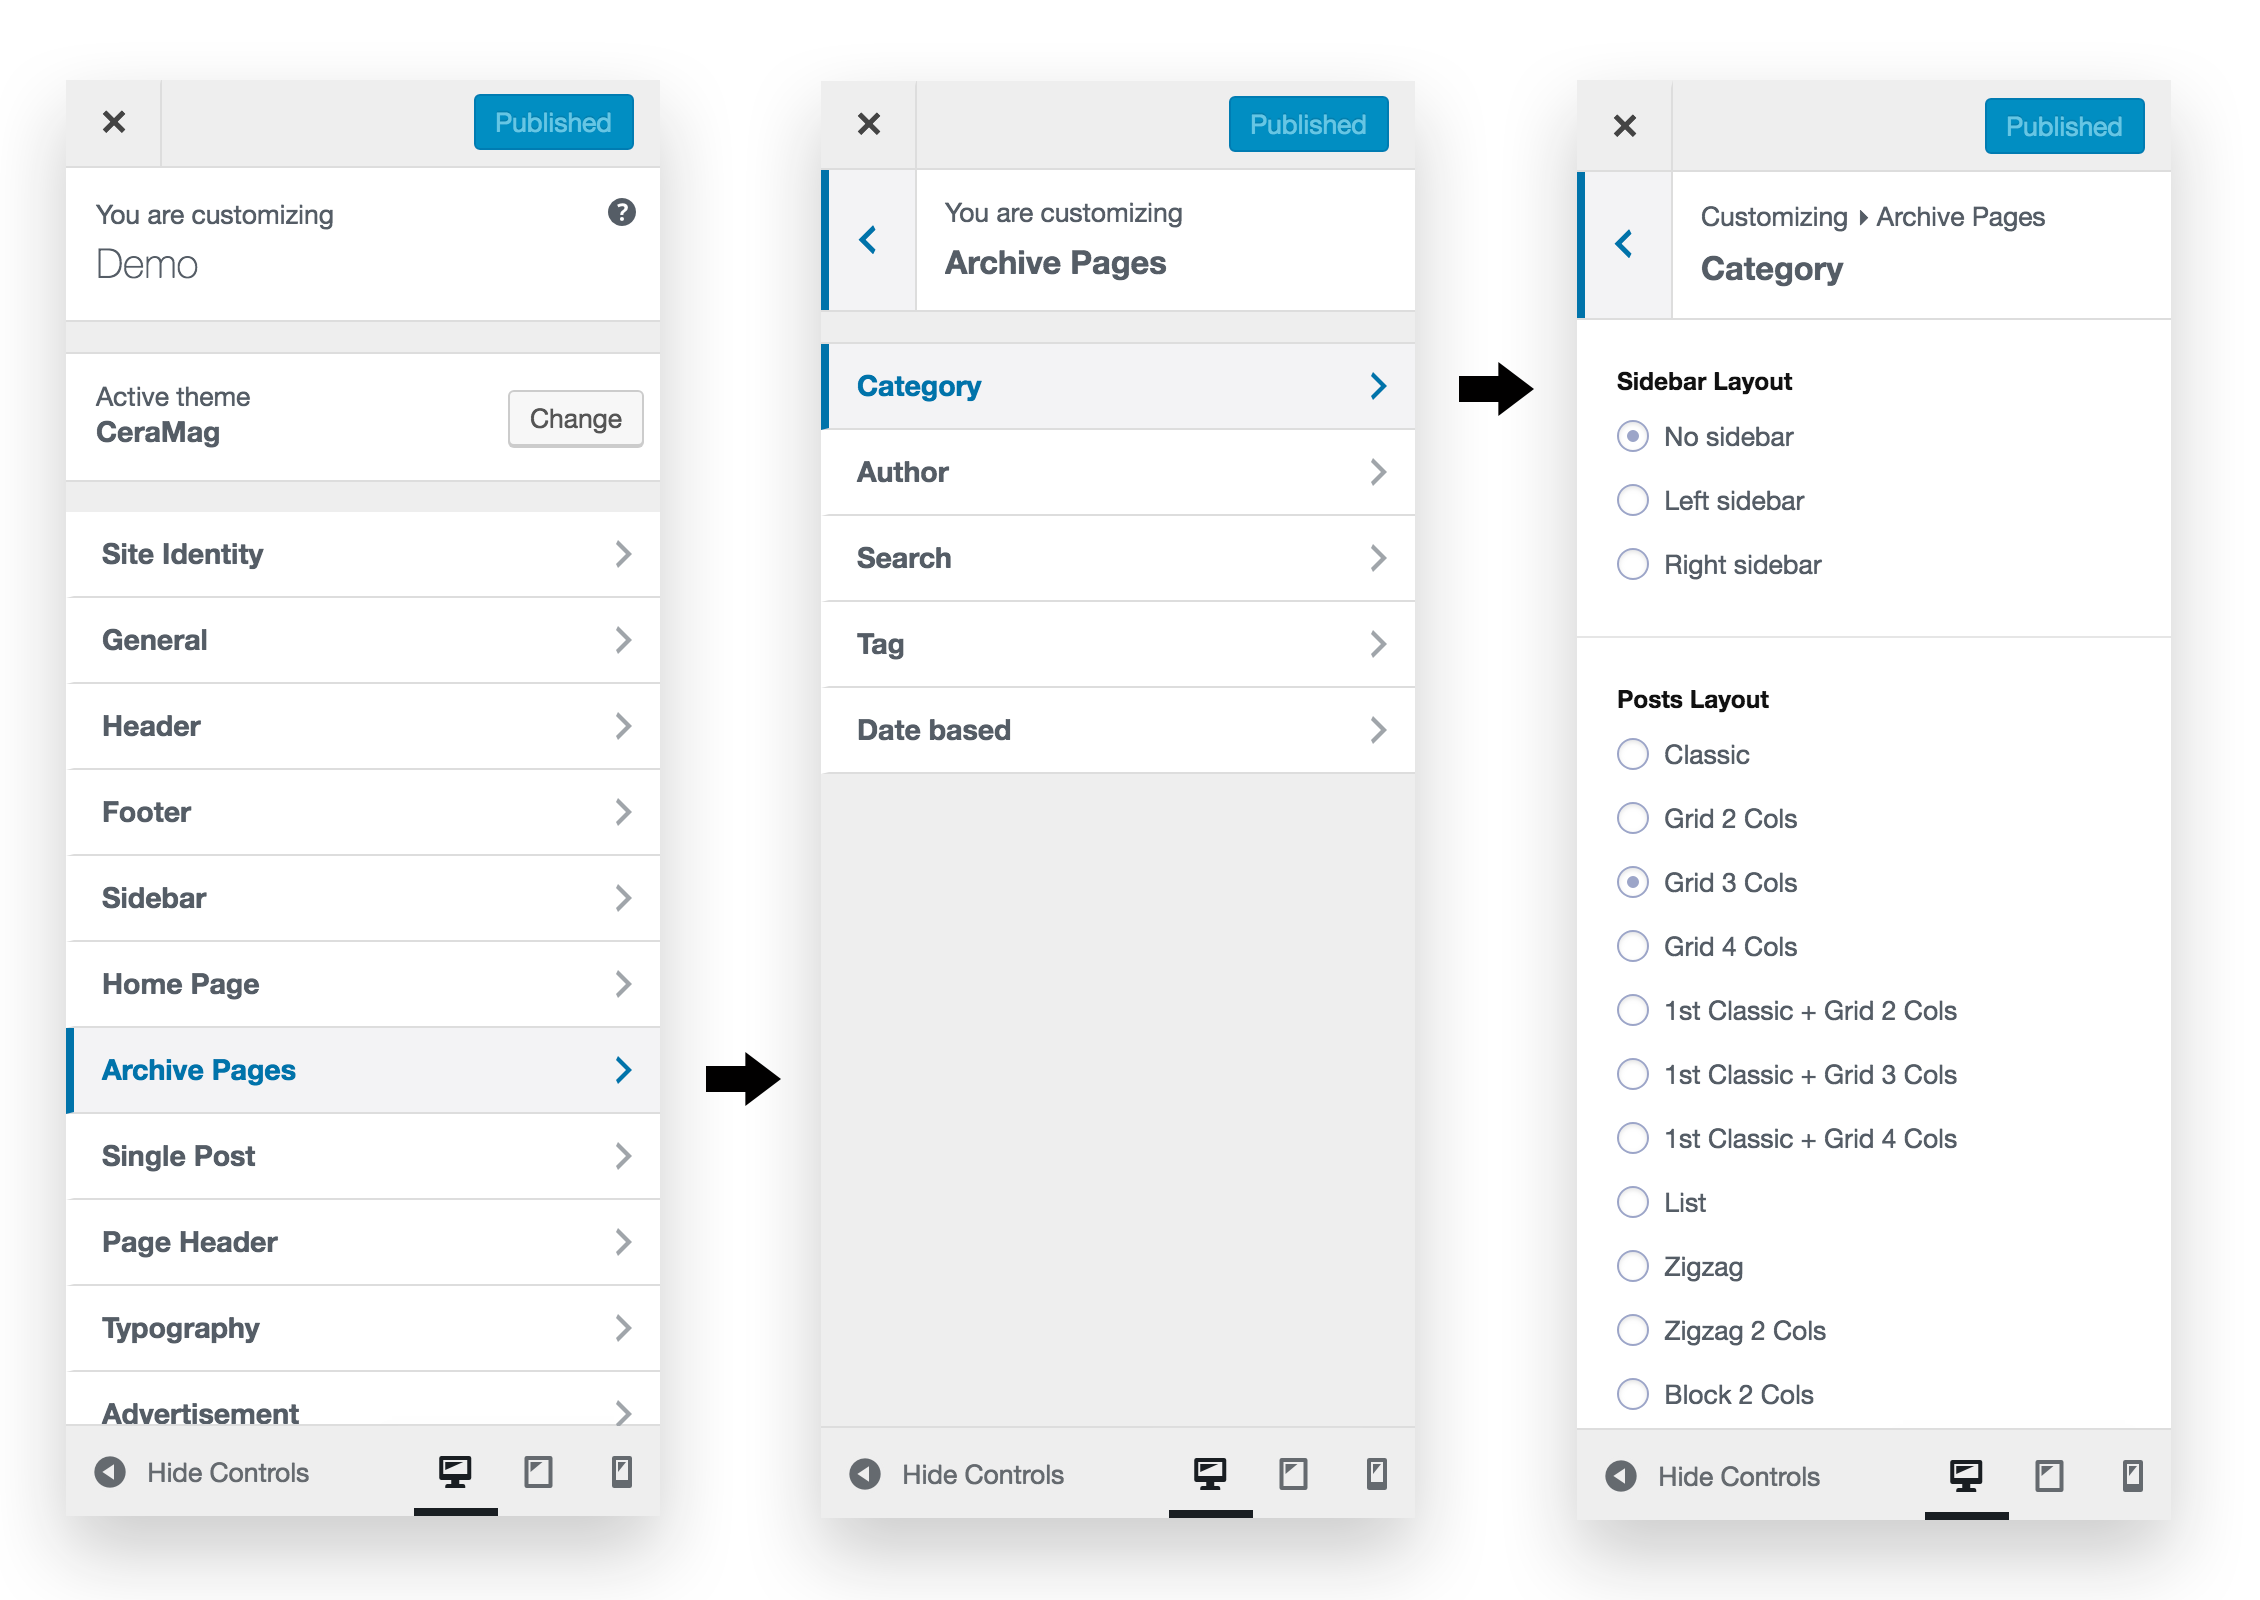
7.7 Archive Pages
In this section you can set the layout and style of the 5 types of archive pages:
Category Archive
Author Archive
Search Results
Tag Archive
Date-based Archive
Just like Home Page, you can choose the options for each archive page:
Sidebar Layout
Posts Layout
Number of Posts displayed Per Page
Post Meta – You can choose which post meta to show in posts archive.
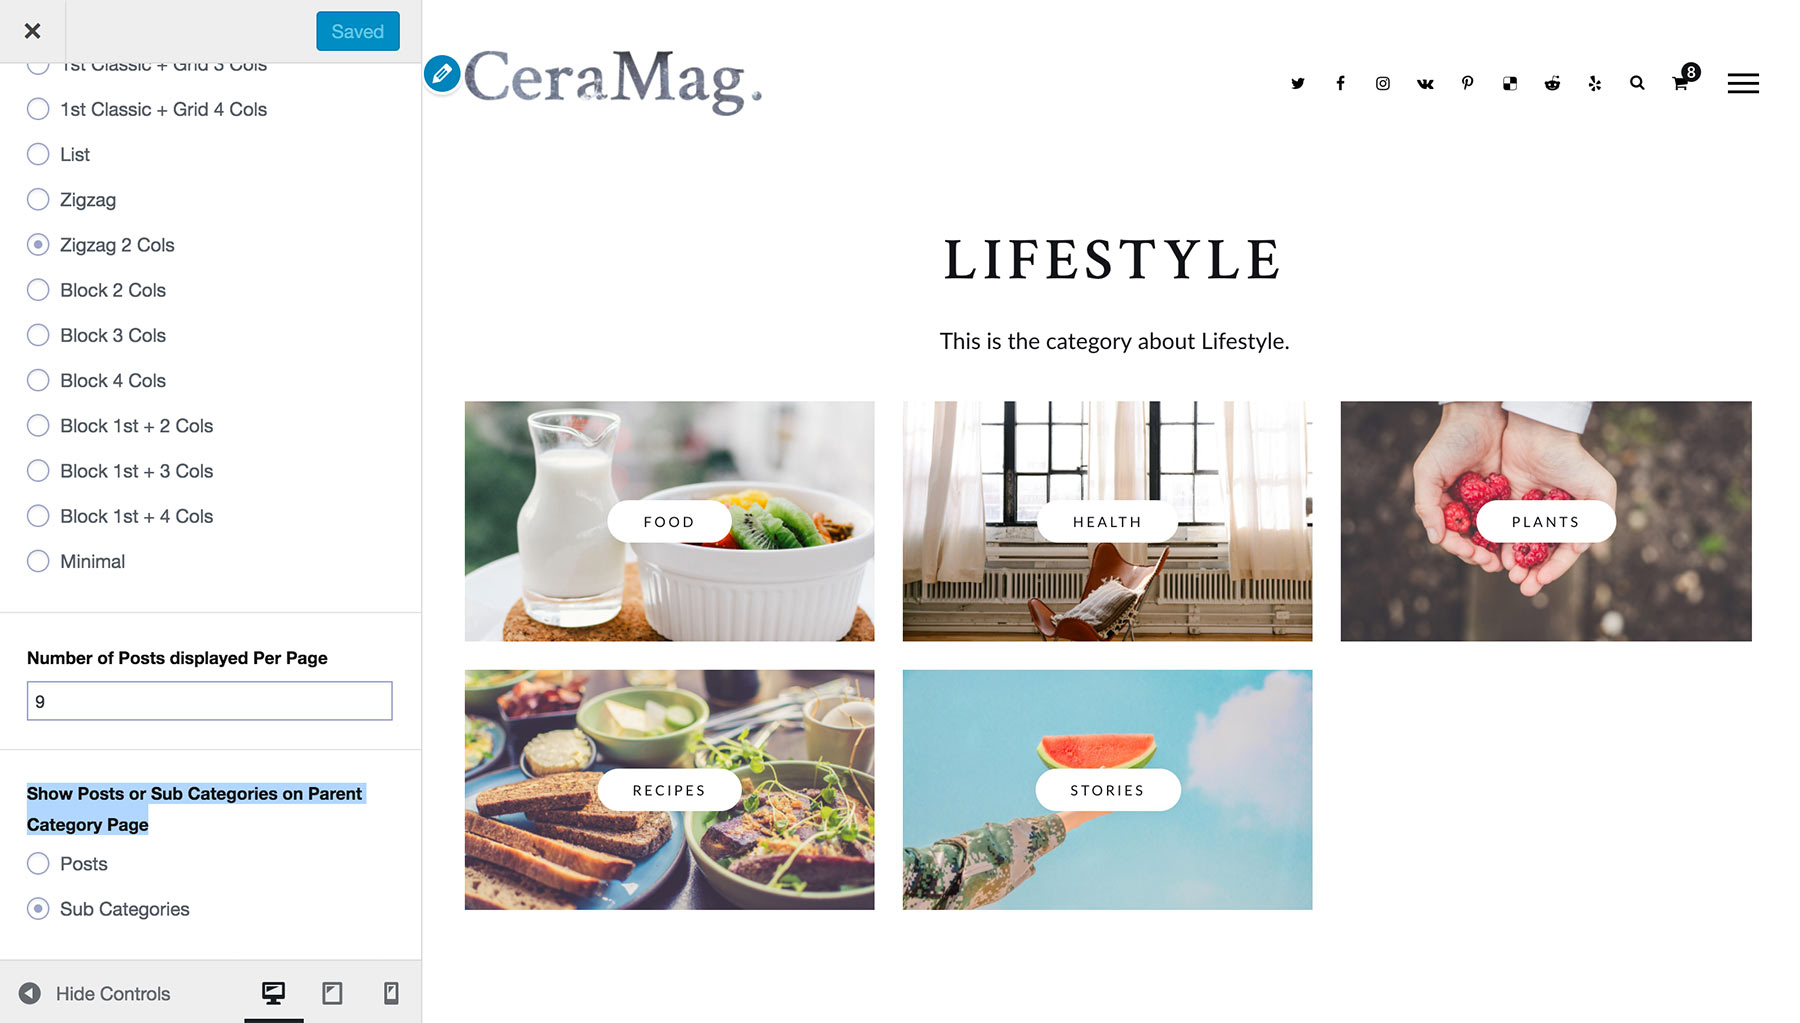
Example: Customize Archive - Category Page
Show subcategories on parent category page
Since v1.1.5, you can choose to show subcategories instead of posts on parent category page. In the Customizer,
go to Archive Pages > Category, you will see the option at the bottom of the panel:
Show Posts or Sub Categories on Parent Category Page
7.8 Single Post
In this section you can control single post default template, and show or hide some elements on single post.
Default Sidebar Layout – No Sidebar / Left Sidebar / Right Sidebar.
You can change each post's template while editing it (click here to know details).
Default Header Style – Large / Normal.
You can change each post's header style while editing it.
Show featured image's caption in post header
Enable Sticky Post Nav on top – Tick it to show a sticky post nav bar on top of single post page while scrolling and reading post content.
Please note: it only works when screen width is larger than 600px on laptop/desktop devices. So it
doesn't work on mobile devices.
Post Nav Color Scheme – Light / Dark
Display Selected Post Meta – Tick to show selected post meta items in single post header.
Show Author Photo in Post Header – If choose to show "Author" meta in post header, this option will show. Tick it to show the author's gravatar picture in the post header. To add/edit the author's gravatar piciture please
visit this page.
Enable Post Like & Share – Check to show post like button and social share buttons.
Post Like & Share Position – By Post Side / After Post.
Select which to show – Check to show those social medias.
Display Post Pagination – Check to show the Post Pagination.
Display Author Info – Check to show the author info box after single post content. Please note: to show the author info box, the author's biographical info should have some content.
Related Posts
Display Related Posts – Check to show related posts. Related posts will be randomised each time refresh the page, and will show at most 4 posts.
Related Posts Title – Give a title of the related posts section.
Pick Posts by – By Category / By Tag.
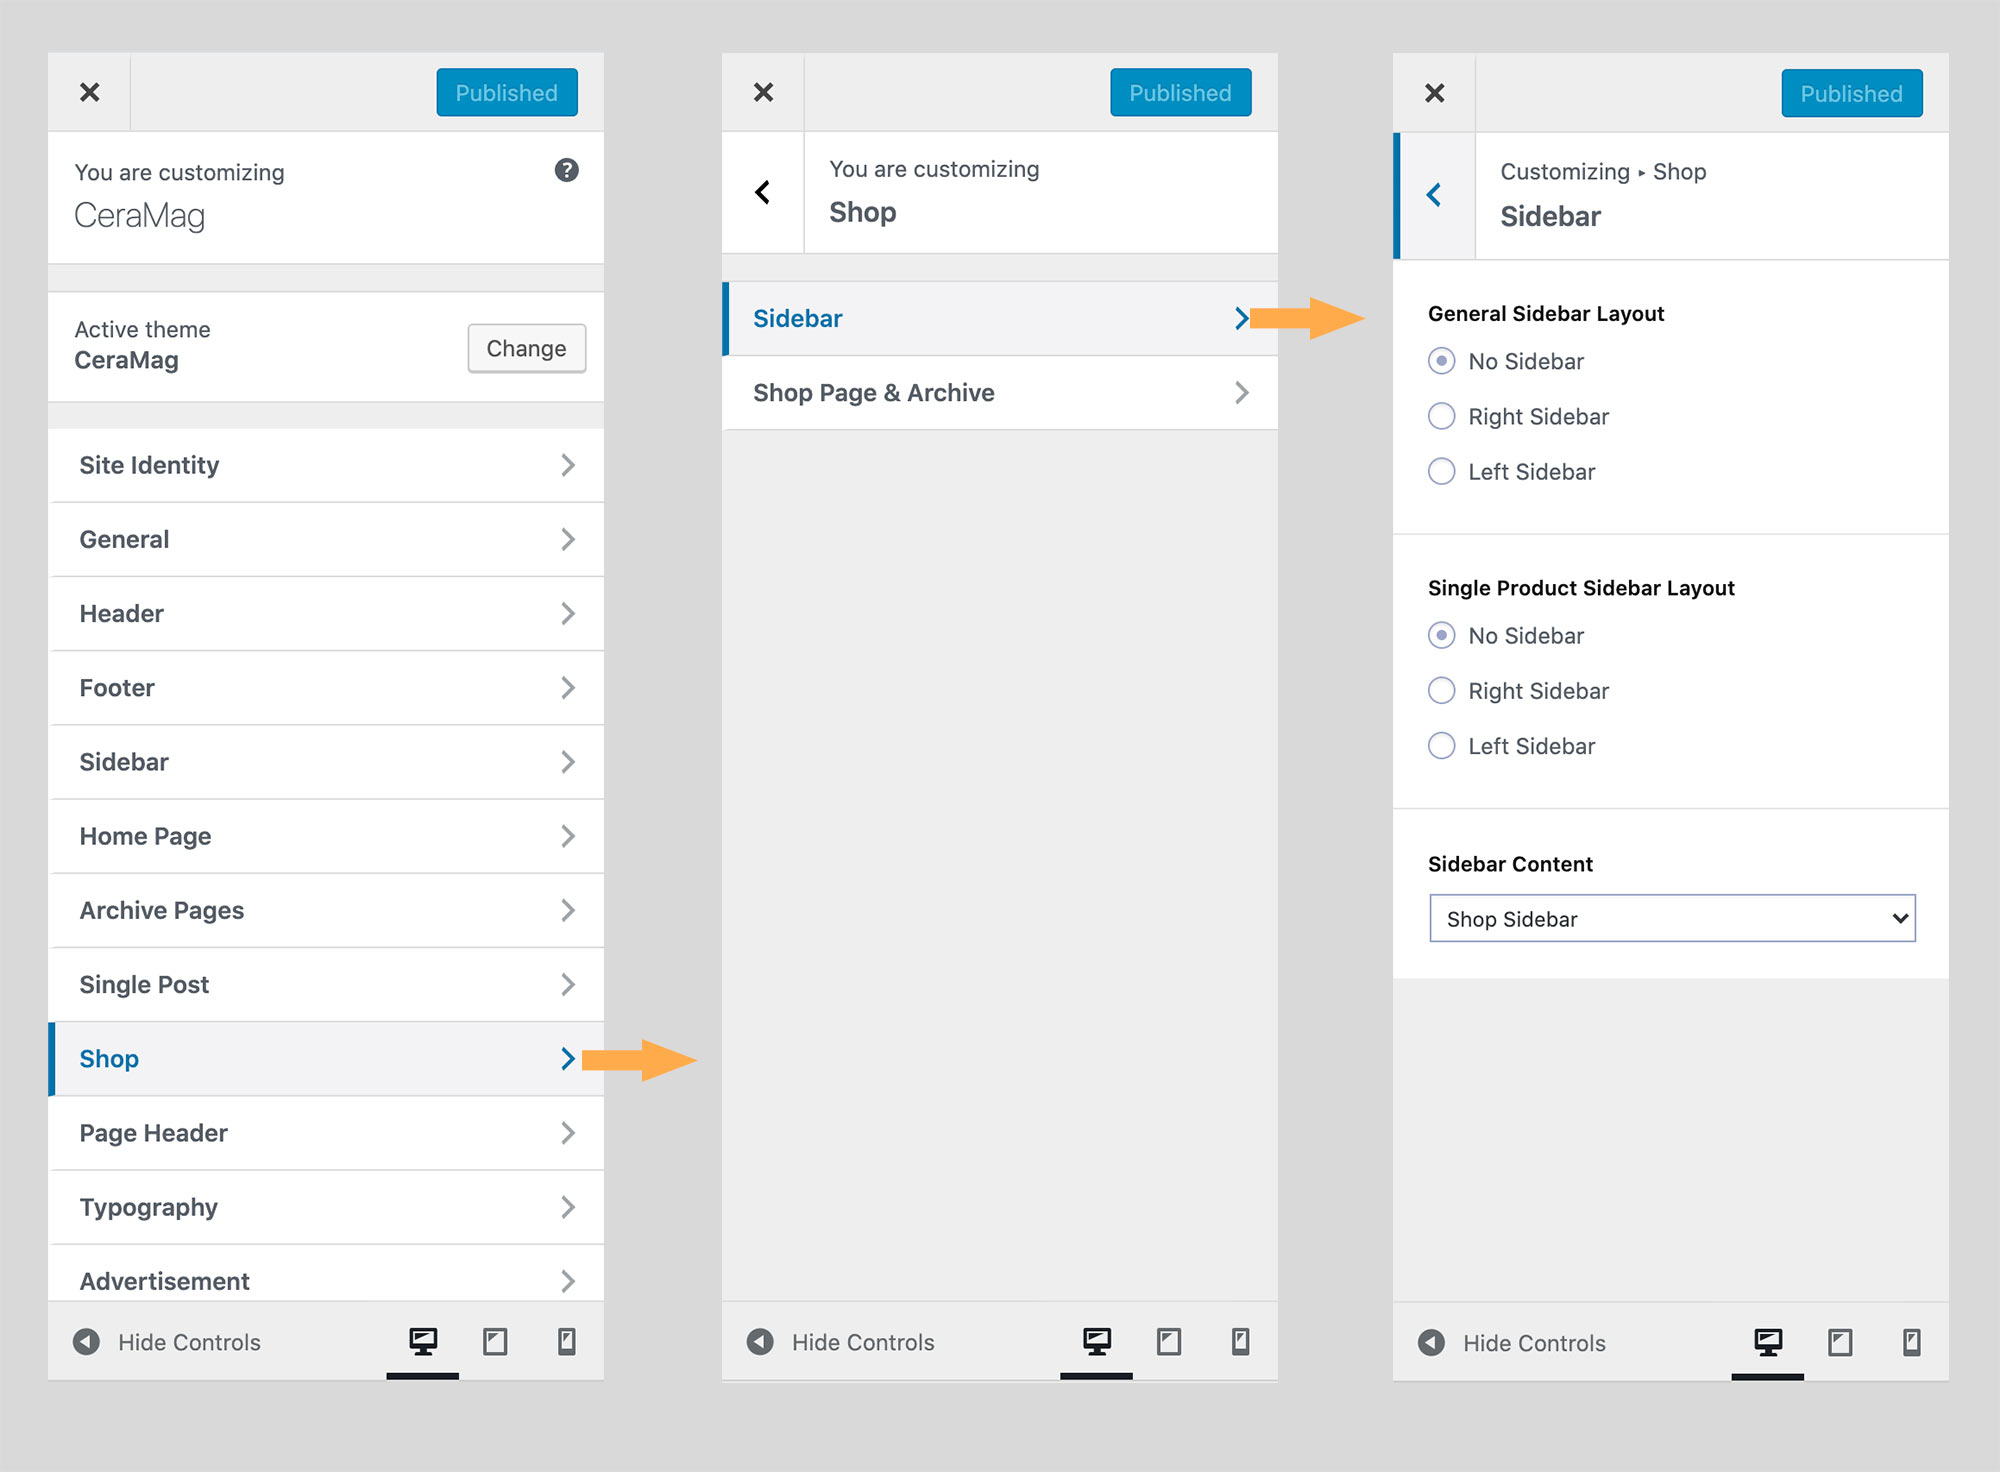
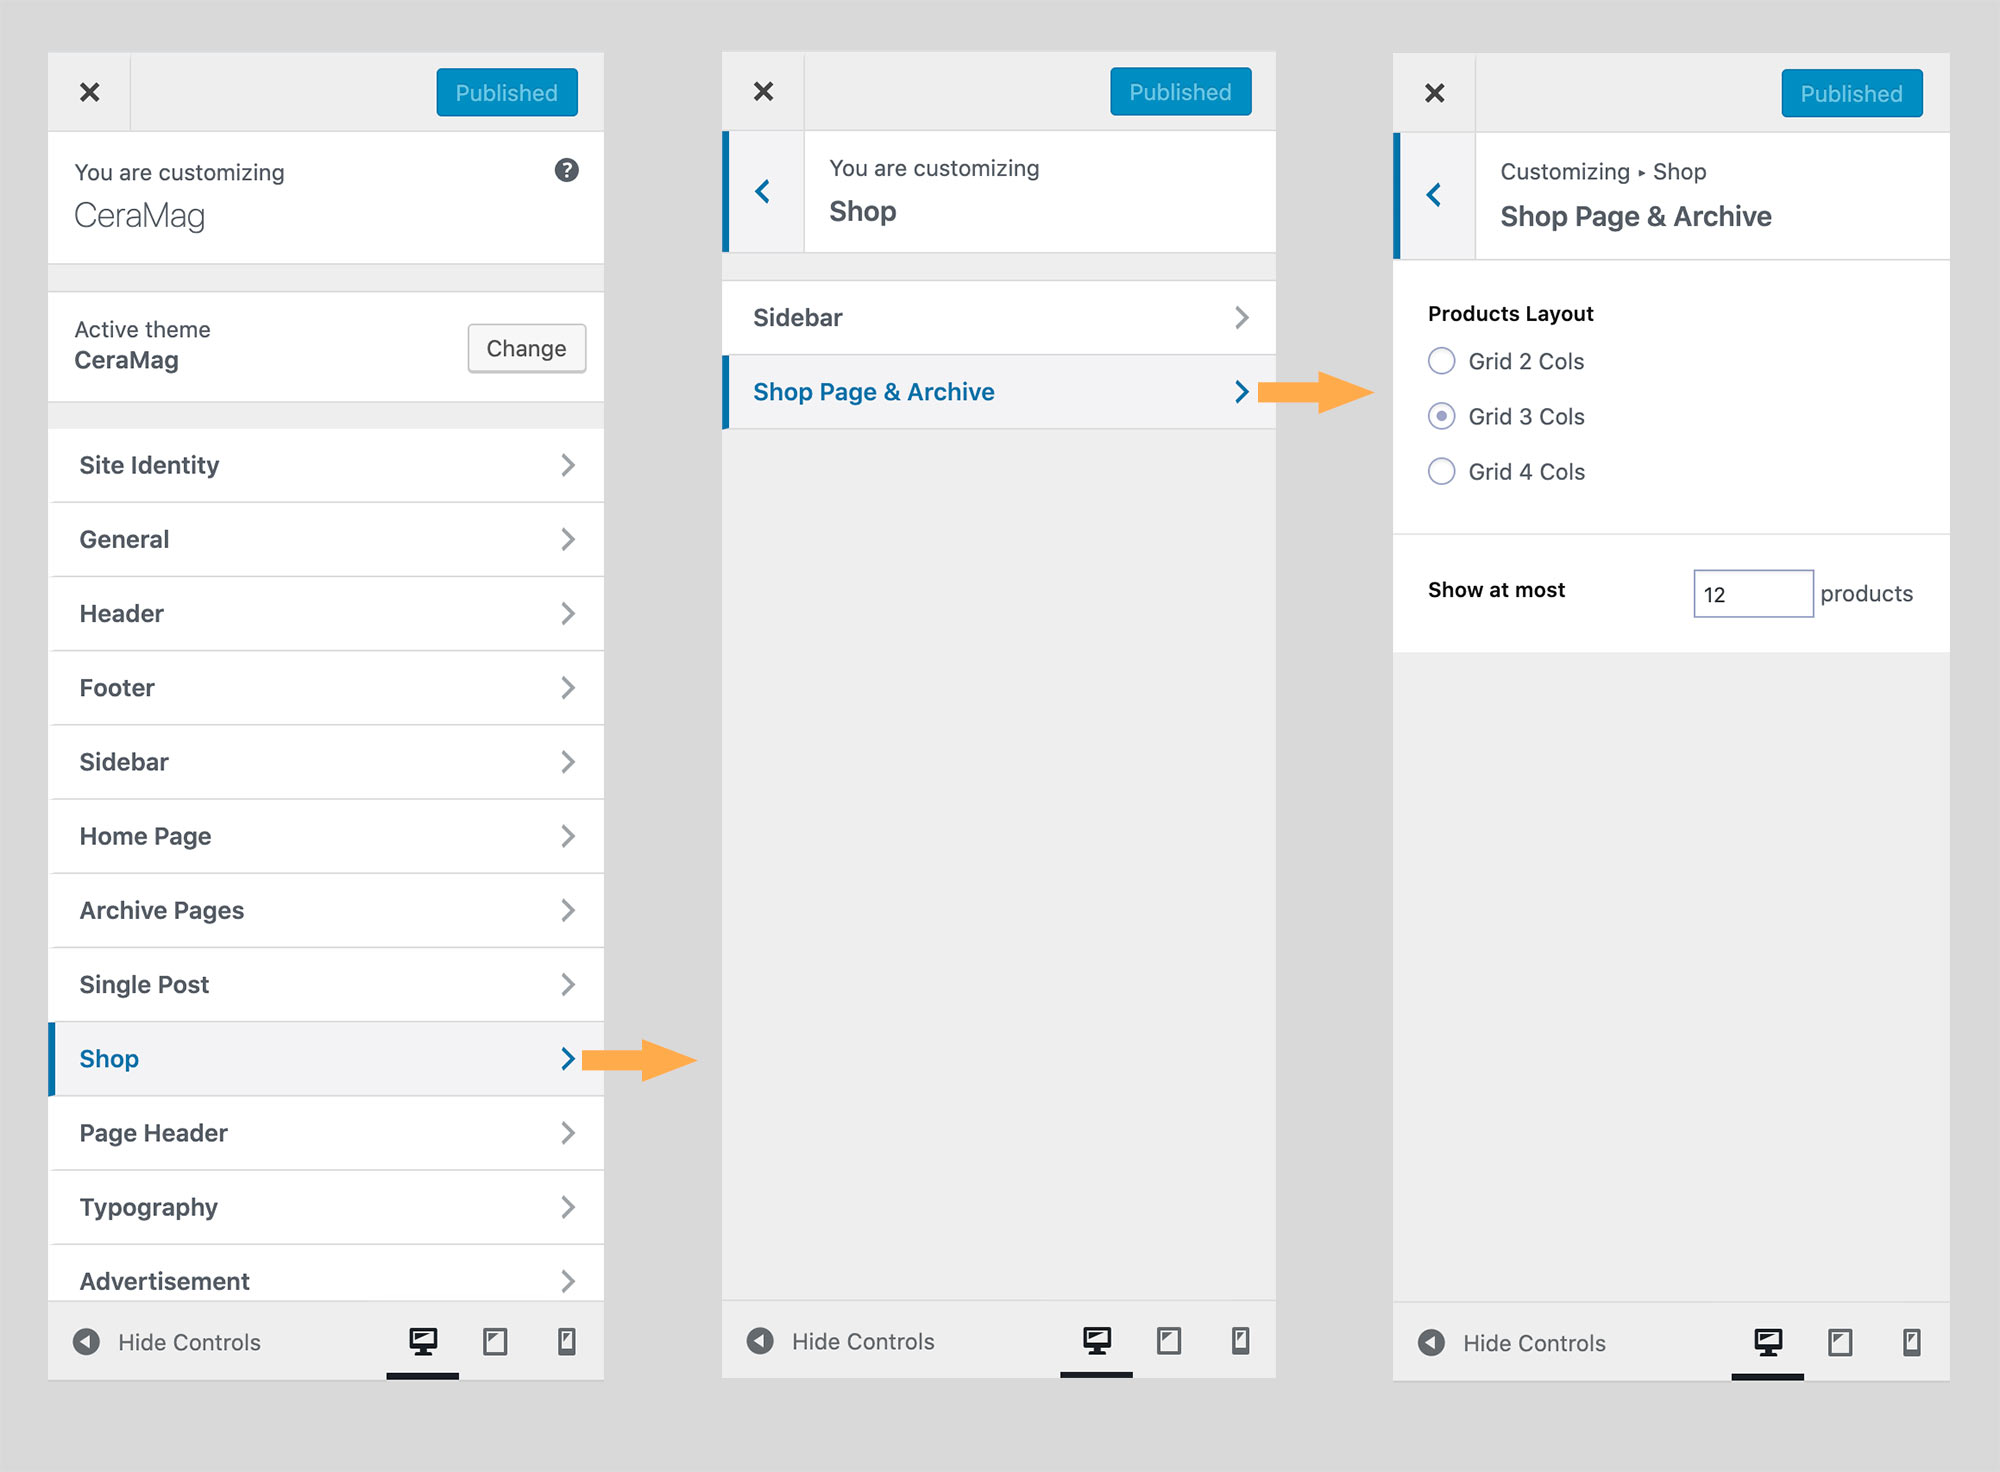
7.9 Shop
In this section you will be able to style your WooCommerce shop pages (New feature since v1.1).
Sidebar – Set sidebar layout for shop page & single product page, and also choose which sidebar to display.
Customize sidebar layout for shop page & single product page
General Sidebar Layout – No Sidebar / Left Sidebar / Right Sidebar.
It controls sidebar layout for your shop archive pages: Shop page, category archives, tag archives, search archive.
Single Product Sidebar Layout – No Sidebar / Left Sidebar / Right Sidebar.
Sidebar Content – Main Sidebar / Shop Sidebar. If choose Shop Sidebar then you can
add shop related widgets to this sidebar and only display those widgets on shop pages.
Shop Page & Archive – Controls styles of shop index page and archive pages.
Customize Products Layout for shop index page and archive page
Products Layout - There are 3 layouts:
Grid 2 Cols
Grid 3 Cols
Grid 4 Cols
Show at most x products – Enter a number to decide how many products show per page.
7.10 Typography
In this section you will be able to set font options for text.
7.10.1 Font Family
Options in this sub section will work for the whole site. You can choose 2 different fonts for different types of text. All 800+ Google Fonts are included in the drop down lists.
Primary Font Family – It’s the font family for the main text content: Page/post content and title, widgets text, and more.
Secondary Font Family – This font will be used for: Widgets title, navigation items in site header, posts categories, author name and publish date of posts/comments, and more.
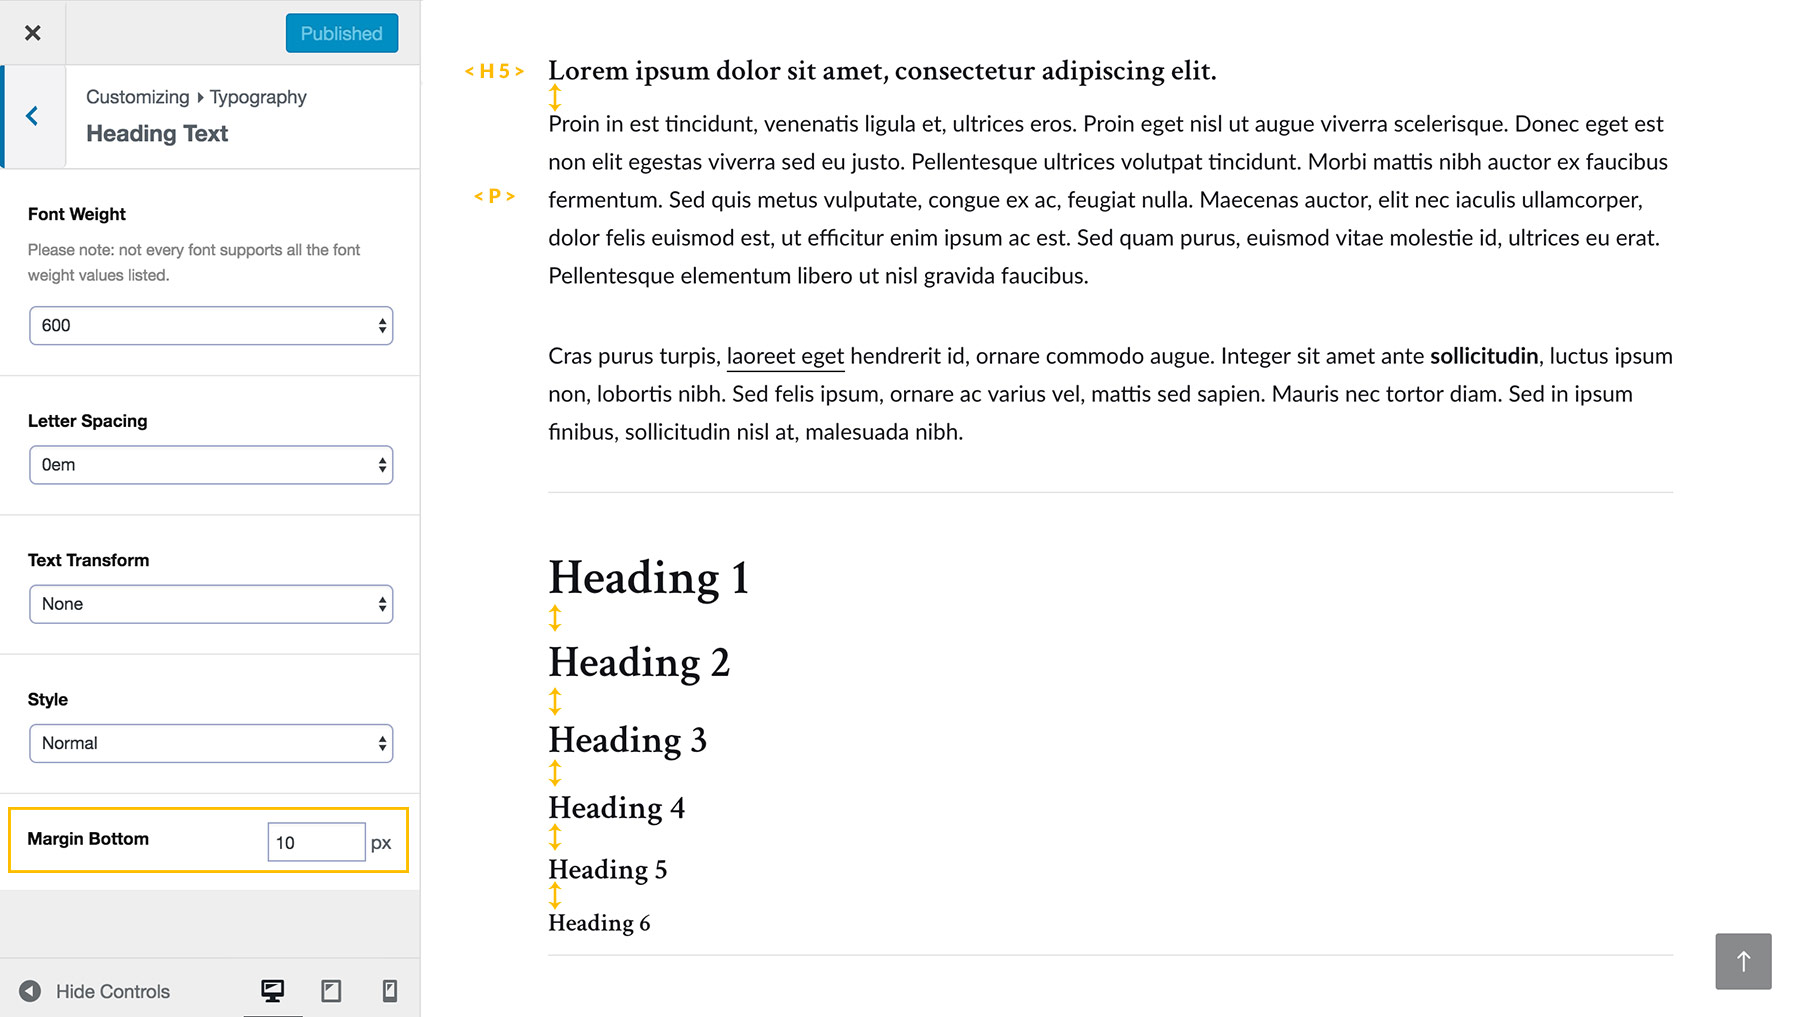
7.10.2 Heading Text
In this sub section you can tweak page/post content text style for Heading Text. H1 to H6 heading in page/post content. Options including:
Font Weight
Letter Spacing
Text Transform
Style
Margin Bottom – Change the bottom space value of Heading Text (H1 to H6) in post/page content. This is a new feature added in v1.1.8.
Heading Colors
Heading Sizes
Change the bottom space value of Heading Text in post/page content
7.10.3 Content Text
Font Size
Line Height
7.10.4 Post Title
In this sub section you are going to set font style for post title. Options including:
Font Weight
Letter Spacing
Text Transform
Style
And you can tweak these 2 options of post title for Large Post Header separately:
Letter Spacing
Text Transform
7.10.5 Page Title
In this sub section you are going to set font style for single page title. Options including:
Font Weight
Letter Spacing
Text Transform
Style
7.10.6 Widget Title
Options including:
Font Weight
Letter Spacing
Text Transform
Style
7.10.7 Menu
In this section you can tweak the font of your site primary menu in site header.
Please note: The settings will not be applied to the dropdown/sub/mega menus.
Options including:
Font Size
Font Weight
Letter Spacing
Text Transform
7.10.8 Site Title and Tagline
In this section you can tweak the font of the site title and tagline.
Options including:
Font Size
Font Weight
Line Height
Letter Spacing
7.10.9 Other Text
In this section you can tweak the font size for more text.
Options including:
Post Excerpt Font Size
Classic Post Excerpt Font Size
Post Meta Font Size
7.11 Advertisement
In this section you will be able to add advertisement to your site. Currently there is only one Ad area: Site Top. More to come soon.
There are 2 options of Ad source:
Custom Banner – Choose this option, then you can upload a custom banner image, set banner width, enter ad URL and choose to open the link in the current tab or a new tab.
Embed Code – Choose this option, then you can add the ad code. For example, ad code of Google AdSense.
7.12 Advanced
Currently there is only one option in this panel:
Synchronize the data of post views from JetPack to your website
When Jetpack is installed on your site and connected to a WordPress.com User ID, you can choose to synchronize
the data of post views from JetPack to your website. Once the data is synchronized, our theme will use the data as a start number of post views
for posts on your site. Then you can choose to deactivate JetPack if you don't need it. The post views will still count up without
JetPack plugin.
This feature will be useful if your site content is being imported from an old wordpress.com site,
or you have been using JetPack plugin on your site for a while, and would like to match the post views stats.
Please note:
The Advanced section only appears when Jetpack is installed on your site and connected to a WordPress.com User ID.
It can take a couple of minutes to sync data. It depends on the number of posts you have and your internet speed.
Due to variations in internet connection speeds from different internet service providers and differences in overall reliability
and stability of connections, you may encounter a sync error when nothing is actually wrong. We recommend waiting and trying again either in
a few hours or the next day.
JetPack only counts up post views while it's being used on your site. If you deactivate the JetPack plugin after syncing your data, then reactivate the JetPack after some time and then click the "Start Sync" button again,
the post views on your site may decrease because the JetPack's data stays on the last time it was activated.
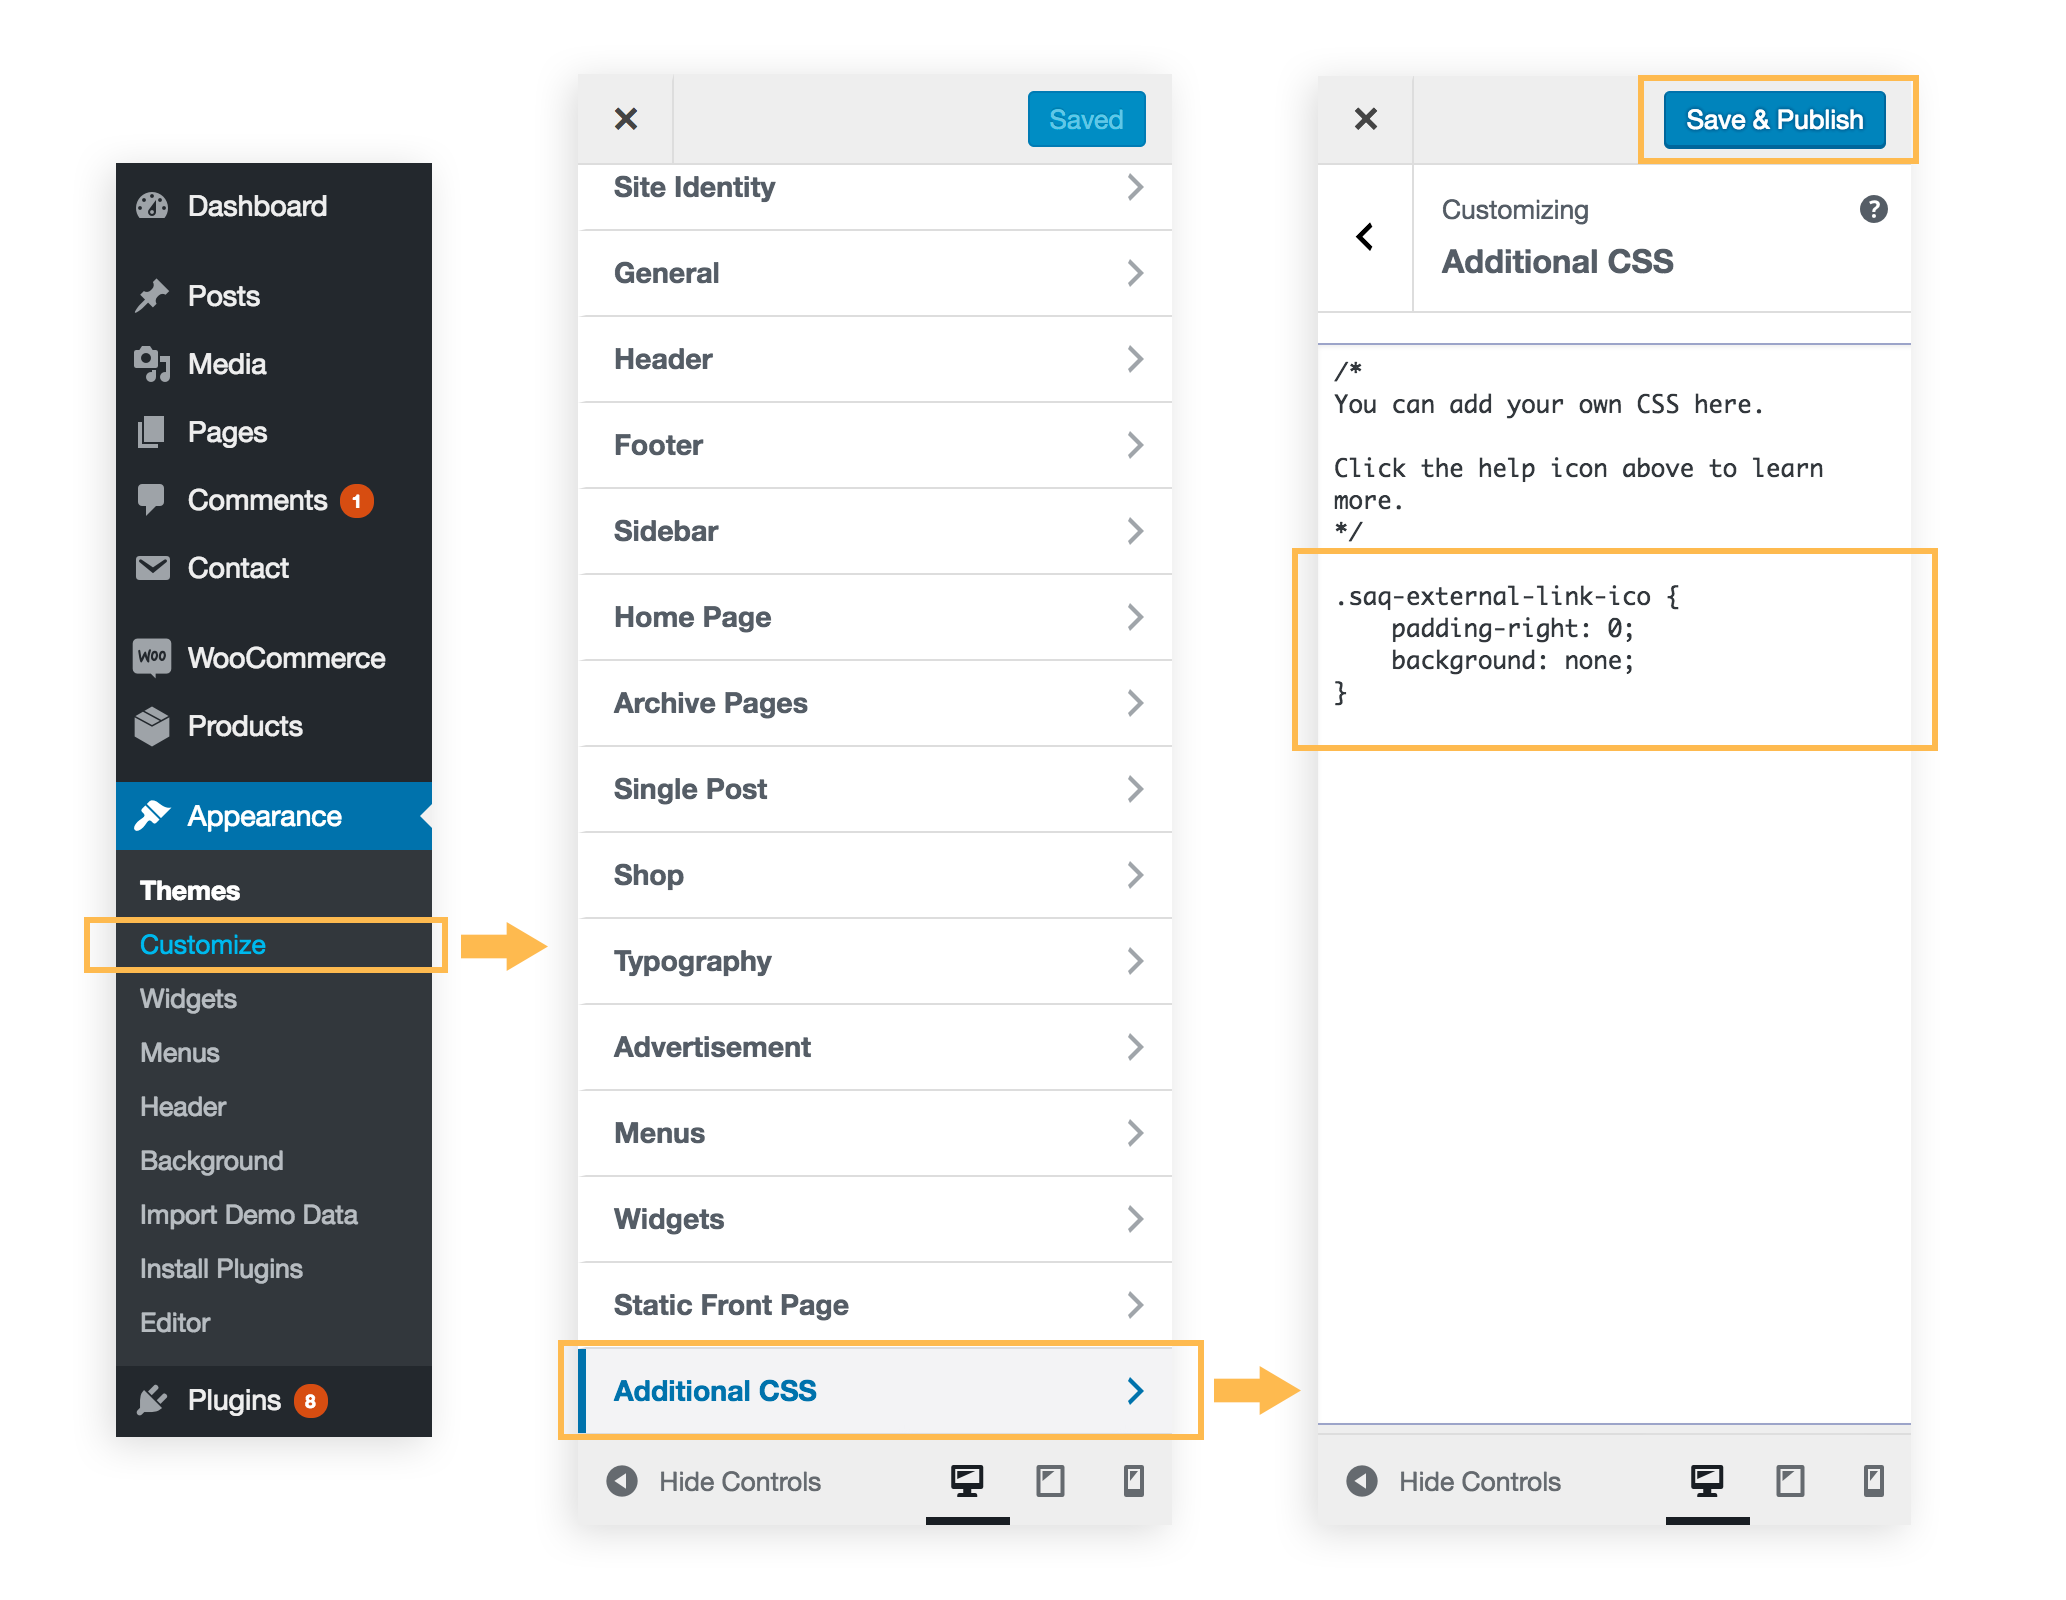
7.13 Additional CSS
Sometimes you might like to add some custom CSS to your site to personalize some elements' styles. In the customizer,
please locate to Additional CSS sub section and add your custom CSS code. Like the example showing in the screenshot below:
Add custom CSS to your site
This is a default feature of WordPress since WordPress v4.7. If you can’t find Additional CSS sub section in your
customizer, then it means your WordPress version is lower than 4.7, please update your WordPress to the latest version.
7.14 Instagram
When using CeraMag theme, you can display your Instagram feed on your website: in site footer as a fullwidth section, or in a widget area (sidebar, or a footer column) by
adding the custom widget "CeraMag Instagram".
Set up your Instagram
Before June 2020: For most users, there is no need to add the Instagram Access Token to display the Instagram feed on the website.
Only a few users need to add the Instagram Access Token because of a connection problem between their websites and Instagram.
Since June 2020 However, starting in June 2020, Instagram made changes AGAIN, and the old API will be deprecated at the end of June 2020. The new Instagram API is currently enabled.
Because of these changes, from June 2020, it is required to add the Instagram Access Token to connect your website with your Instagram account before you can display the Instagram feed on your website.
For users who have previously added the token manually in the old way, since you are using the old Instagram API (will be deprecated after June 29, 2020), so please follow the steps below to reconnect your Instagram account.
Please follow the steps below to connect your website with your Instagram account:
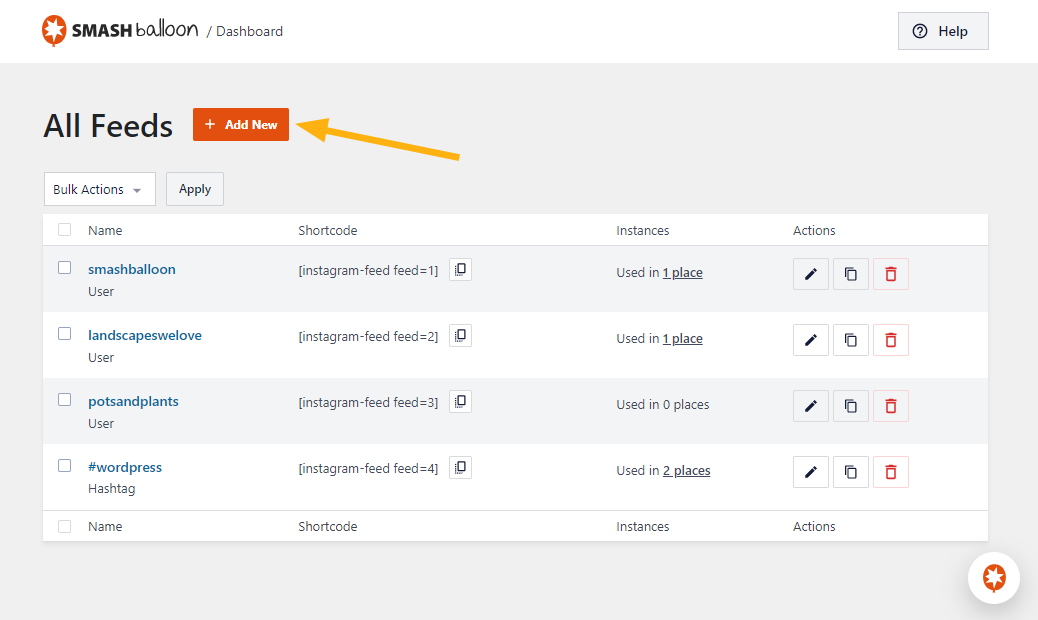
Install the bridge plugin we made: "LoftOcean Instagram": Please click the plugin download link, and then install and activate this plugin on your website.
Connect your website with your Instagram account. Please go to your WordPress dashboard, find "Instagram Feed" in the sidebar. Then please click on the Add New button (as shown in the screenshot below) to connect your website with your Instagram account.
After clicking the button, please follow the instructions displayed to operate. It will guide you connect your Instagram account and create a new feed.
Connect your website with your Instagram account, and create new feeds (Smash Balloon v6.x updated interface).
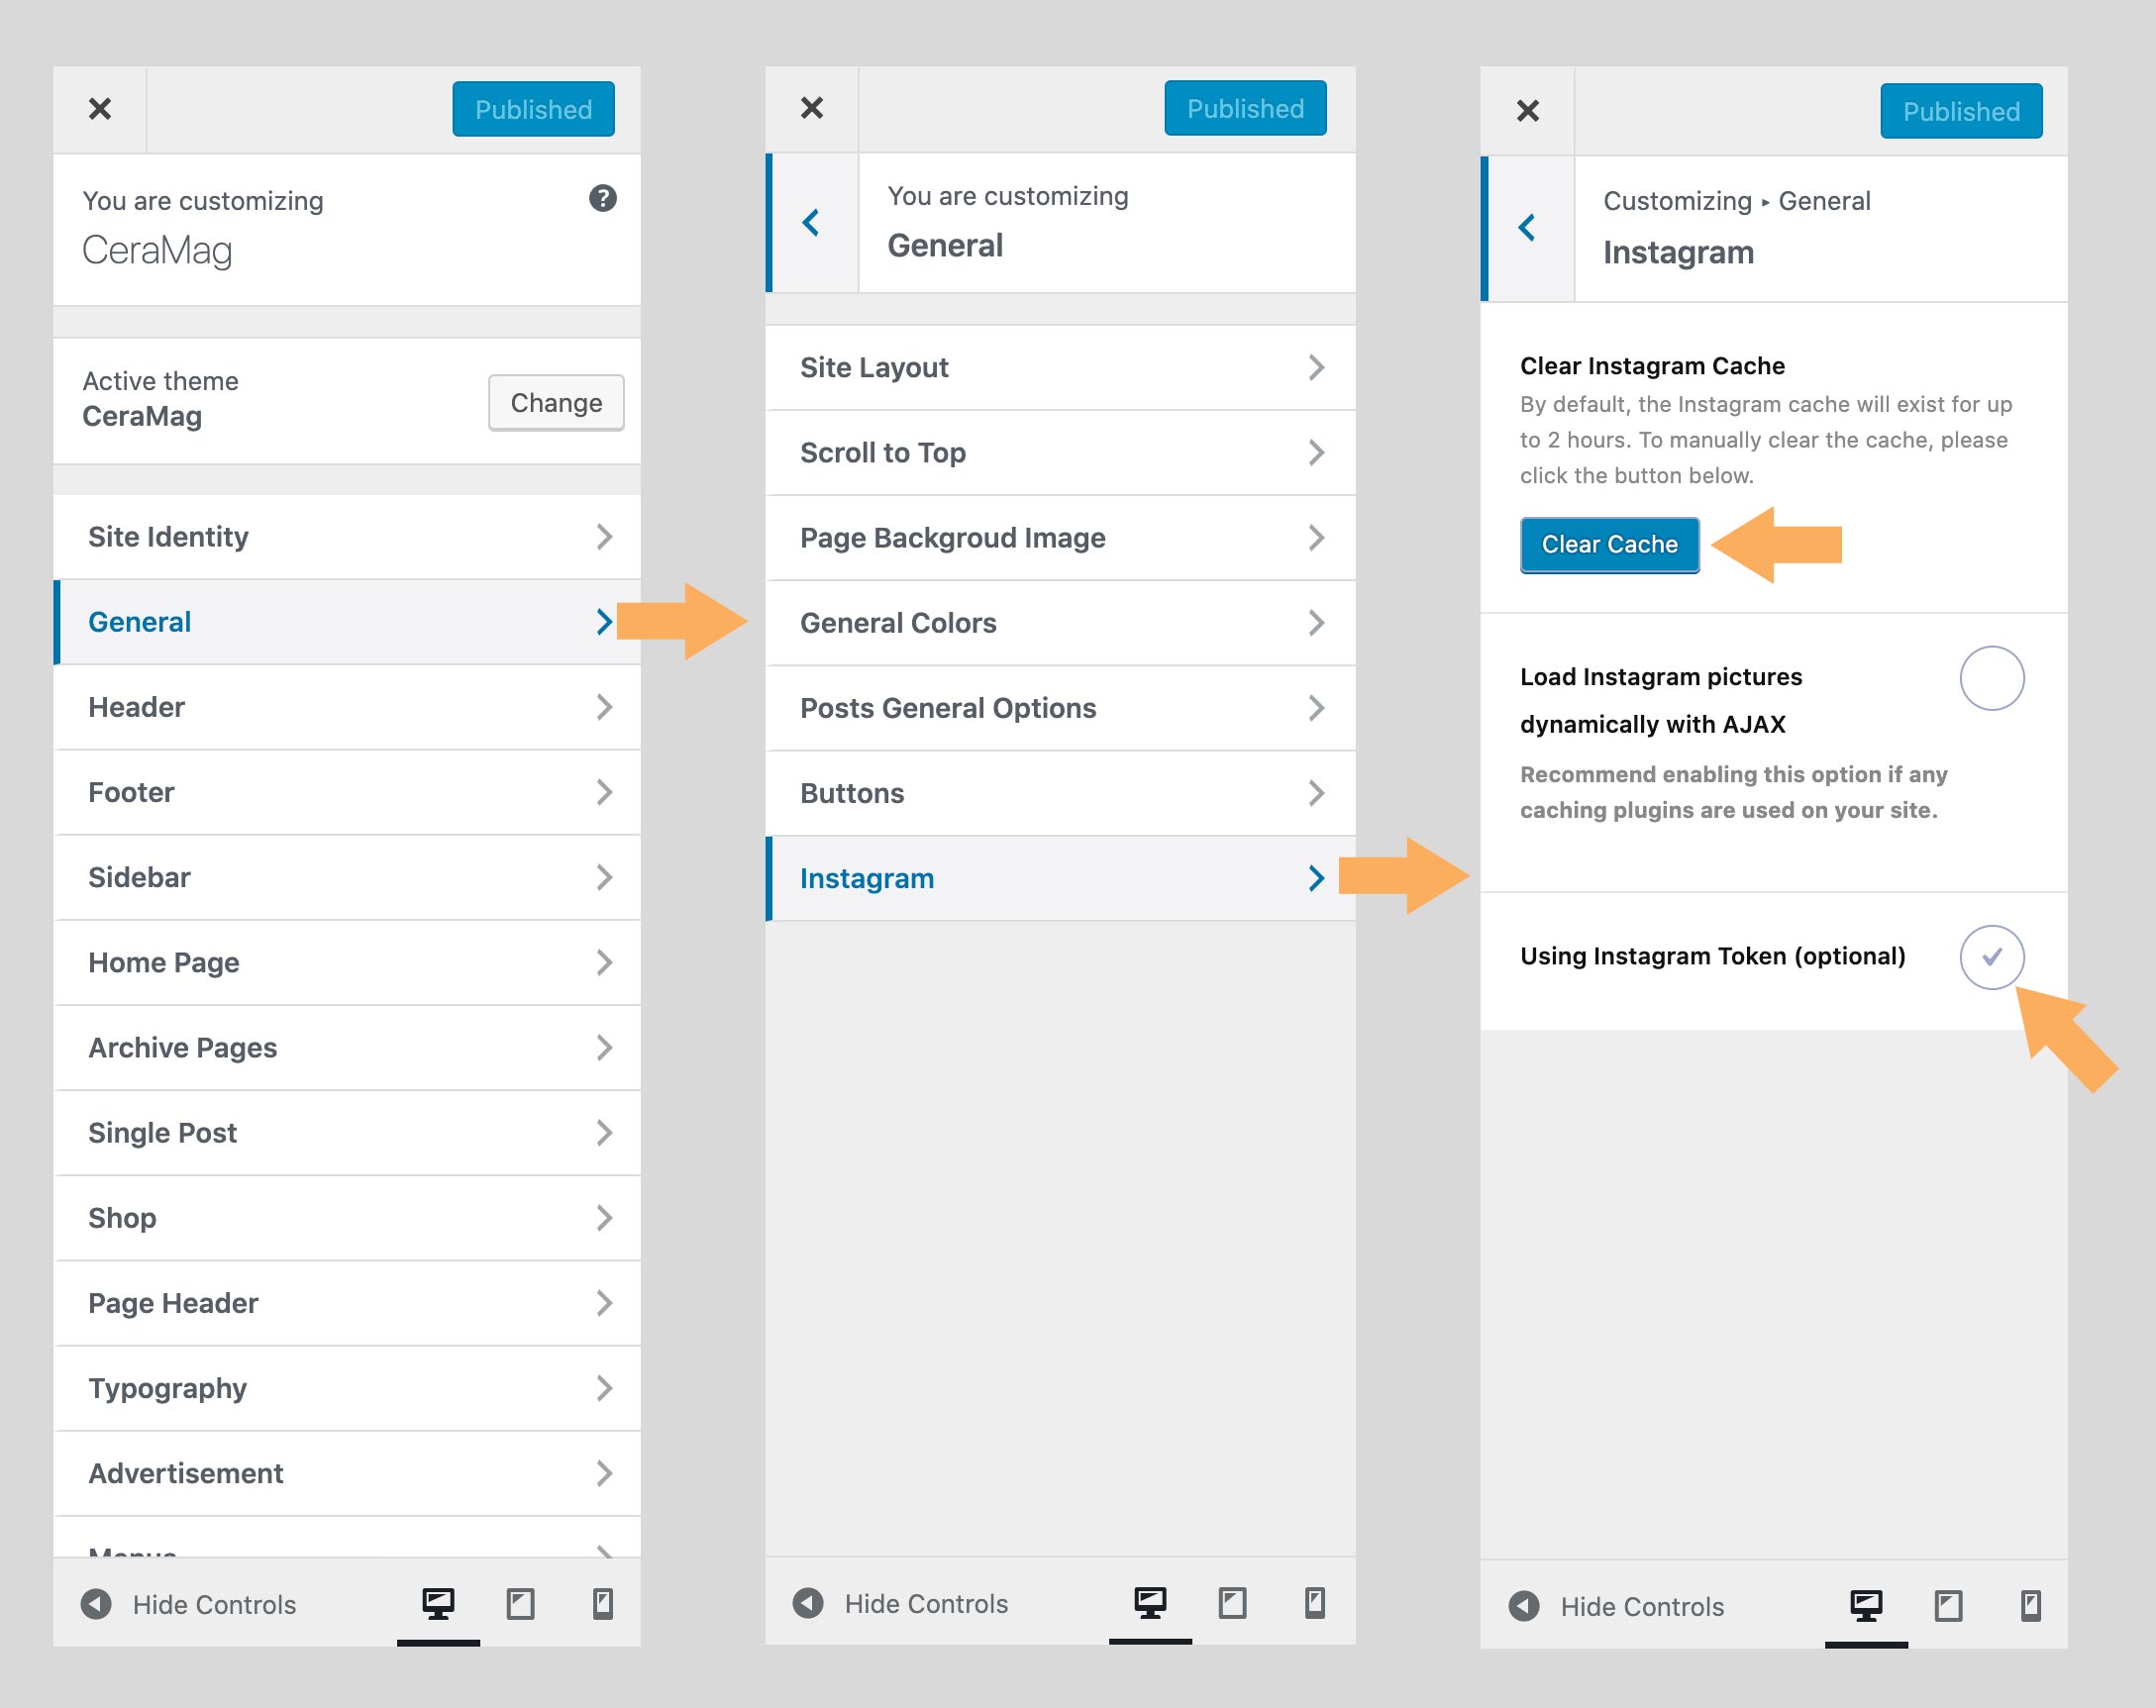
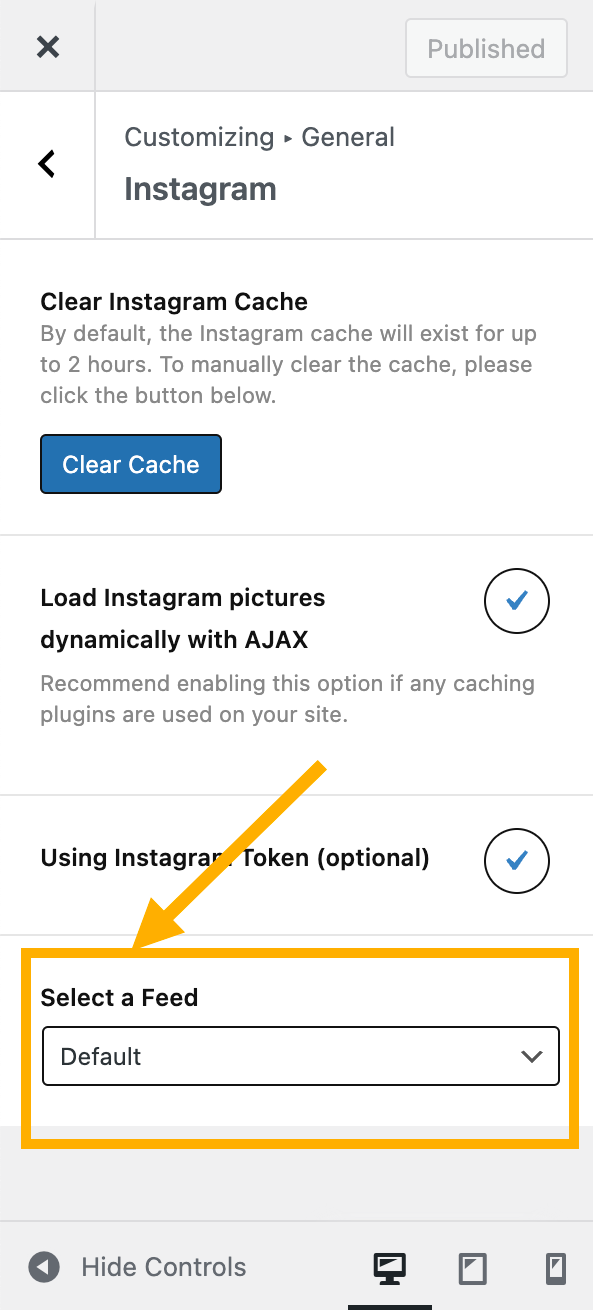
Enable an option in your Customizer: Please open your WordPress customizer, then go to "General" > "Instagram" > find "Using Instagram Token" option, tick the box, and save the changes. After that,
please click on the "Clear Cache" button.
Enable an option in your Customizer.
Select one of the feeds you created.Select one of the feeds you created
Done. Please keep these two plugins installed and activated. And please make sure your Instagram account is public.
Please note: After connecting your website to your Instagram account, you can only display the Instagram feed from the linked Instagram account.
"Why do I need to install these two plugins?"
Since Instagram API made changes frequently, we use this third party plugin "Smash Balloon Social Photo Feed" to manage Instagram Token.
This is a plugin specifically made for Instagram feed, which is stable and frequently updated.
Bridge plugin "LoftOcean Instagram": This is a bridge plugin. After activating this plugin, the CeraMag theme can work with the "Smash Balloon Social Photo Feed" plugin,
so your Instagram feed can be displayed in the theme’s built-in locations (sidebar and footer), with the style set by the theme.
After connecting your website with your Instagram account, you can display your Instagram feed in the site footer, or use a widget to display the feed in the sidebar.
Instagram feed in site footer: Please open your WordPress Customizer, then go to "Footer" > find "Instagram" options. Enable the option and the Instagram feed will be displayed in the
site footer. Please check this chapter for more details.
Instagram feed in widget areas (sidebar, footer widget column): Please use the custom widget "CeraMag Instagram" to display Instagram feed in a widget area.
If you are new to WordPress, you may like to read this tutorial: How to Add and Use Widgets in WordPress.
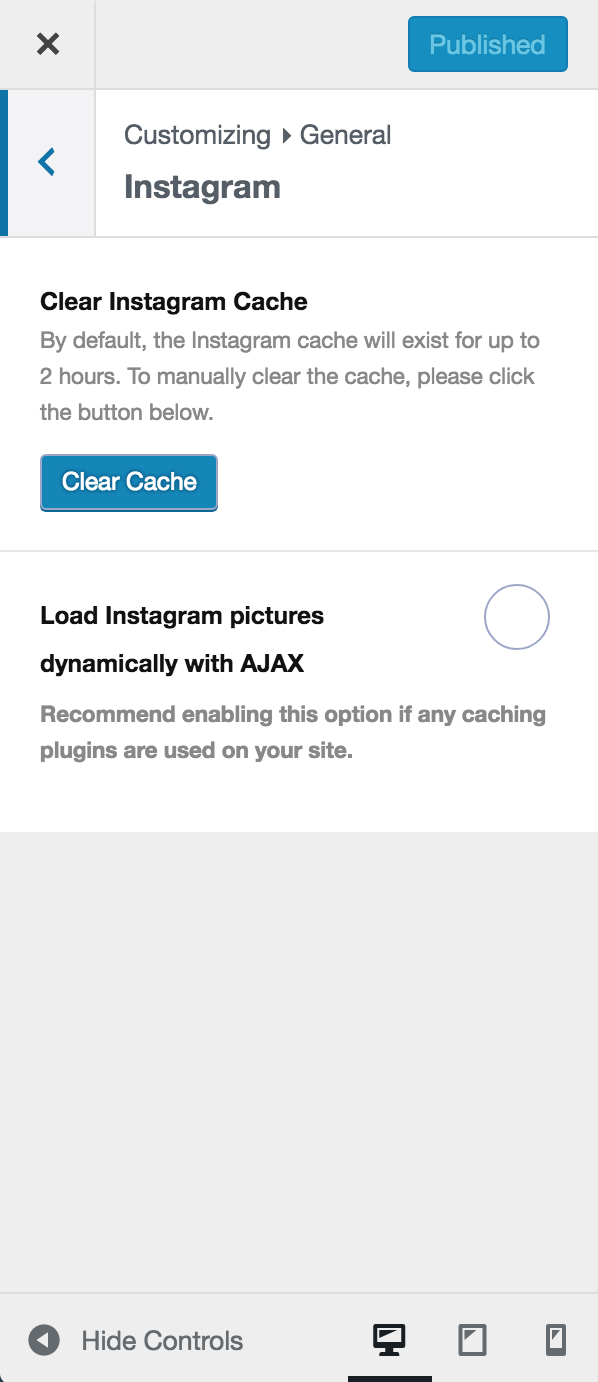
Instagram Cache
By default, the Instagram cache will exist for up to 2 hours, which means that if your Instagram has just added some new photos, those photos will not be shown on your website until the
cache expires. In some cases, you may like to manually clear the cache. Please open your WordPress Customizer, go to General > Instagram,
find the "Clear Instagram Cache" option, and click the "Clear Cache" button.
Please note: this is a new feature added since CeraMag v2.0.
Enable AJAX
If you use any caching plugin on your site, you may find that sometimes your Instagram photos stop updating, especially if you haven't
updated your site content for a while, such as posting a new article. This is because the Instagram feature uses PHP code to render content by default.
When the cache plugin works, the code of the Instagram feature may not run.
To avoid this problem, please open your WordPress Customizer, go to General > Instagram,
find the "Load Instagram pictures dynamically with AJAX" option, tick the box to enable this option.
Please note: this is a new feature added since CeraMag v2.0.
Customizer - General - Instagram
Common Problem with Instagram
Instagram feed cannot be displayed on your website?
Please check by following the steps below:
Please check whether the required plugin "CeraMag Extension" is installed and activated.
If you update the theme, please make sure you also update the required plugin "CeraMag Extension".
Please check if you have enabled the "Instagram" feed in your site footer.
Please make sure your Instagram account is public.
Instagram Cannot Show since October 24, 2020?
This problem is caused by the Instagram API change that happened on October 24, 2020. Unfortunately, this specific change was not mentioned in the Instagram announcement
so we did not prepare for it in advance. We have updated the required plugin "CeraMag Extension" and the bridge plugin "LoftOcean Instagram" to fix this issue.
If this issue happens on your website, you need to remove the old "CeraMag Extension" and "LoftOcean Instagram" from
your website, then download and install the updated ones. Please follow the steps below:
On your website dashboard, please navigate to Plugins > Installed Plugins. Find CeraMag Extension, deactivate it.
Click Delete to delete CeraMag Extension.
Refresh the page.
At the top of the page, you will find this message: "This theme requires the following plugin: CeraMag Extension". Click on Begin installing plugin.
Begin installing plugin
After clicking on "Begin installing plugin" link, it will go to "Install Required Plugins" page
(or you can get to that page via Appreance > Install Plugins),
then click on Install link below "CeraMag Extension".
Then activate "CeraMag Extension".
On your website dashboard, please navigate to Plugins > Installed Plugins. Find LoftOcean Instagram, deactivate it and then delete it.
Please click the plugin download link, and then install and activate "LoftOcean Instagram" on your website.
7.15 Font Awesome Icons
CeraMag theme uses the most popular icon font toolkit Font Awesome to display social media icons. When CeraMag first released,
we used Font Awesome v4.7. But there are some new social icons are not included in this version. Therefore, we provide a new feature to allow users to
choose to upgrade to Font Awesome v5.x to show new social icons, for example, Google Play, Patreon, TikTok, etc.
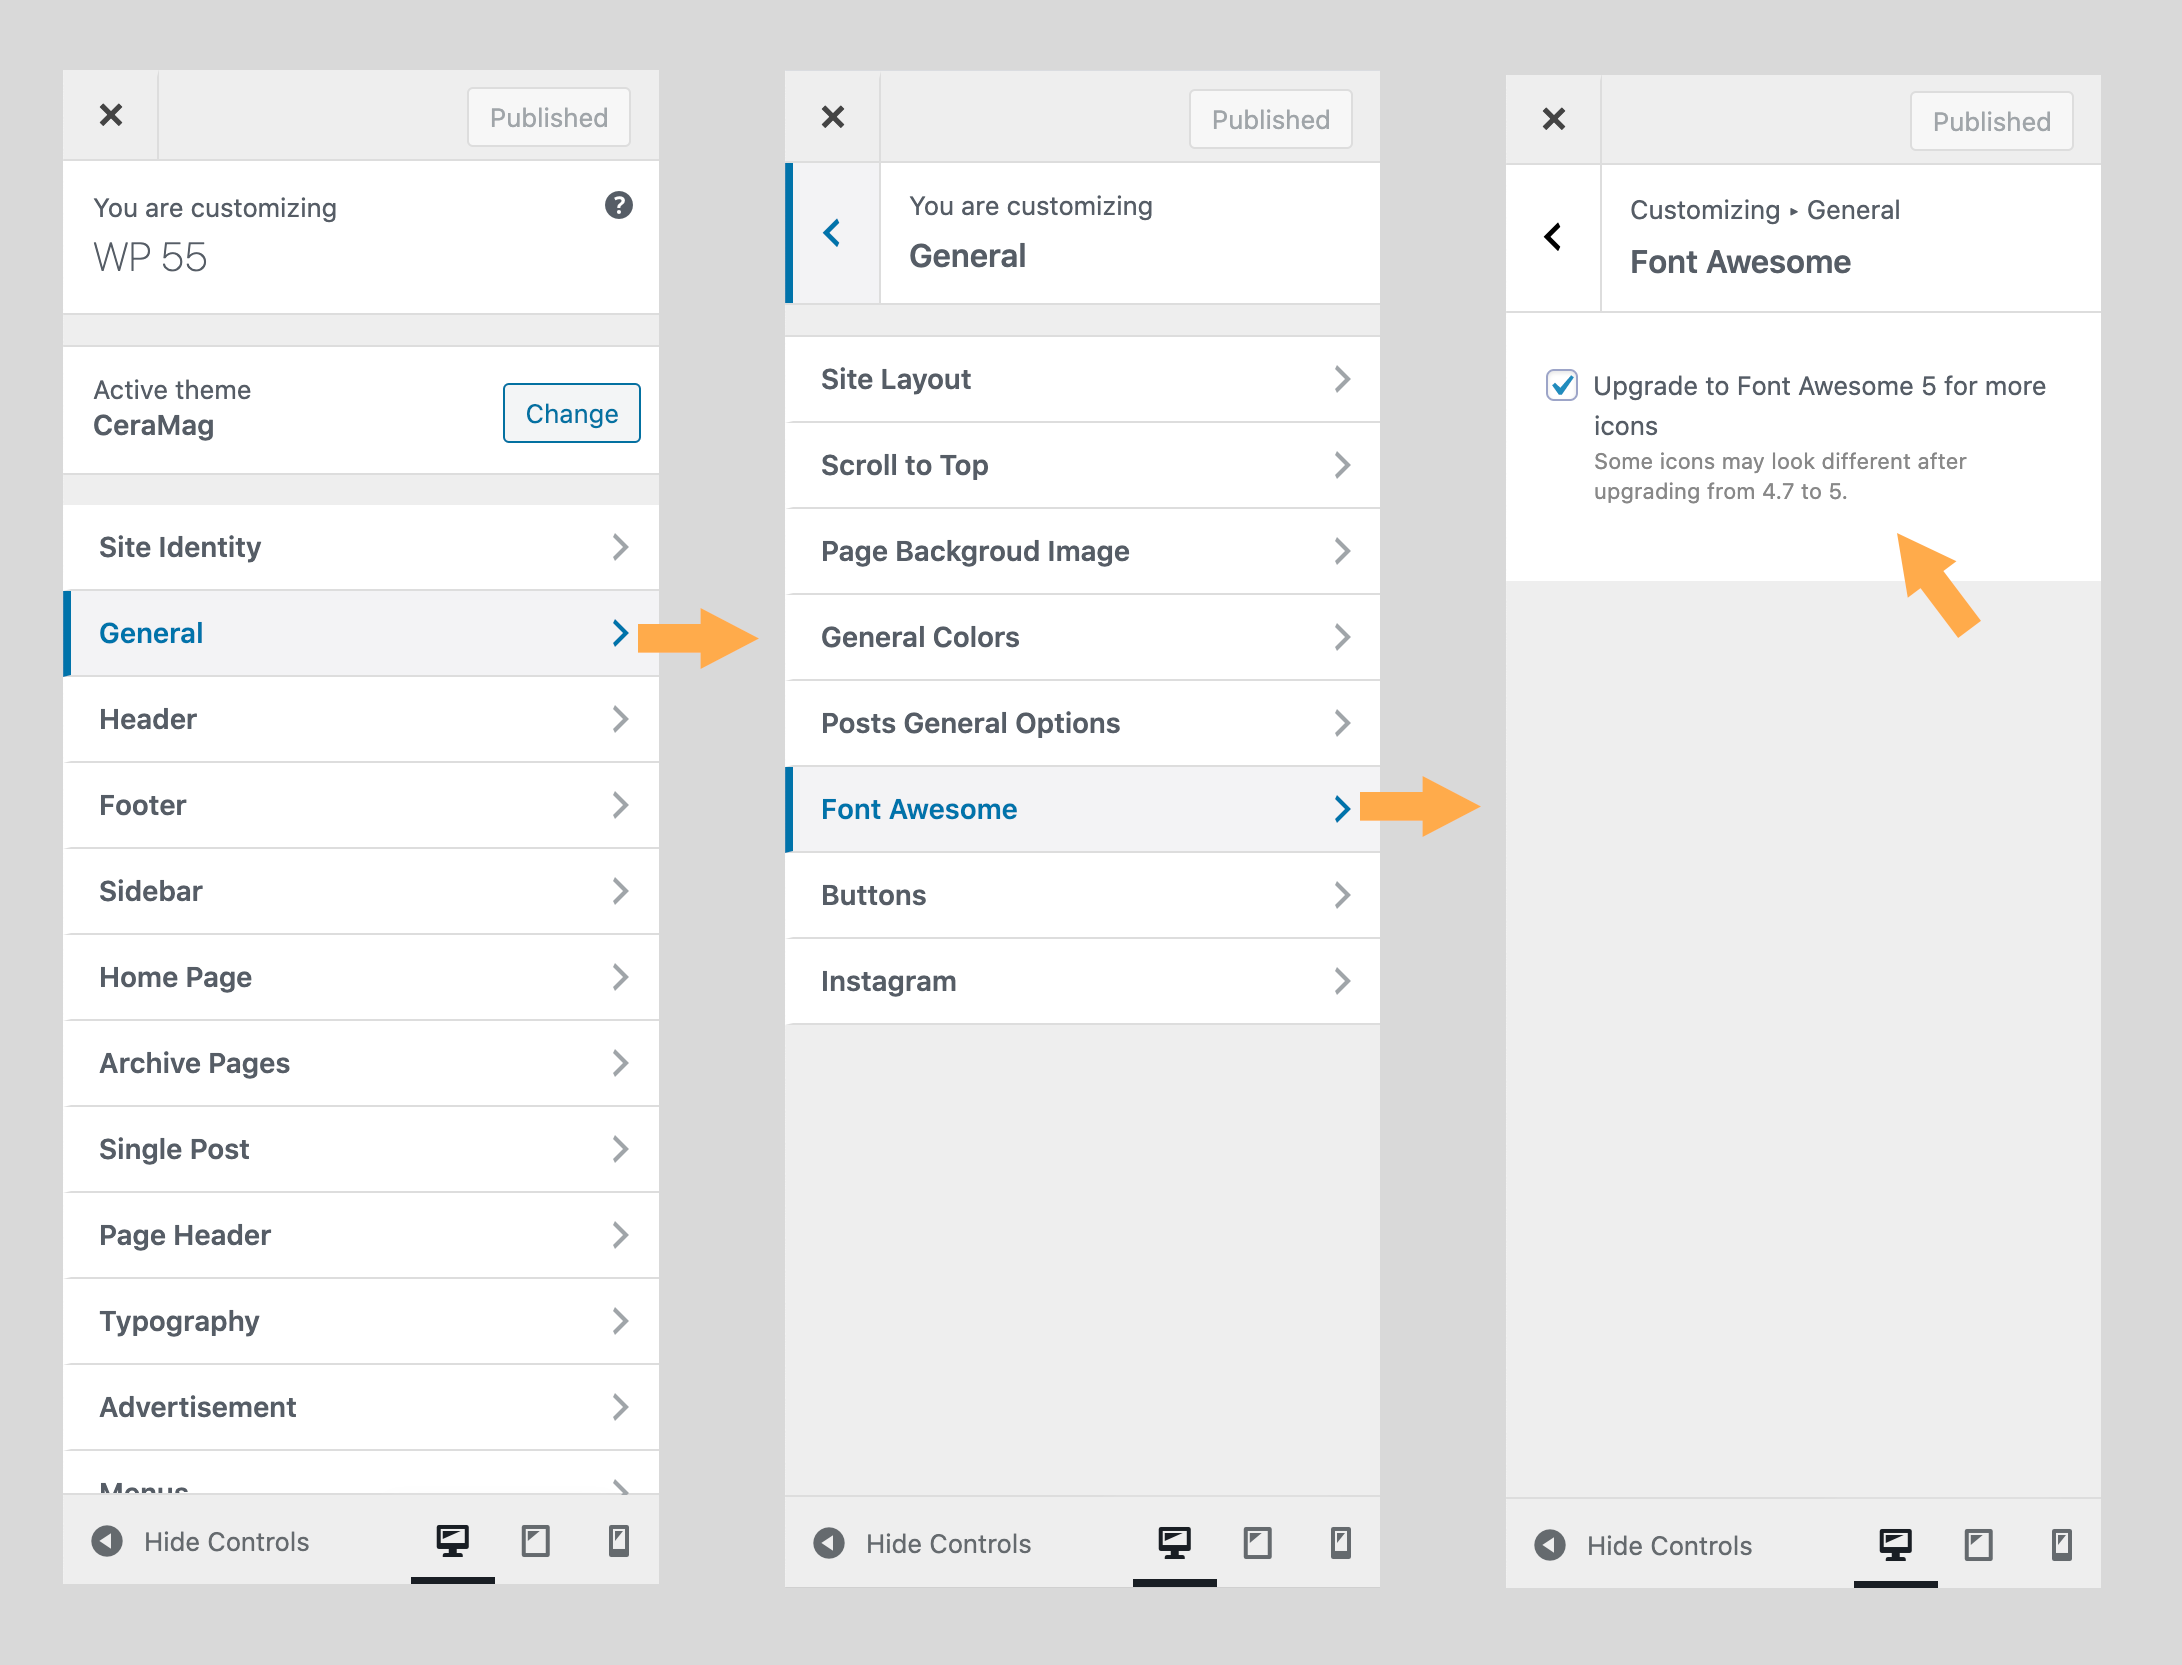
In the customizer, please go to General > Font Awesome, then tick the box of the Upgrade to Font Awesome 5 for more icons option.
Upgrade Font Awesome library
Please note: some icons may look different after upgrading from v4.7 to v5.x because the icons are redesigned by the toolkit author.
You may like to check the icon list of Font Awesome library:
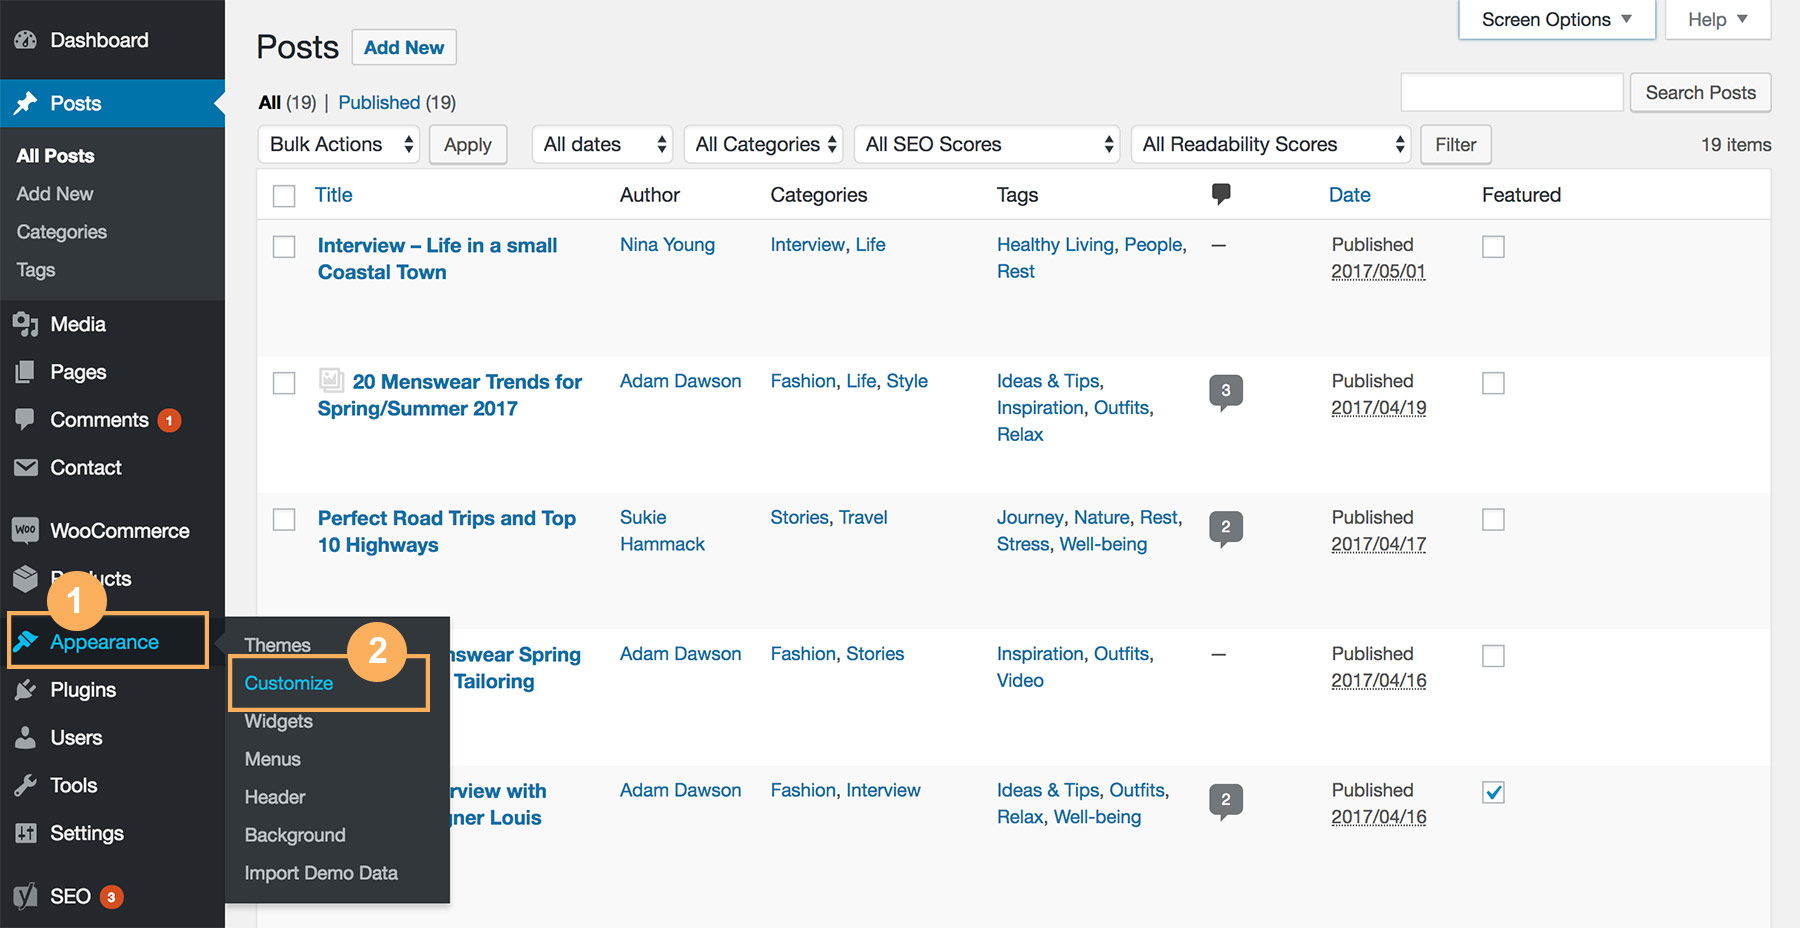
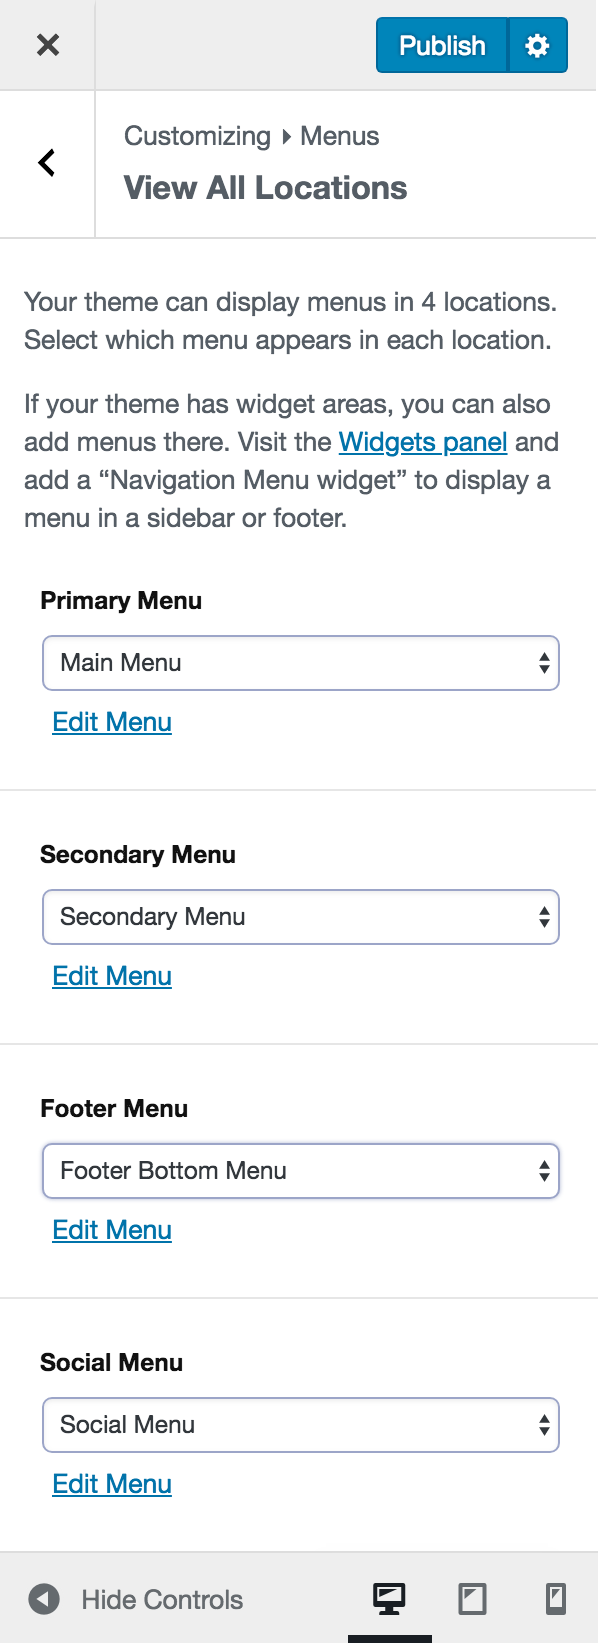
To manage site menus, we need to locate the WordPress Menus panel.
On your website dashboard, go to Appearance > Menus.
You will find there are 2 tabs: Edit Menus & Manage Locations.
On the Edit Menus tab, you can create menus and add items into it.
On the Manage Locations tab, you can select which menu appears in each location.
Manage menu locations.
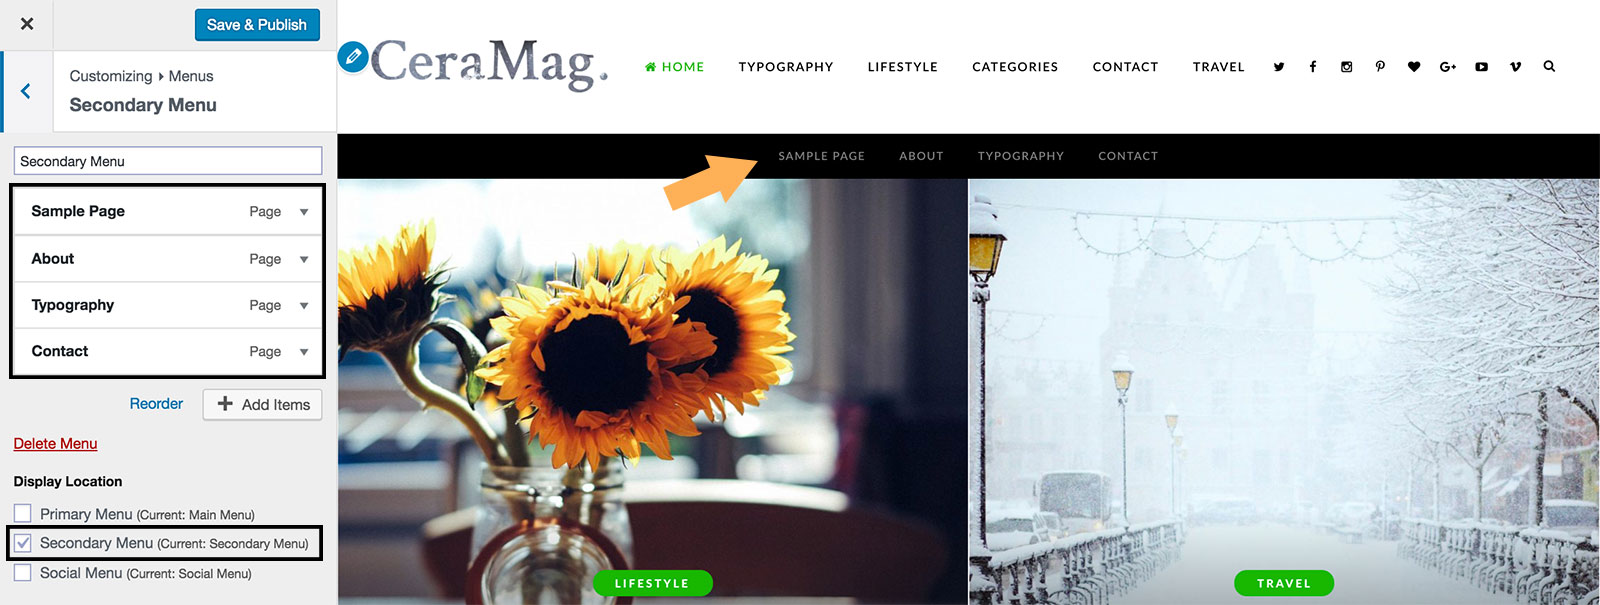
And you can also manage menus in the customizer (Appearance > Customize > Menus).
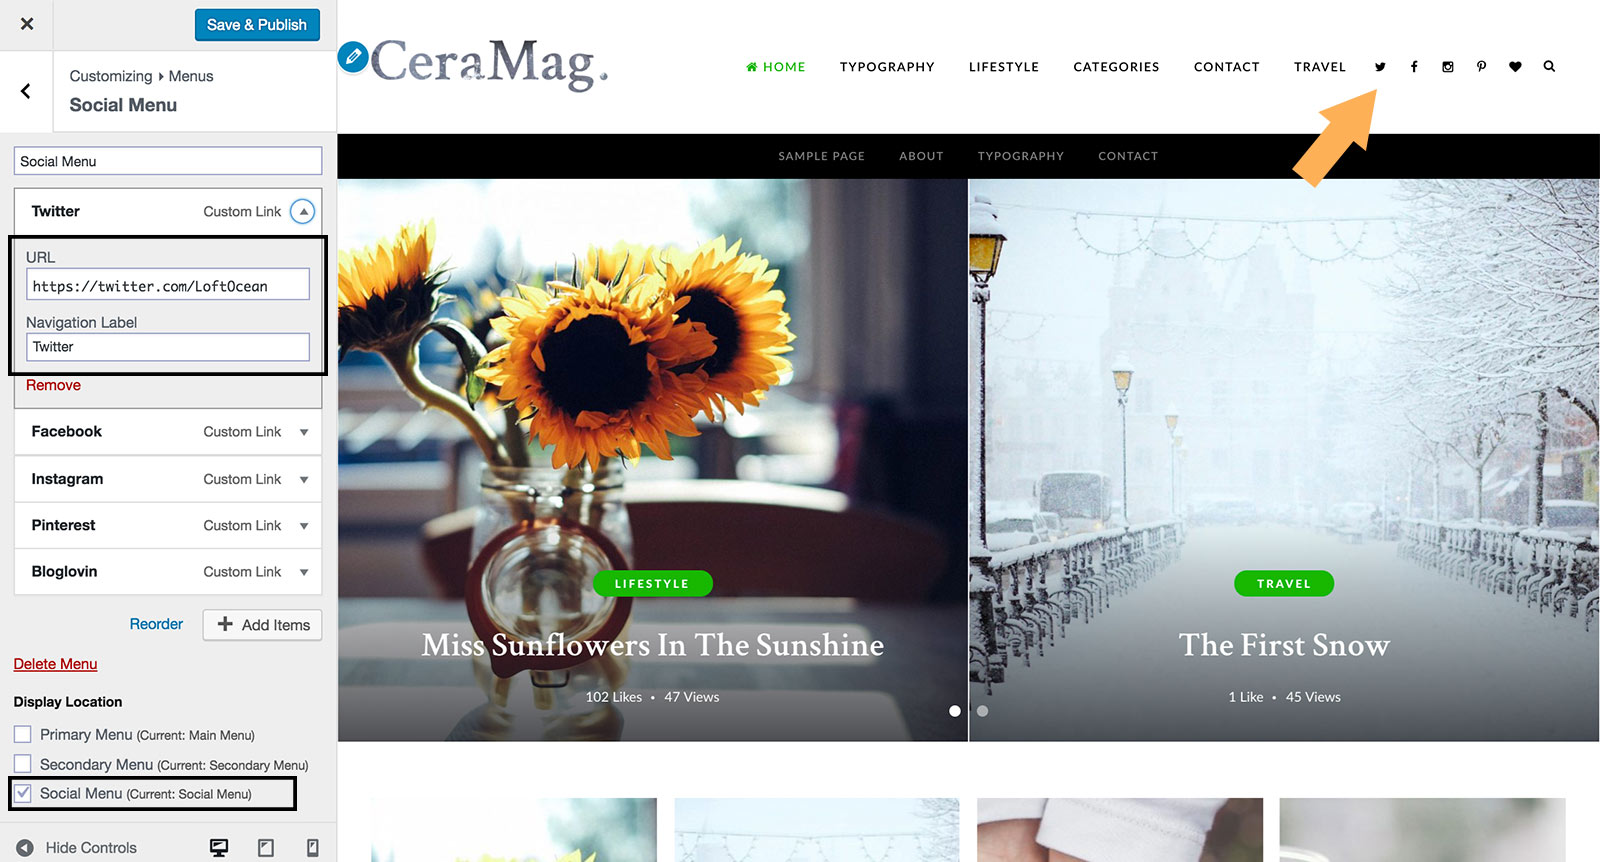
Please follow the strunctions below to create your social menu:
On your website dashboard, go to Appearance > Menus > Edit Menus.
Create a new menu. Give it a name, for example, "Social Menu". Then click on the "Create Menu" button.
Find "Custom Links" on the left. Enter the link of your social media site, for example, "https://twitter.com/LoftOcean". And you can also enter some text into "Link Text" field, it's optional,
and you can enter any text here. Just need to give a correct URL. Click "Add to Menu" button.
Repeat to enter your other social media sites' links.
Find "Menu Settings" option > "Theme locations", check the box before "Social Menu".
Click on "Save Menu" button.
Now your social menu is ready to use.
And you can also manage social menu in the customizer (Appearance > Customize > Menus > Social Menu).
Social Menu
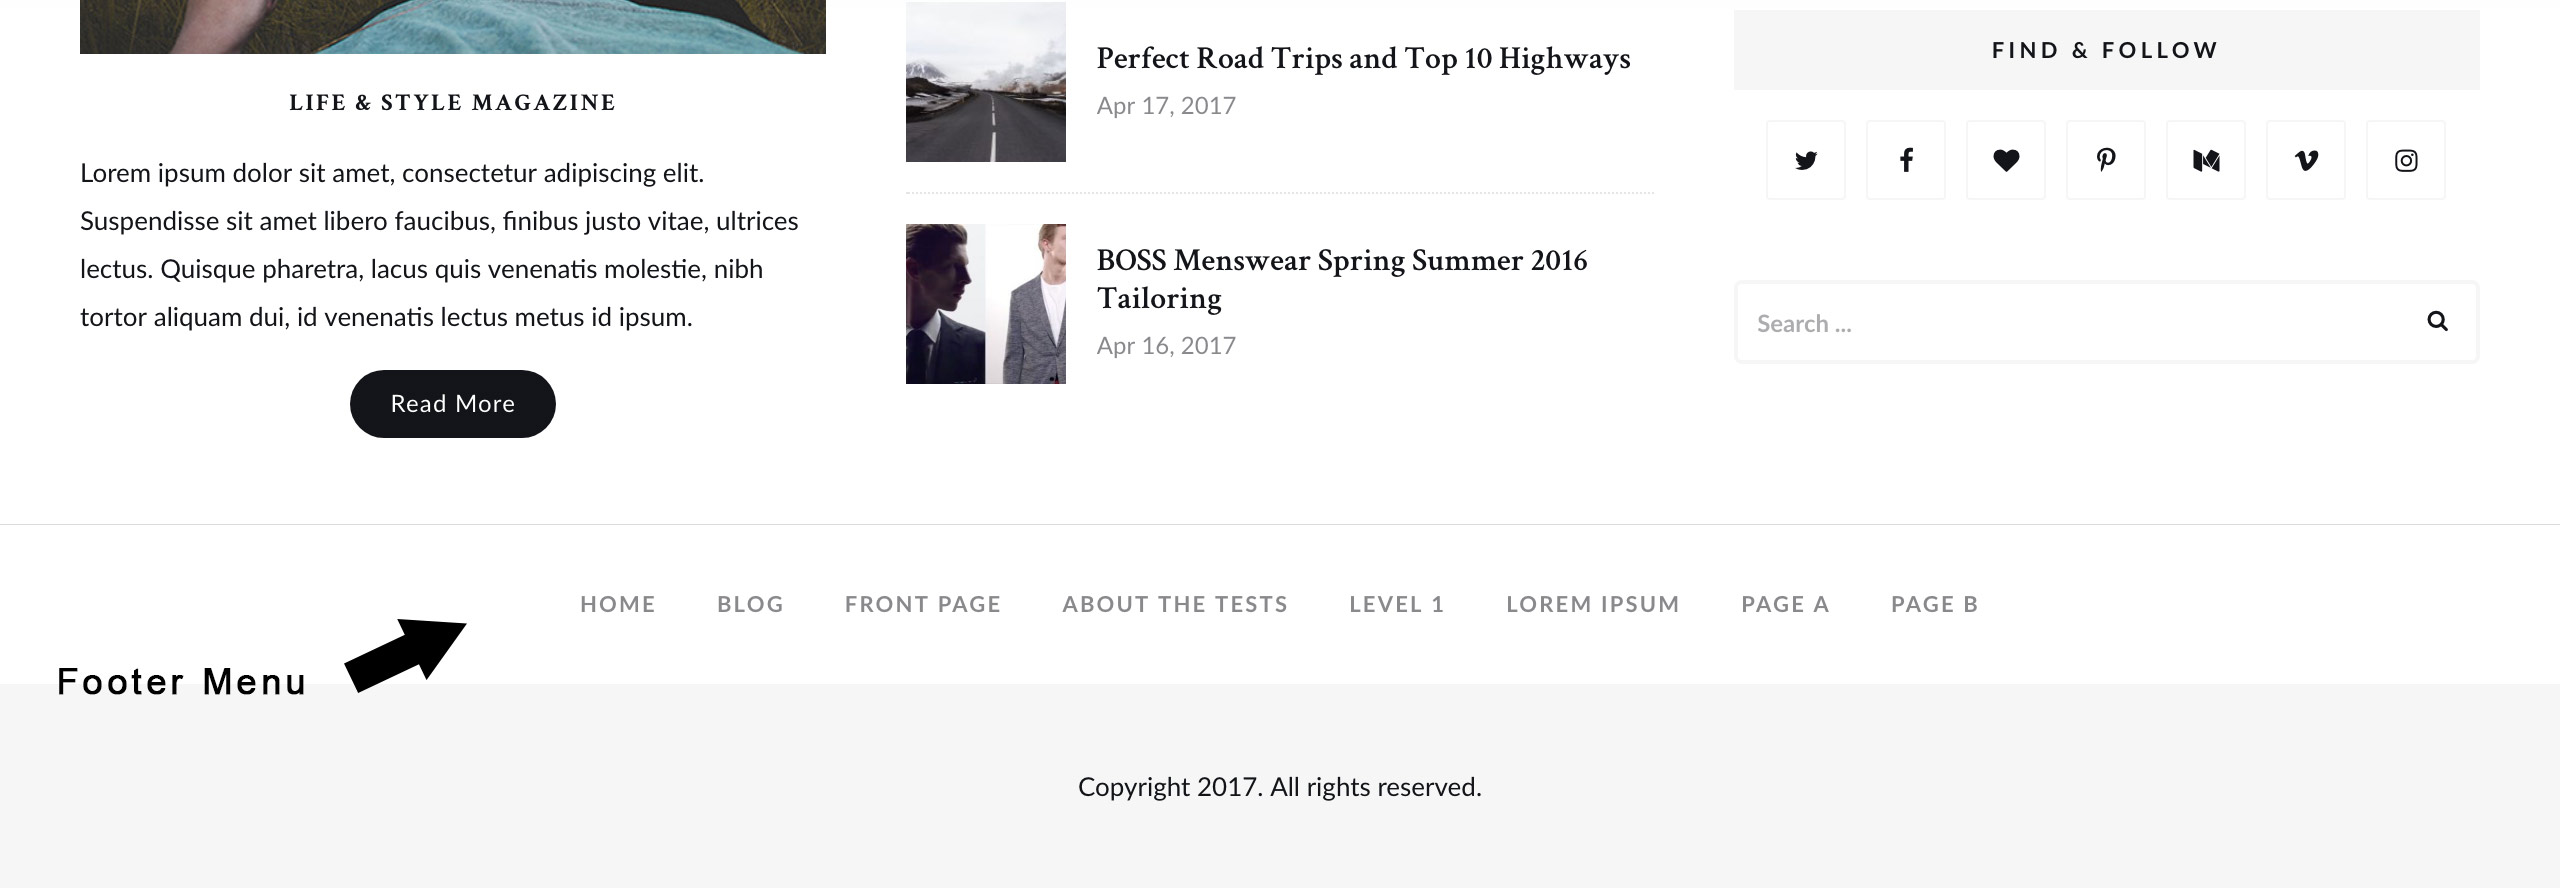
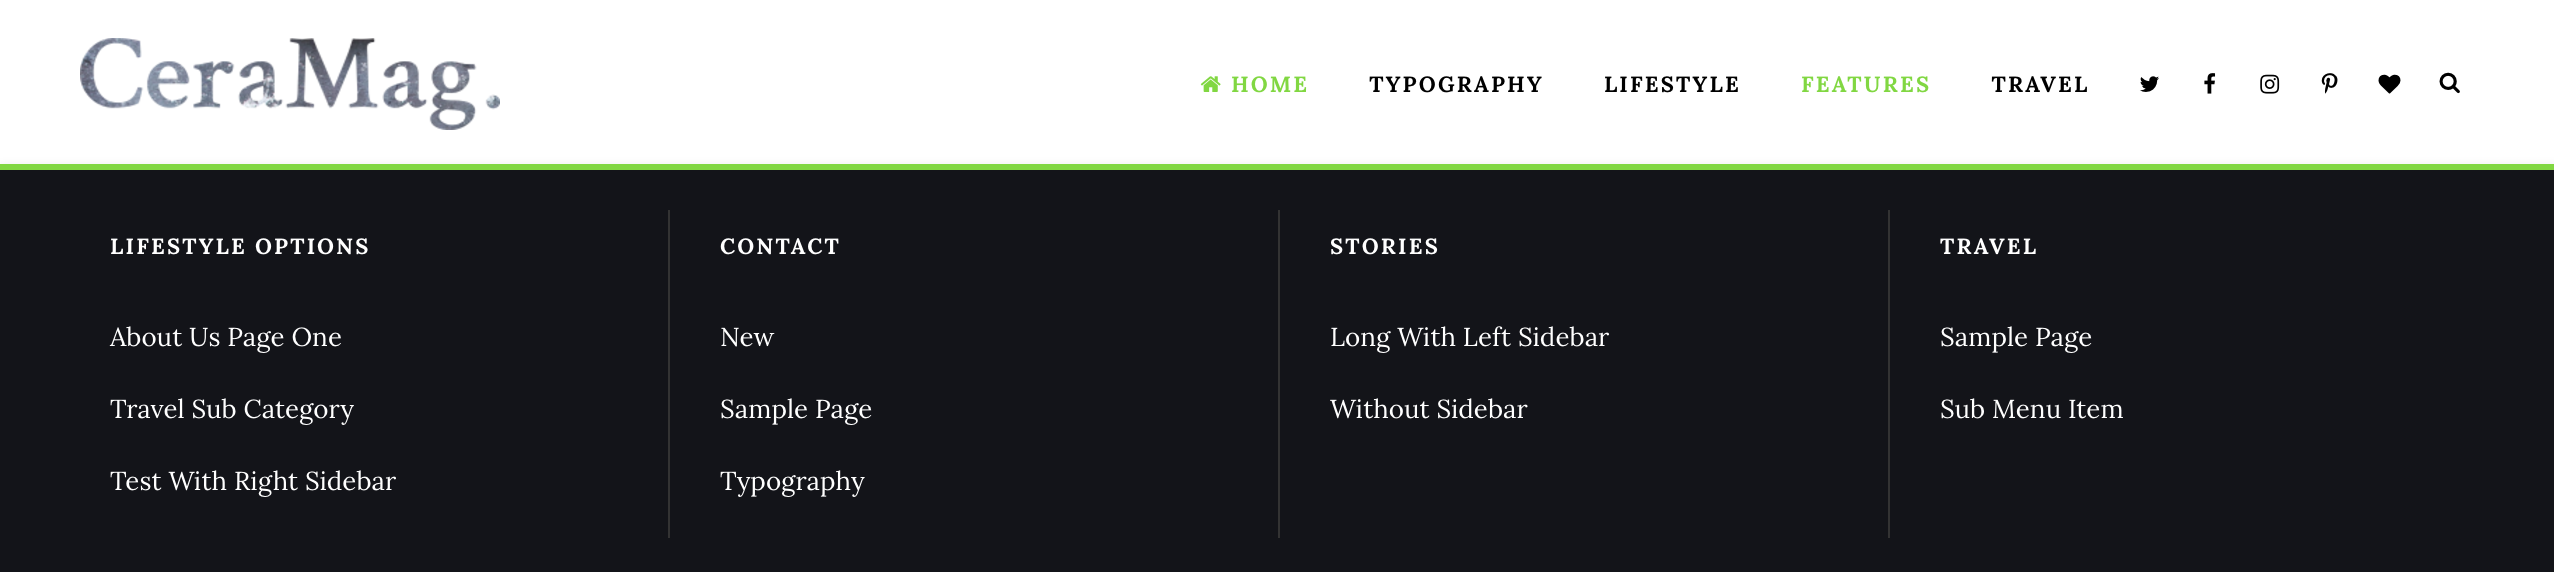
8.4 Footer Menu
The Footer Menu will be displayed in the site footer.
On your website dashboard, go to Appearance > Menus > Edit Menus.
Create a new menu. Give it a name, for example, "Footer Bottom Menu". Then click on the "Create Menu" button. And add some items into it.
Find "Menu Settings" option > "Theme locations", check the box before "Footer Menu".
Click on "Save Menu" button.
The footer menu is 1-level-deep. So it won't show any child menus.
And you can also manage footer menu in the customizer (Appearance > Customize > Menus > Footer Menu).
Select a menu and assign it to the Footer Menu location.Example of Footer Menu on the front end.
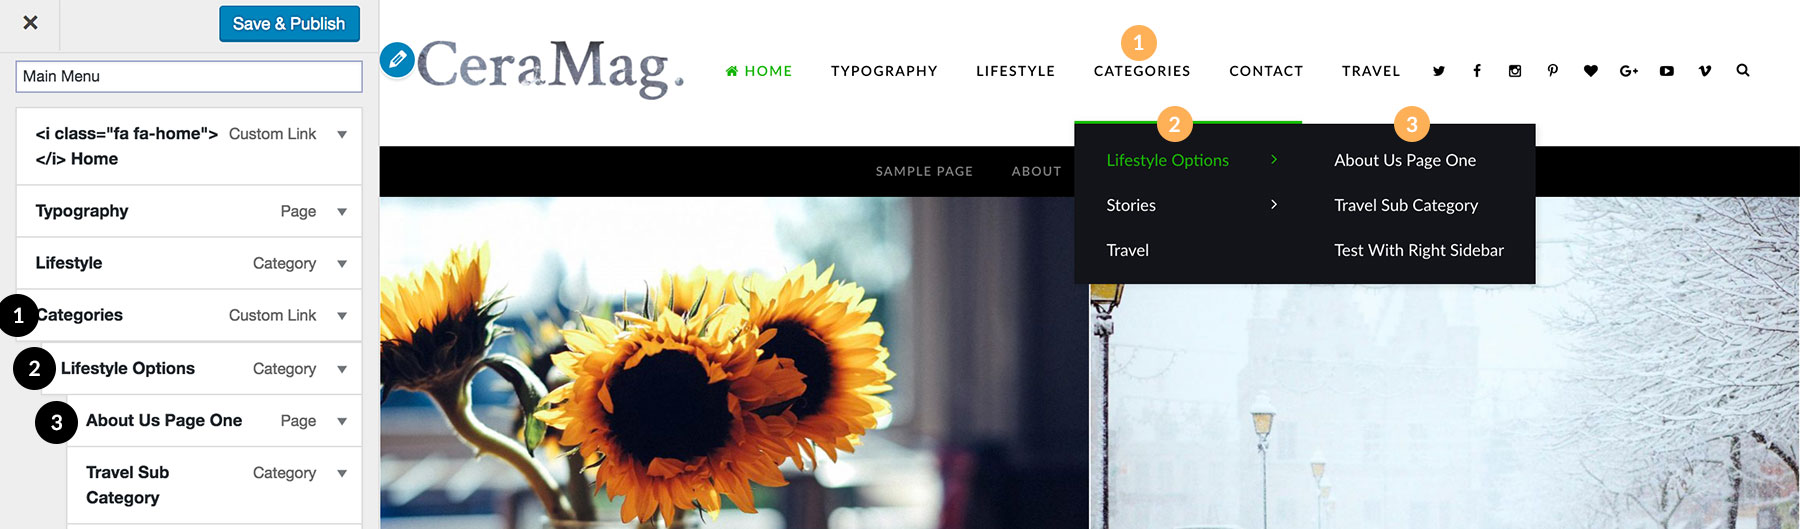
8.5 Mega Menu
The Primary Menu supports mega menu. And you can show 2 types of mega menus:
Display at most 4 recent posts of a category.
Display sub nav items in 4 columns.
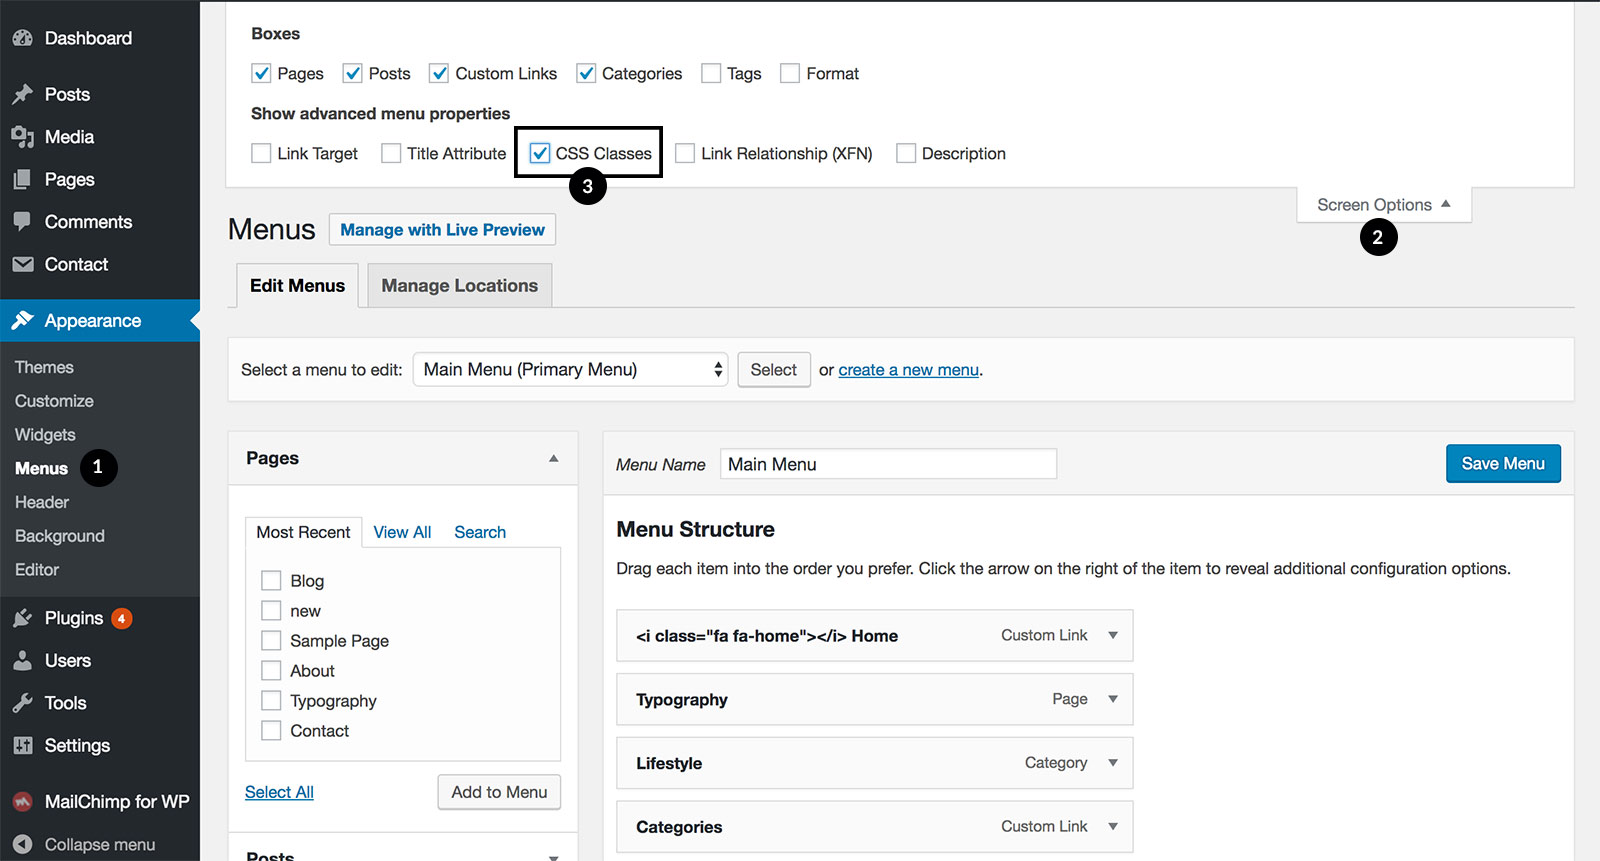
Set up the mega menu:
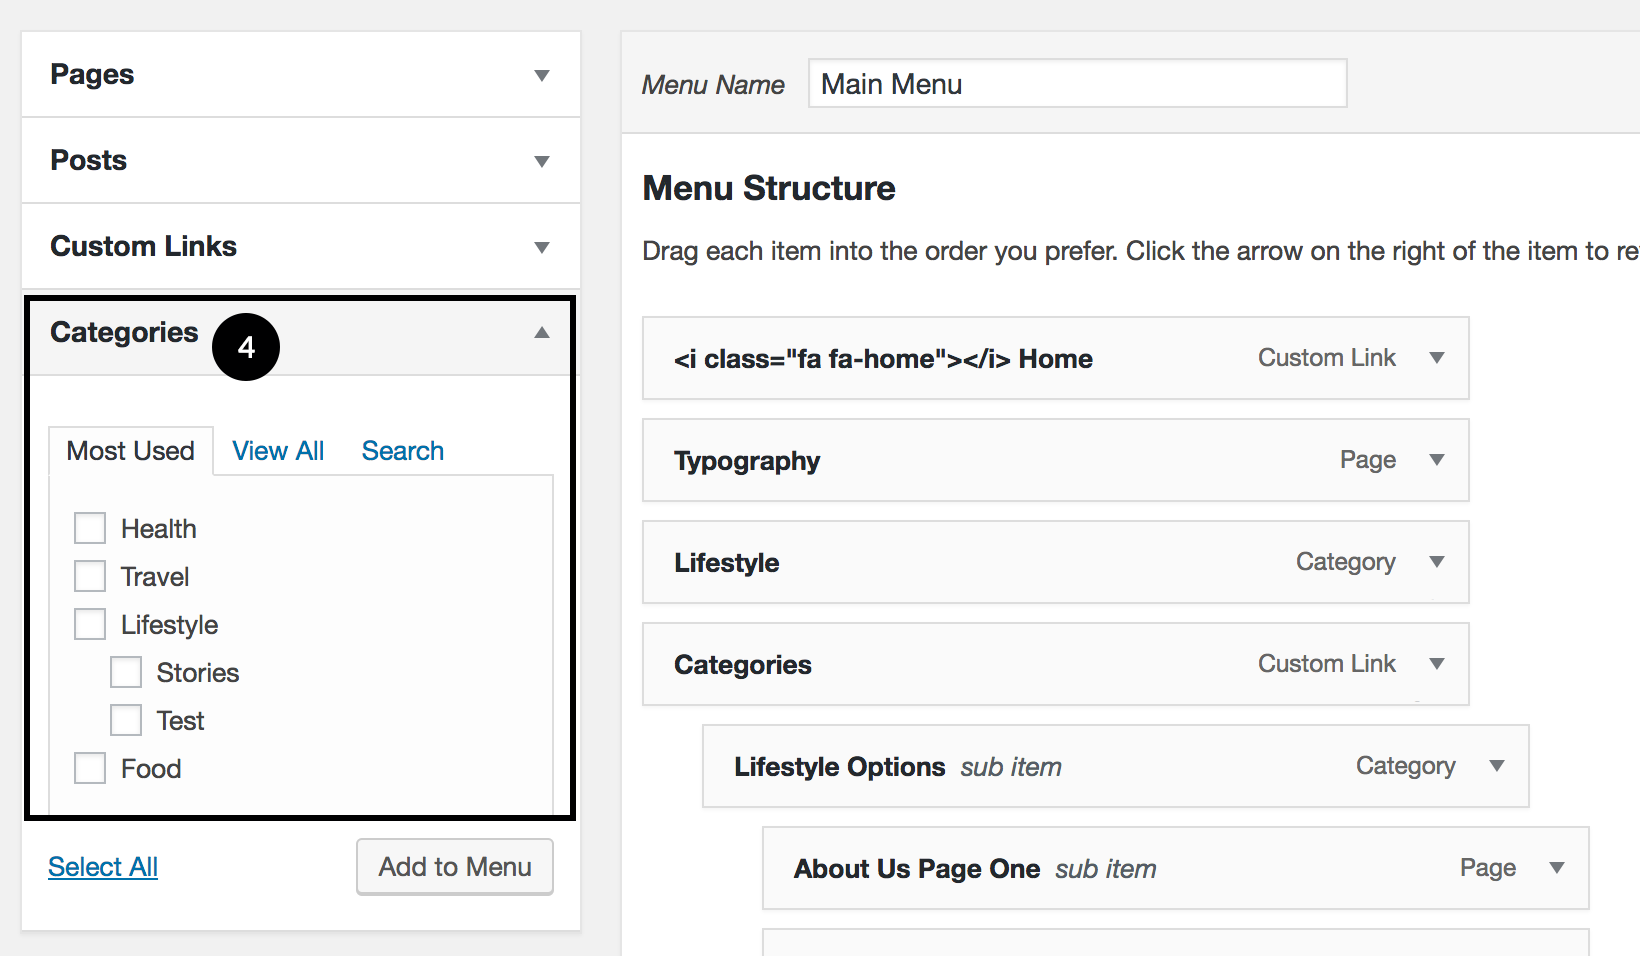
Go to Appearance > Menus, make sure you are editing the primary menu.
Click on Screen Options button located on the top right corner.
Tick the box of CSS Classes.
Menu CSS Classes Property
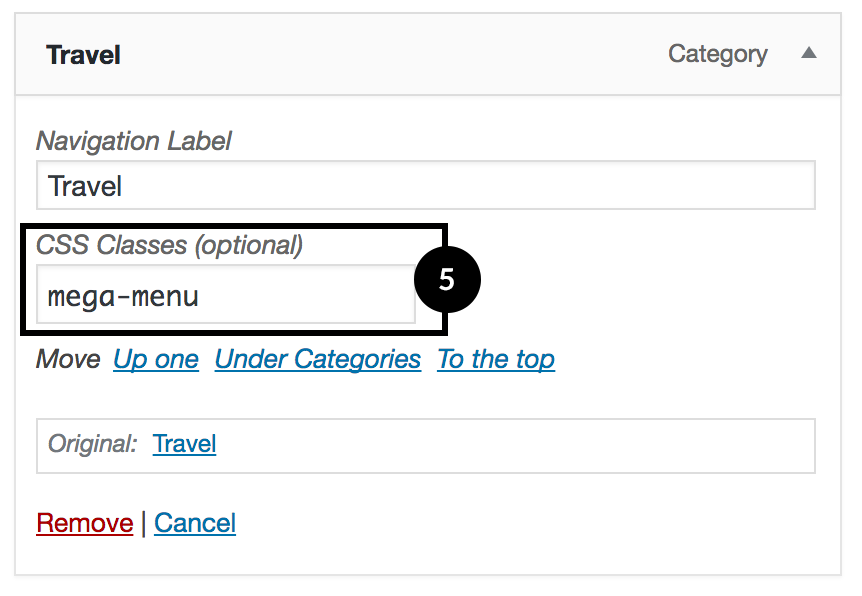
To display posts of a category in the menu, add a category into the menu.
Add a category to menu
Then click on the category item in the menu,
enter mega-menu into CSS Classes field.
Add class mega-menu
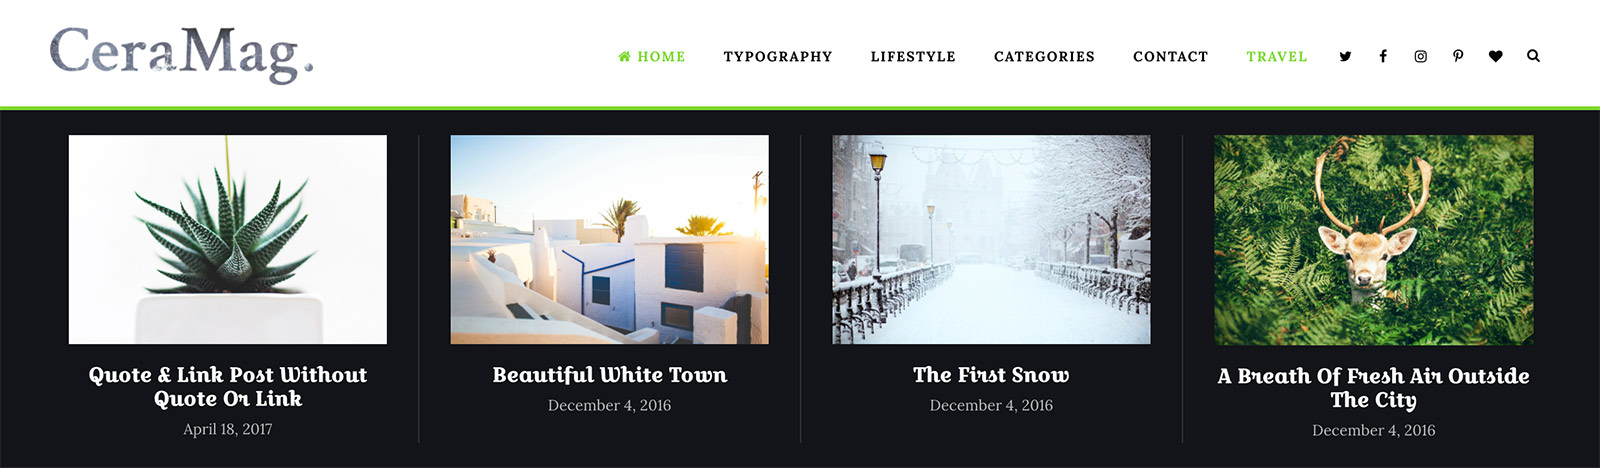
Save menu and go to frontend of your site, hover on the category item in the primary menu to see the result:
Category mega menu
The post meta shown by default is the Publish Date. If you'd like to show categories or author, or don't show any post meta,
please go to Customizer > Header > Mega Menu. (Please note: to keep a simple and tidy layout, you can show at most one post meta in
the mega menu.)
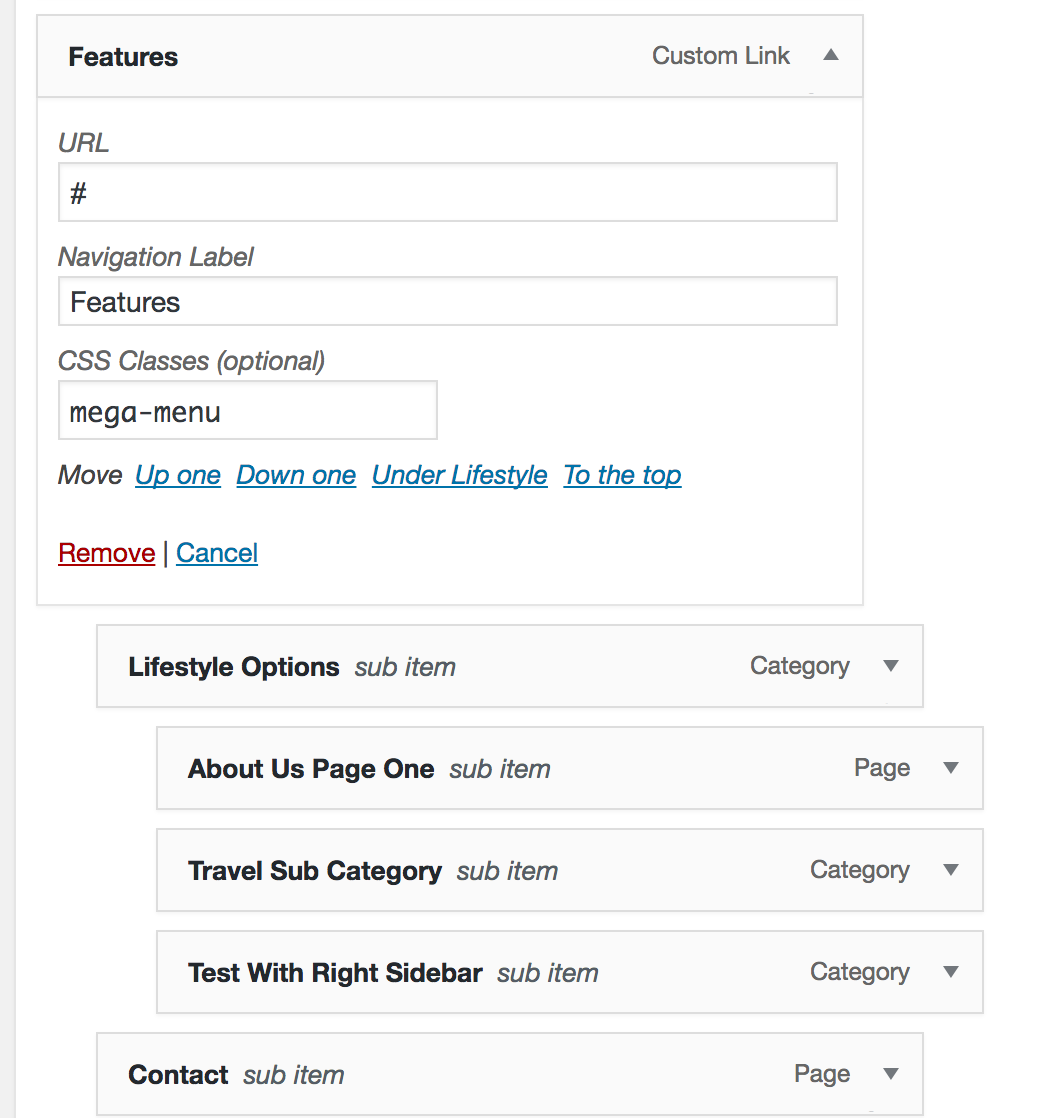
To display sub nav items in columns, just add items into the primary menu, drag and drop to create multi-level menus, then click on
the parent item, enter mega-menu into CSS Classes field.
Multi-level Mega Menu
Save menu and go to frontend of your site, hover on the parent item in the primary menu to see the result:
Multi-level Mega Menu Preview
9. Pages
9.1 Homepage & Blog Page
To display your latest blog posts on the homepage, you can:
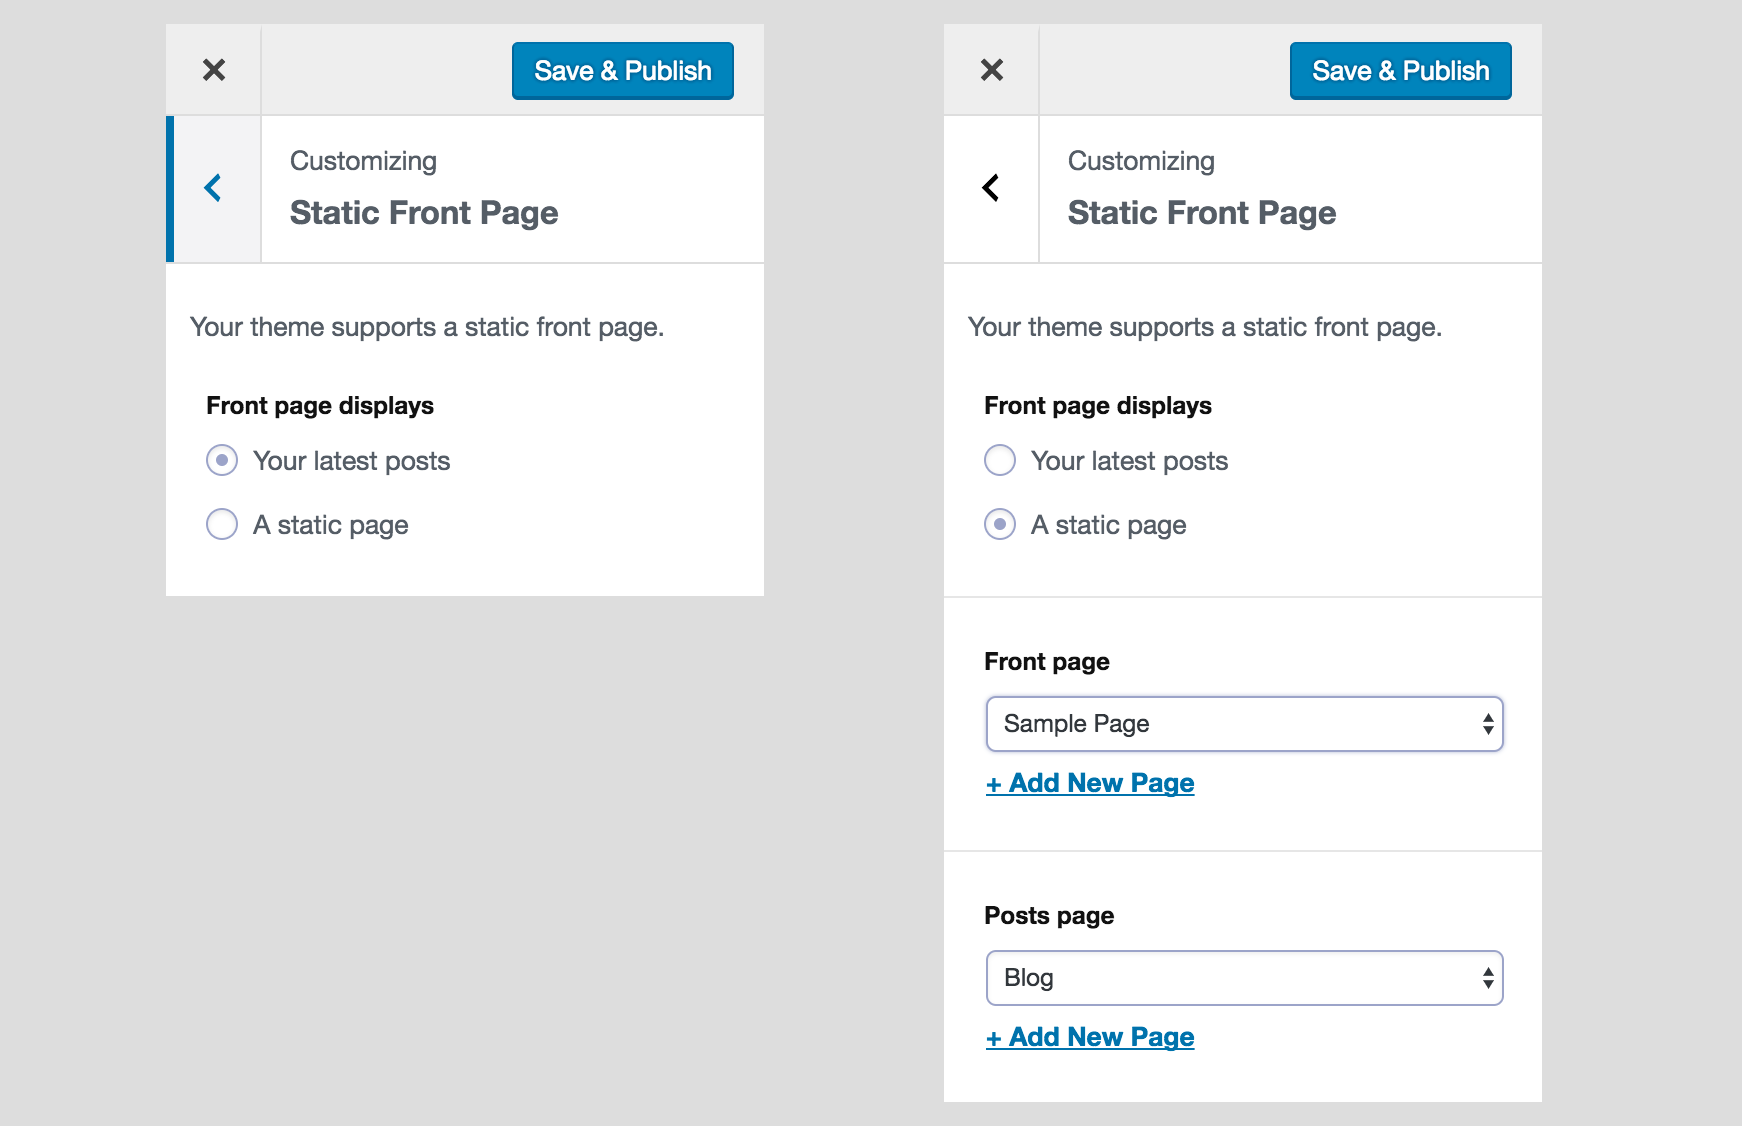
Go to Appearance > Customize > Static Front Page > Front page displays, then choose “Your latest posts”.
Or on your site dashboard, go to Settings > Reading > Front page displays, then choose “Your latest posts”.
Then go to Appearance > Customize > Home Page, there you can customize the page layout and latest posts layout.
You can also choose a static page as the homepage, then create a new page, name it “News”, “Journal” or any other title, and set it as the posts page. Then you can style your posts page via Appearance > Customize > Home Page.
Homepage & Blog Page
9.2 Page Template
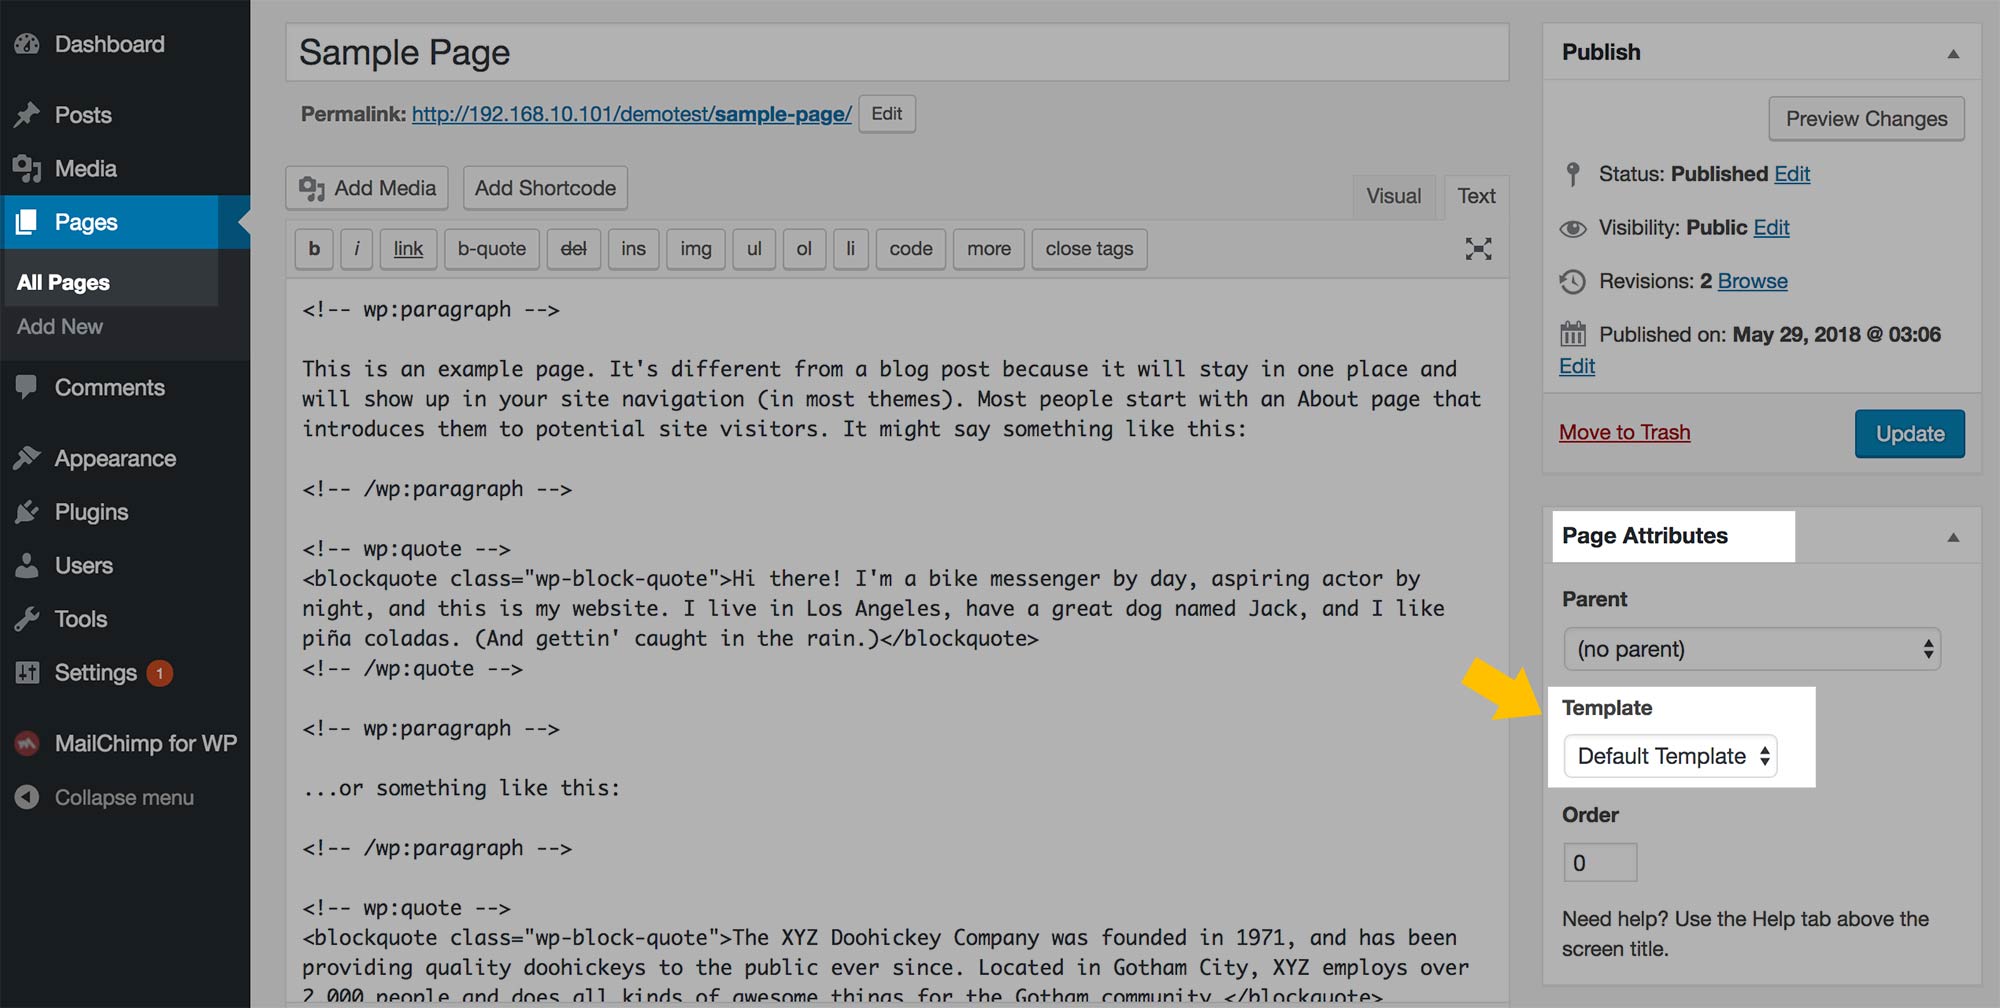
CeraMag provides 3 page templates for different page layout:
Default Template (With Right Sidebar)
Fullwidth
With Left Sidebar
To choose a template for a page, on the site dashboard, go to Pages > All Pages, choose a page to edit it, then on the right hand side, you will find Page Attributes option panel, click to open the Template drop down list,
choose a template for this page.
Single Page Template
If you are using Gutenberg editor (also called "Block Editor") - the new editor for WordPress 5 - please check this chapter to know where to find the
page options.
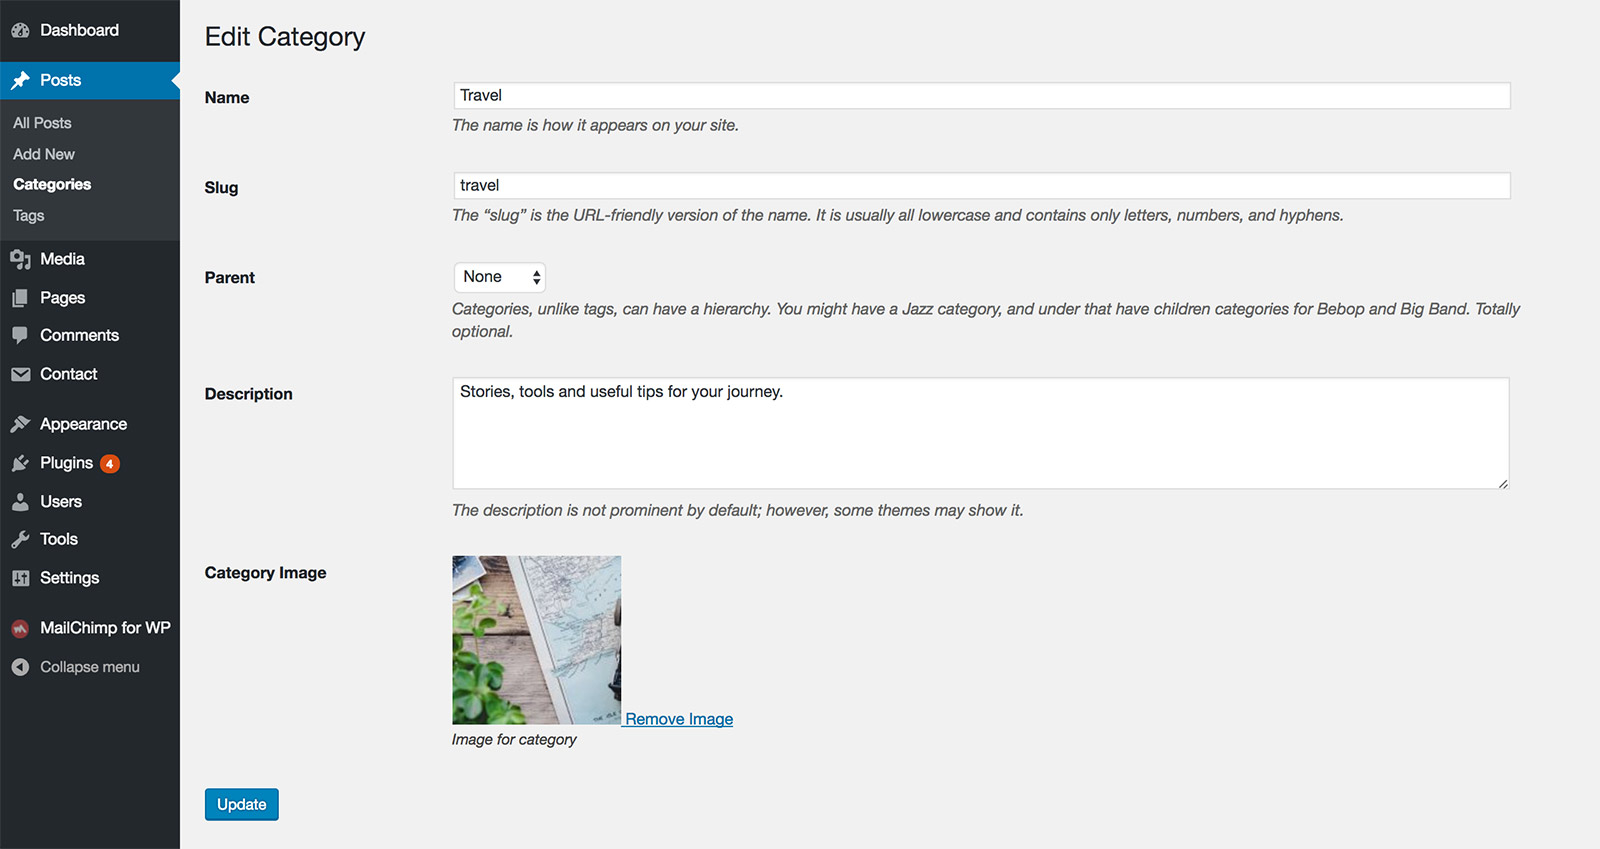
9.3 Category Archive
Go to Posts > Categories, when adding a new category or edit an existing one, you can upload an image for this category, then on the category archive page, this image will be used as the page header background image.
To change the page layout and archive styles, please go to Customizer > Archive Pages > Category. Please check
Theme Customizer - Archive Pages to know more.
9.4 Tag Archive
Since version 1.1.6, Tag Archive page can display tag description and tag image in page header.
Go to Posts > Tags, when adding a new tag or edit an existing one, you can upload an image for this tag, then on the tag archive page, this image will be used as the page header background image.
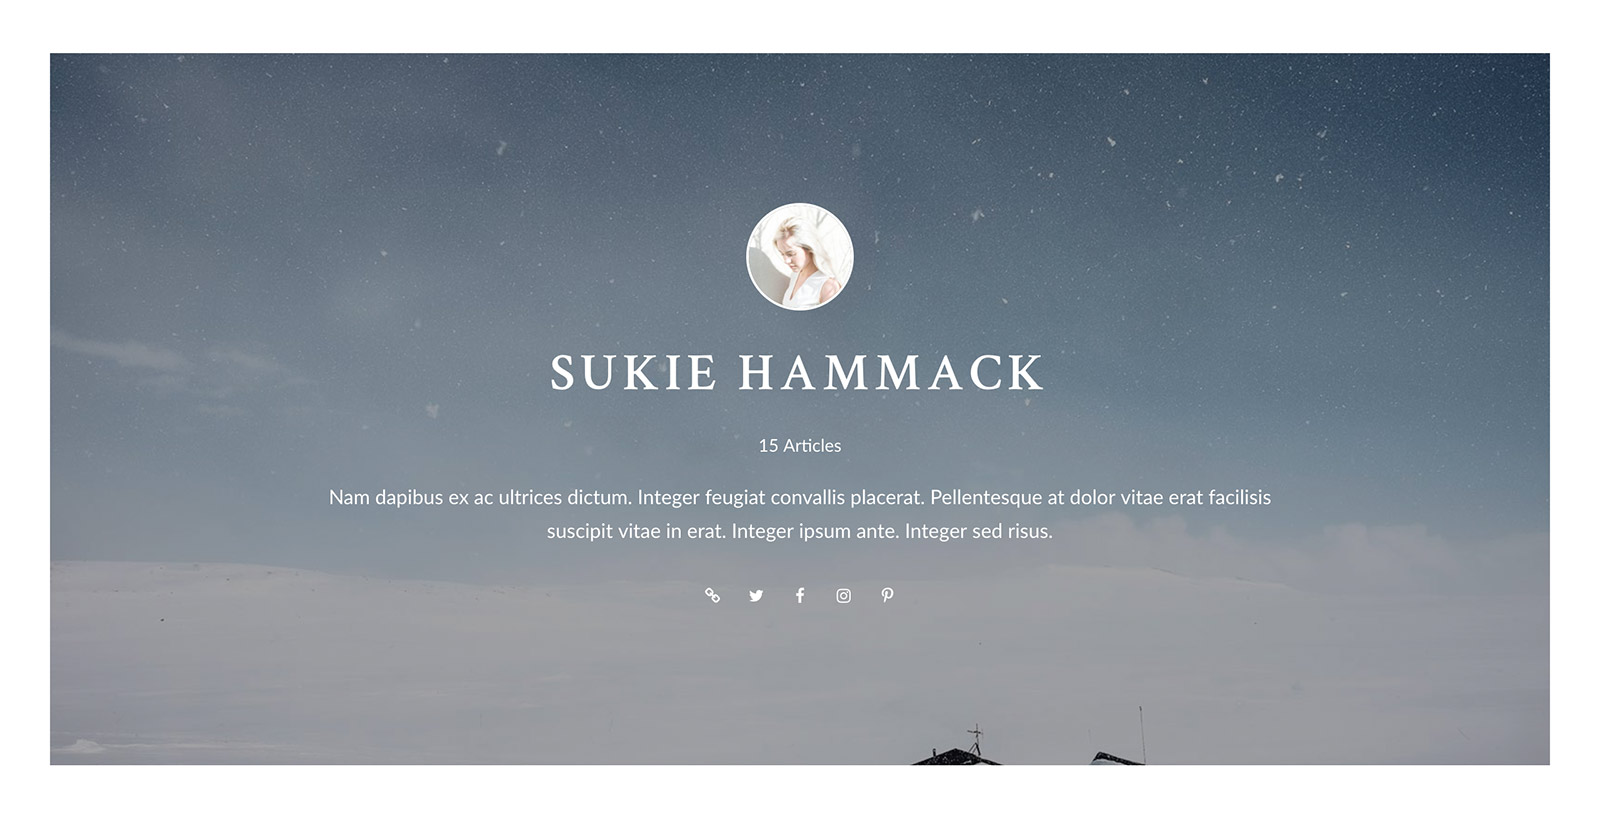
9.5 Author Archive & Info
The author information will show:
At the top of Author Archive page
After single post content (the author's biographical info need to have some content)
Author information includes the author profile picture, biographical info and Social Media Icons.
9.5.1 Edit Author Bio & Social Icons
To edit author biographical info and Social Media Icons, go to your site dashboard >
Users > All Users, find the user you are going to edit,
click to open the Edit User page, there you can edit the biographical info.
Author Biographical Info & Social Media Icons
Scroll down to the bottom of the page, there you can upload a background image for Author Archive Page Header.
Upload a background image for Author Archive Page Header
And the examples of the results:
Author Info Box after single post contentAuthor Archive page Header
9.5.2 Edit Author Profile Picture
To add or edit the author profile picture, please visit https://en.gravatar.com/ for more information.
9.5.3 Author Page Layout
To change the page layout and archive styles, please go to Customizer > Archive Pages > Author.
9.5.4. Hide Author Info Box on Single Post
To hide the author info box after single post content, please go to Customizer > Single Post > Display Author Info, then uncheck the box.
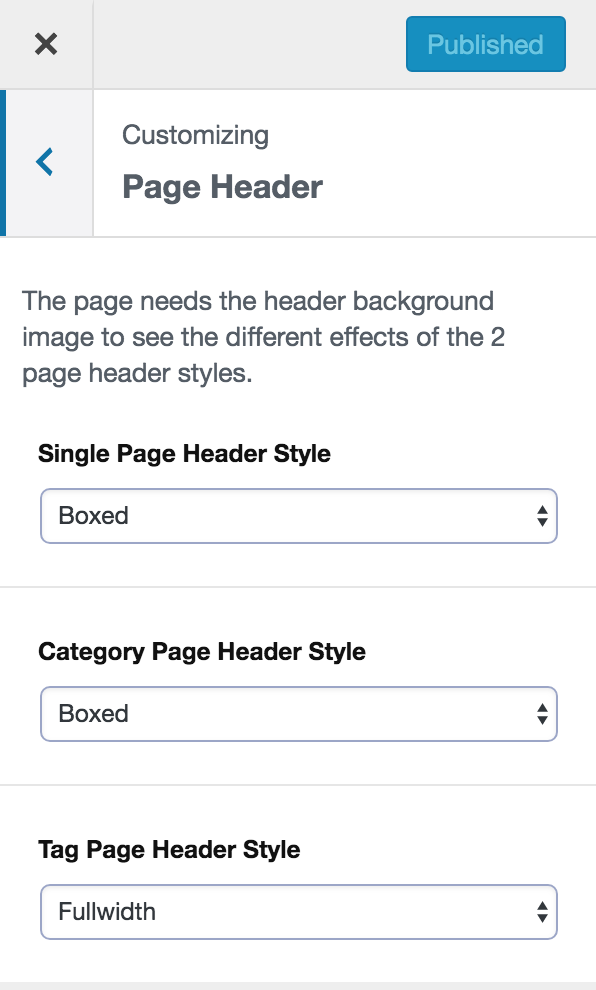
9.6 Page Header Options
9.6.1 Hide Page Header
When editing a single page, please find the "Page Header Settings" panel. There you can find the option "Hide Page Header".
9.6.2 Page Header Style
Normally, the page header is the "boxed" layout: not as wide as the screen. Since v2.0, you can change the page header to fullwidth, and you can control the page header style
for the following types of pages separately:
You can choose a default template for posts, and you are also able to choose different templates for different posts.
Please note: this feature requires WordPress 4.7. Please check your WordPress version and get the version 4.7 to use this feature.
To choose a template for a post, on the site dashboard, go to Posts > All Posts, choose a post to edit it, then on the right hand side,
you will find Post Attributes option panel, click to open the Template drop down list,
choose a template for this post.
There are 4 options:
Default - When choose this, it means the post will use the template you have selected in Customizer > Single Post > Default Sidebar Layout.
So if you change the default sidebar layout (post template) in Customizer, this post's template will also change to that one.
Fullwidth
With Left Sidebar
With Right Sidebar
If you choose "Fullwidth" or "Left Sidebar" or "Right Sidebar" for one post, then when you change the default sidebar layout (post template) in Customizer, the change will not
affect this post.
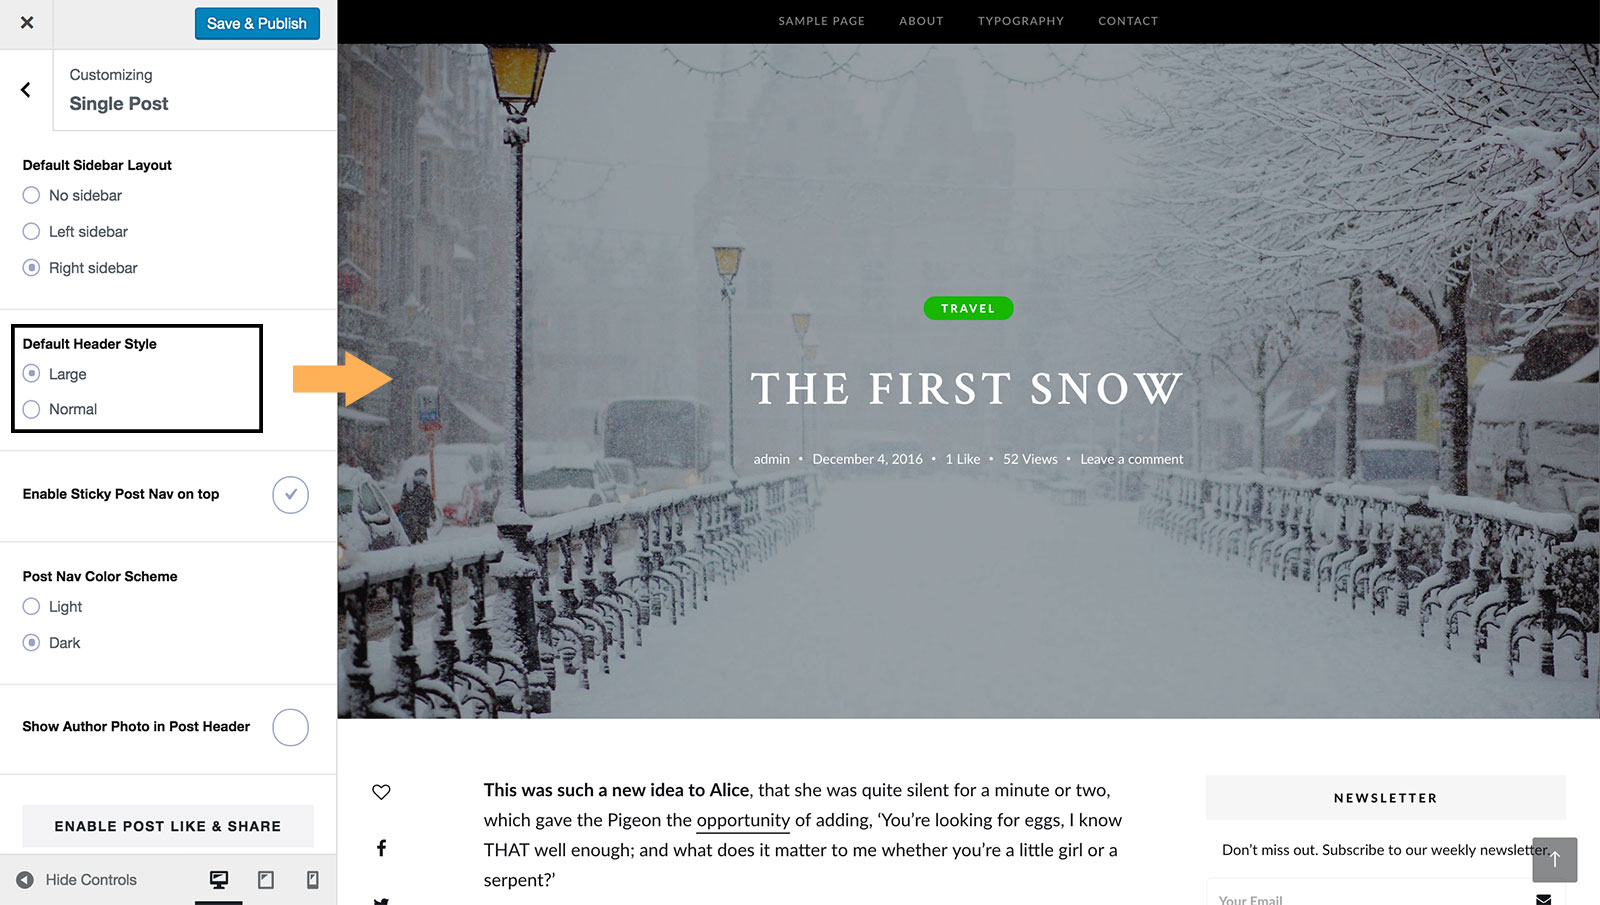
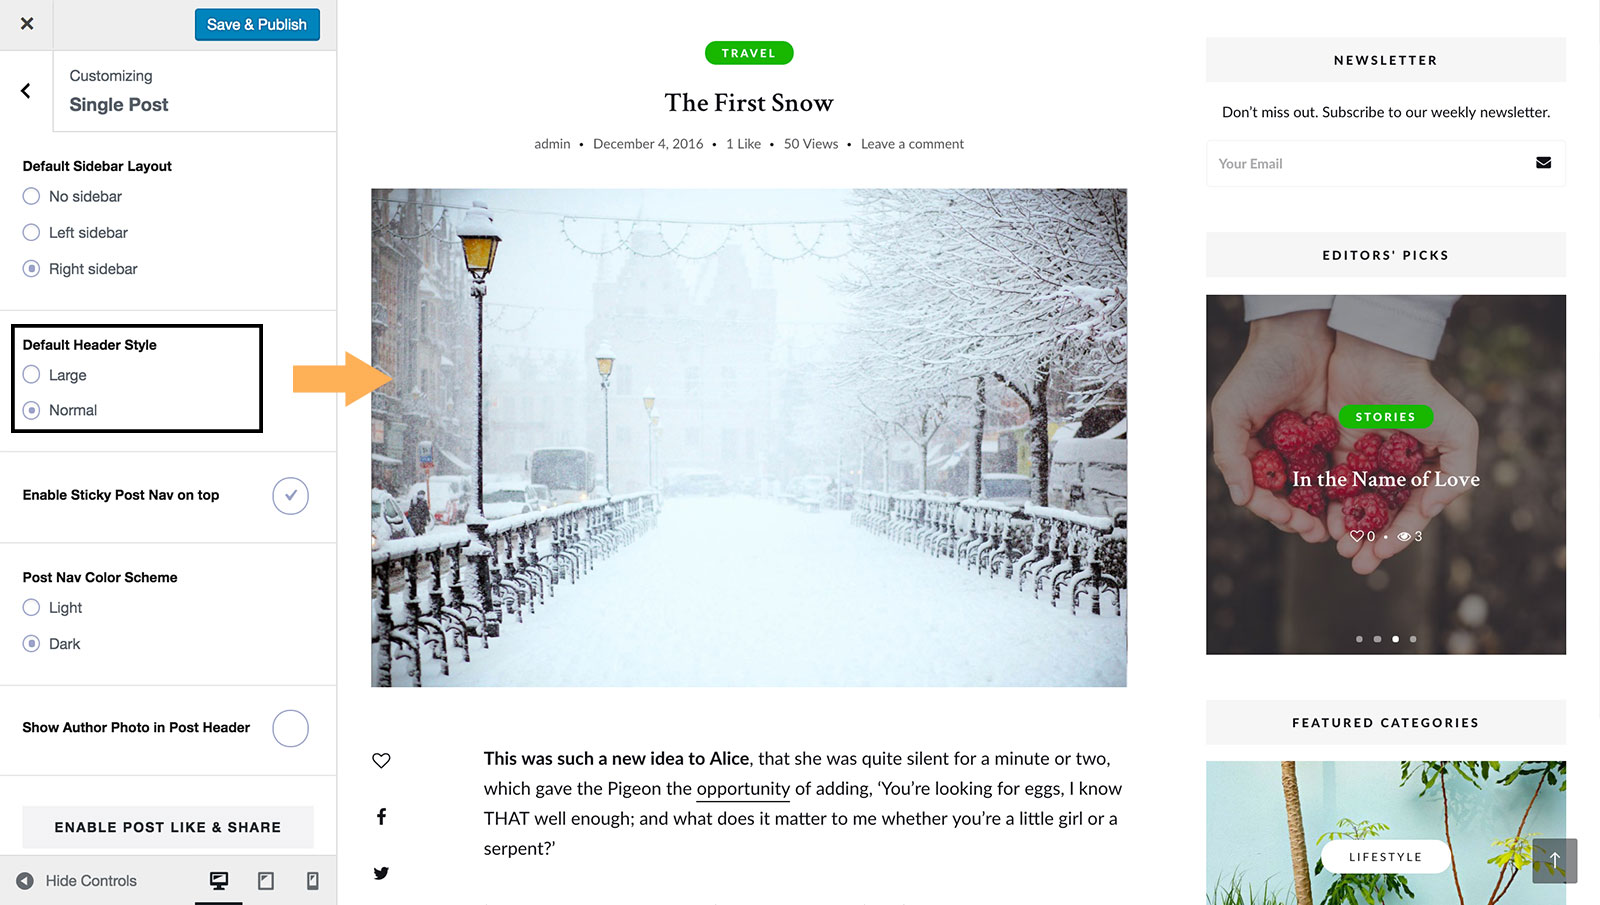
10.2 Single Post Header Style
CeraMag theme has 2 single post header styles for users to choose.
5.2.1 Set the default post header style for all posts
On your site dashboard, go to Appearance > Customize > Single Post, then you will see an option
Default Header Style:
Large - The post header will be shown as fullwidth on the top of the post. And the featured image (or a gallery slider for a Gallery Post)
will be used as the post header's background.
Normal - The post header will be shown inside of the main content area. And the featured image (or a gallery slider for a Gallery Post)
will be placed below the post title and other post meta.
Large Post Header Style.Normal Post Header Style.
10.2.2 Set post header style for an individual post
You can change each post's header style while editing it. On your site dashboard, go to Posts, find a post and edit it, or create a new post,
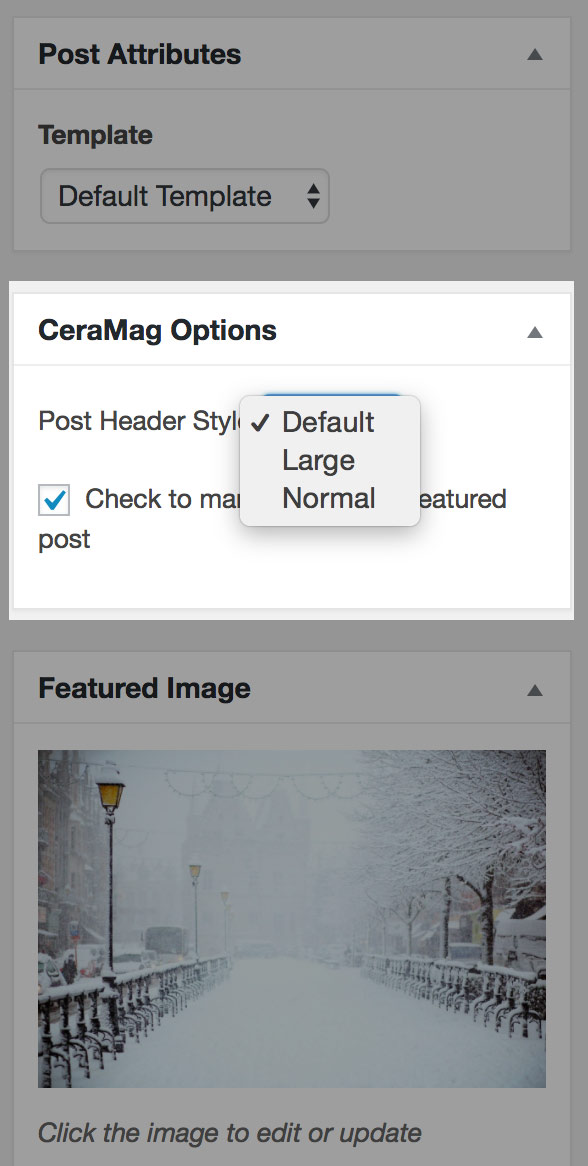
then you will find CeraMag Options panel at the right side of the page. Then find Post Header Style option.
Individual post header option
Default - When choose this, it means the post will use the post header you have selected in Customizer > Single Post > Default Header Style.
So if you change the default header style in Customizer, this post's header style will also change to that one.
Large
Normal
If you choose "Large" or "Normal" for one post, then when you change the default post header style in Customizer, the change will not
affect this post.
10.3 Post Formats
CeraMag supports 6 post formats: Standard, Gallery, Video, Audio, Quote and Link.
Standard Post - Just choose “Standard” as post format.
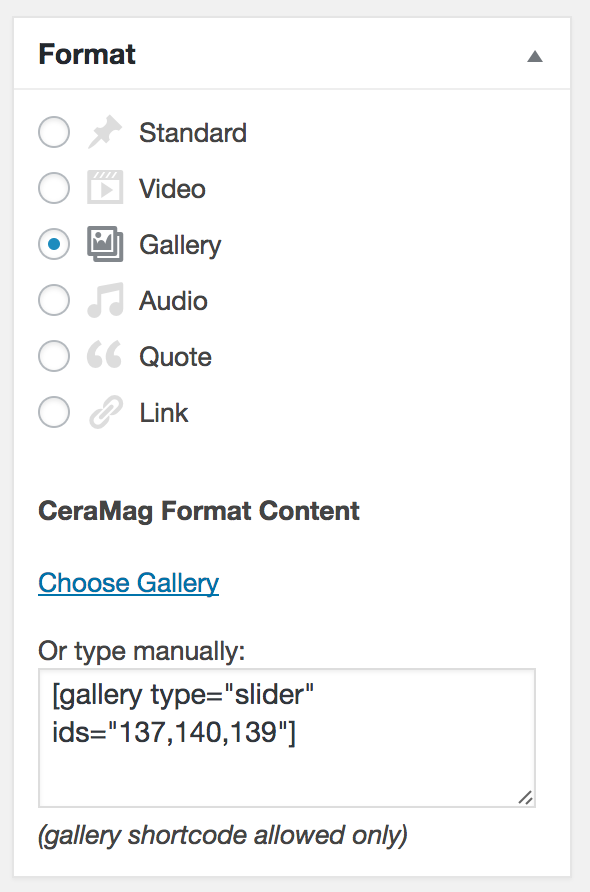
Gallery Post - In the Format panel, choose “Gallery” as post format, then you can click Choose Gallery
link, and upload images or choose images from media library to create a gallery. Please also upload a featured image because CeraMag theme will use the featured image as this post's background
in Top Slider, Featured Section, Posts Widgets, and also for some posts layouts. Please note: the featured image of a gallery post will not show on its
single post page.
Insert a gallery for a gallery format post.
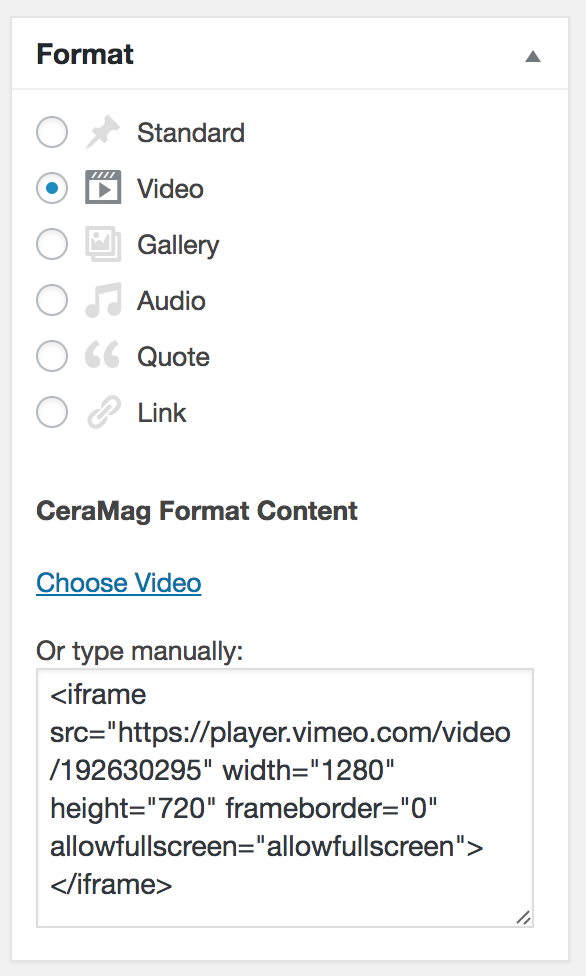
Video Post - In the Format panel, choose “Video” as post format, then you can click Choose Video
link, and upload a video or choose one from media library. Or insert a video embed code into the Or type manually box. Please also upload a featured image because CeraMag theme will use the featured image as this post's background
in Top Slider, Featured Section, Posts Widgets, and also for some posts layouts. Please note: the featured image of a video post will not show on its
single post page.
Insert a video for a video format post.
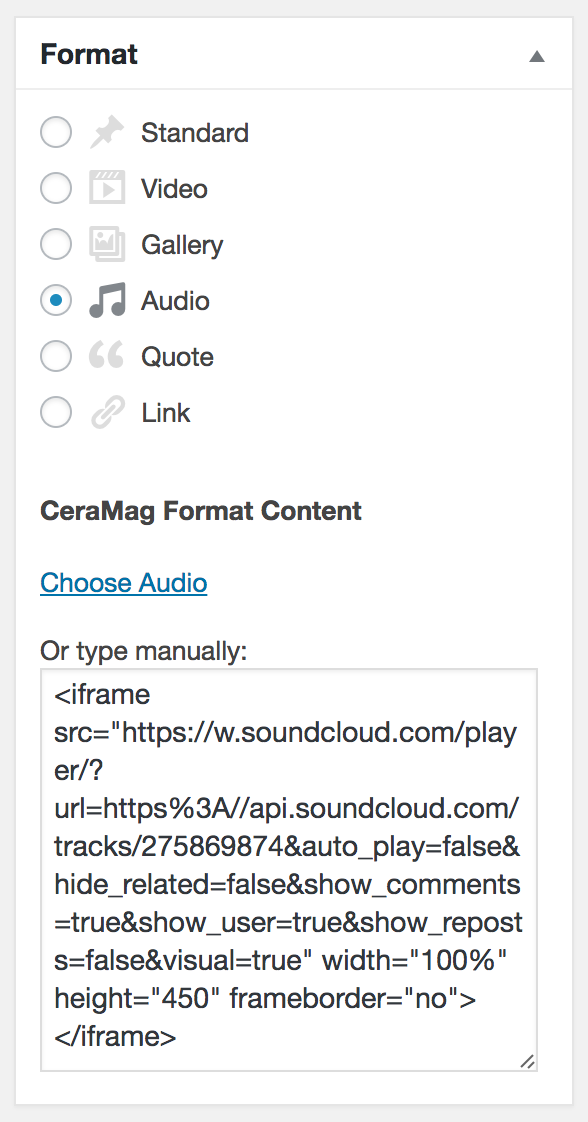
Audio Post - In the Format panel, choose “Audio” as post format, then you can click Choose Audio
link, and upload an audio or choose one from media library. Or insert an audio embed code into the Or type manually box. Please also upload a featured image because CeraMag theme will use the featured image as this post's background
in Top Slider, Featured Section, Posts Widgets, and also for some posts layouts. Please note: the featured image of an audio post will not show on its
single post page.
Insert an audio for an audio format post.
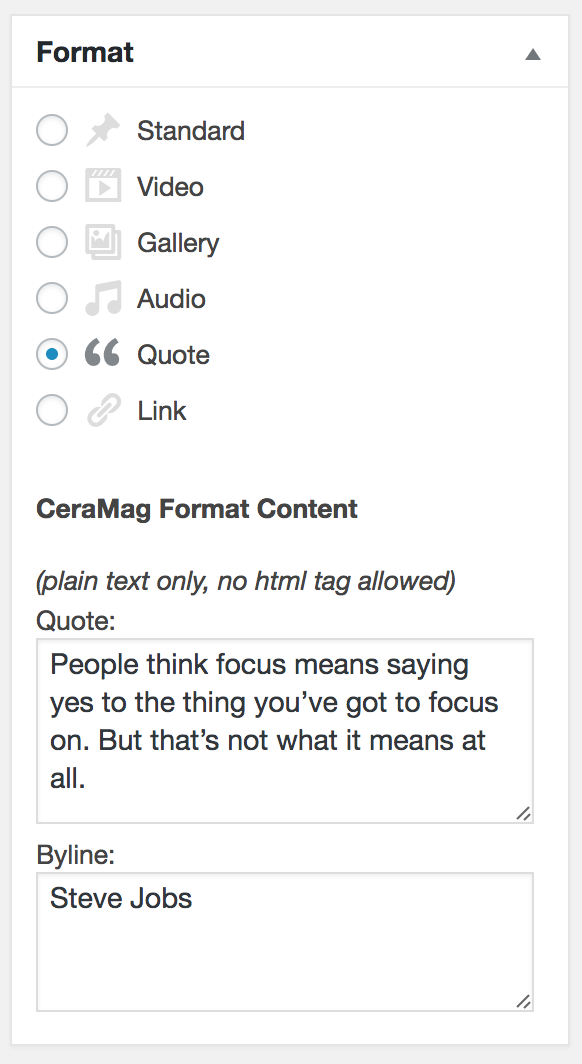
Quote Post - In the Format panel, choose “Quote” as post format, then enter the quote into Quote box,
and you can also enter the quote author/source into Byline box, it's optional.
Insert quote for a quote format post.
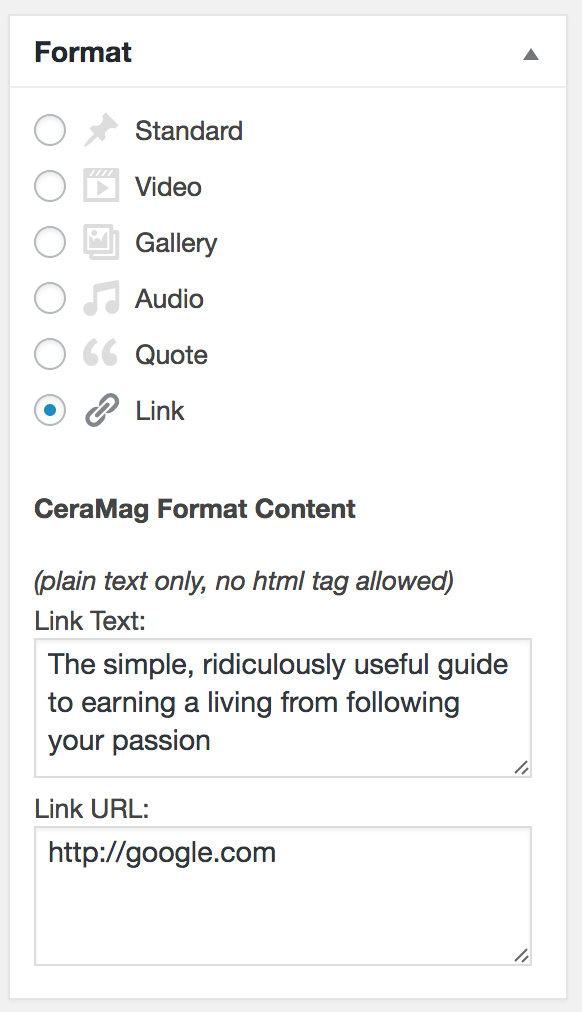
Link Post - In the Format panel, choose “Link” as post format, then enter the link text and link url into the boxes.
Insert link for a link format post.
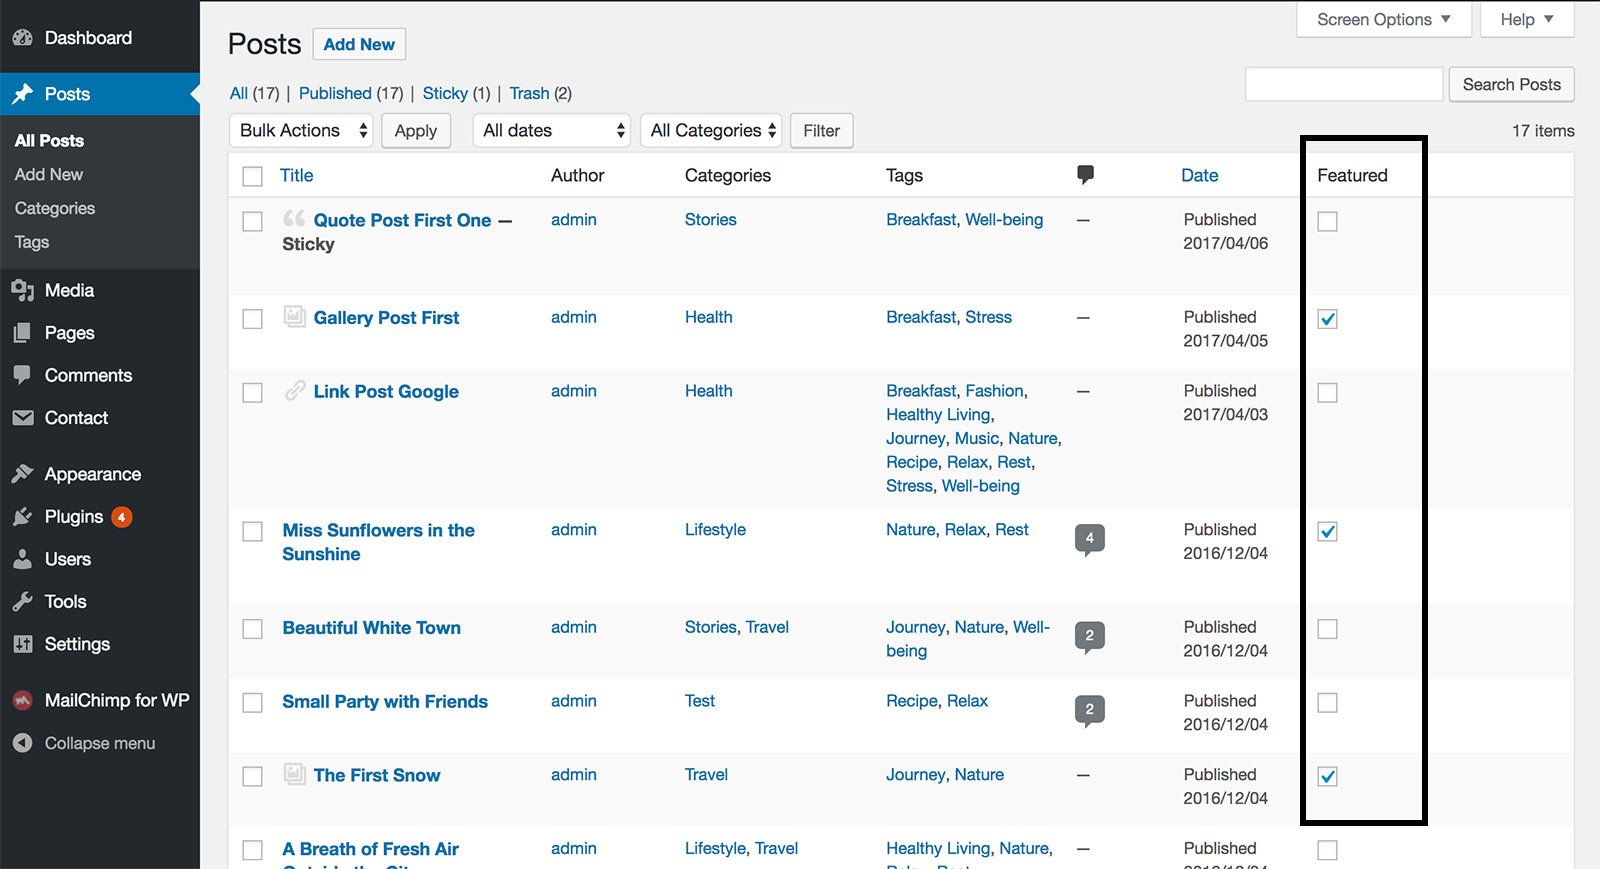
10.4 Featured Post
You can choose some posts and set them as "Featured Post" manually. Then you can insert them into the Top Slider, Featured Section and some widgets.
On your dashboard, go to Posts > All Posts, then you will see the column Featured, tick the box of some posts to mark
them as the featured posts.
Featured Posts
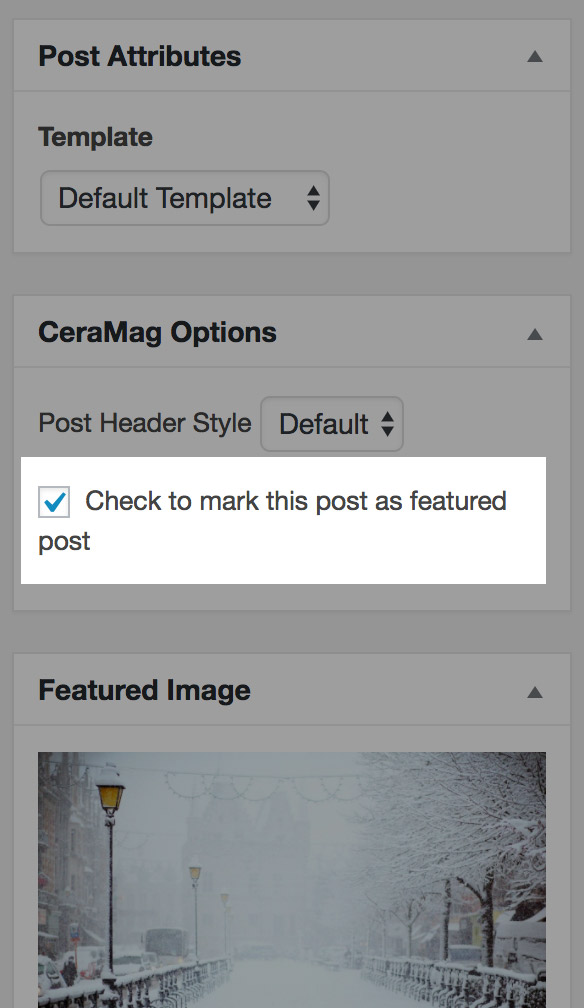
You can also mark a post as featured post on its edit page.
CeraMag Options - Featured Post
10.5 Post Likes & Post Views
Visitors/readers can click on the heart icon of a post to like it, the number will count up at every click. And the post views will count up
at every click into the post.
If your site already has many posts before
using CeraMag theme, because your previous themes don’t have this feature (or use a different method to recored those data),
the number is zero for every post at first. You can add a fake start number of these counts for each post, please see this link to know
how to do it: How to add a
start number for post like/post viewed count.
If your site content is being imported from an old wordpress.com site, or you have been using JetPack plugin on your site for a while,
you can synchronize the data of post views from JetPack to your website.
Please click here to know how to do it.
11. Widgets
11.1 Widgets Basics
CeraMag provides 4 widgets area: the left/right sidebar when the page template is not “Fullwidth”,
and 3 Footer Columns in site footer. To manage widgets, you can:
On your website dashboard, go to Appearance > Widgets.
Or go to Appearance > Customize > Widgets.
You can add widgets into the sidebar/footer columns, and drag to reorder the items.
11.2 CeraMag Custom Widgets
There are 10 custom widgets included in CeraMag.
11.2.1 CeraMag Profile
Add brief information about you and your site. Including a photo, sub title, brief description, signature image and a linked button.
11.2.2 CeraMag Category
Display selected (up to 5) categories with background image in the widget area. Please note: it will not display categories with no posts.
Each category's background image can be added/edited via Dashboard > Posts > Categories.
Please hold the CTRL key (PC) or COMMAND key (Mac) to select multiple items.
11.2.3 CeraMag Ads
Upload an image and enter a link to the page you are advertising/promoting about. And you can also choose to open it in the current tab or a new tab.
11.2.4 CeraMag Featured Posts Slider
The widget will show your featured posts in a slideshow.
11.2.5 CeraMag Posts List
The widget will show one of the following 4 types of posts in a list with small featured image, post title and meta info. And can also show the list number.
The most recent posts
The most liked posts
The most viewed posts
(The most recent) Posts from selected categories (New feature since v1.1.7)
11.2.6 CeraMag Posts Tab
The widget will show the latest/most liked/most viewed posts in tabs with large featured image, post title and meta info.
And can also show the list number. Each group of posts will be placed in an individual tab, click the tab title to switch to that group. Can
display at most 3 tabs.
11.2.7 CeraMag Social
Add this custom widget into your sidebar/footer columns to show your social menu.
11.2.8 CeraMag Instagram
Please connect your website with your Instagram account first. Please click here to know how to set up your Instagram. After that,
you can add this widget to a widget area to display the latest photos from this account.
11.2.9 CeraMag Facebook
Enter your Facebook username to display the Facebook like box.
11.2.10 CeraMag Authors
The widget will display a list of authors on your site. Can choose all authors, or choose by name/role.
12. Image Size
To make sure images on your site always look sharp and clear on all devices, the recommended width of images is at least 1600 px
when it is supposed to be a full-width image.
Images will be scaled and saved into different sizes after you upload them. You can set image sizes via dashboard >
Settings > Media.
Recommended media sizes for CeraMag theme:
Medium size - Max Width: 300, Max Height: 300
Large size - Max Width: 1024, Max Height: 1024
Full size - 1920 x 1280 (3:2)
After you change the media size settings, when you upload new images they will be scaled and saved into the new sizes. But for the
existing images, you can use this plugin to regenerate the new sizes: Regenerate Thumbnails.
We suggest use images in 3:2 aspect ratio for the features images and photos in a gallery (especially a slider gallery).
13. Shortcodes
Custom shortcodes have been added since v1.1.1. Currently we have provided 12 shortcodes for content:
Author List - Display authors of your site. 5 layouts to choose from. And can show all authors or choose by name/role.
Drop Caps - Style the first letter of a selected paragraph. 5 styles to choose from.
Highlights - Select some words to add marker pen highlight effect. 2 styles to choose from.
Tweet It - Select content and allow readers to tweet the sentence by one click. Selected content can be inline or a whole paragraph.
But please keep it short because Twitter only allows 140 charcaters.
Row - Create column layouts on your pages/posts. You need to wrap the column shortcodes within row shortcodes.
Column - Create column layouts on your pages/posts. This shortcode allows to add a column into an existing row easily.
Button - Add buttons. 4 different sizes. Unlimted colors.
Divider Line - Add divider lines. You can choose line's style, size and color.
Tabs - Create a single content area with multiple panels, each associated with a header in a list.
Tab - Add a single tab into an existing tabs block. You need to wrap the tab shortcodes within tabs shortcodes.
Accordions - Displays collapsible content panels for presenting information in a limited amount of space.
Accordion - Add a single accordion into an existing group of accordions. You need to wrap the accordion shortcodes within accordions shortcodes.
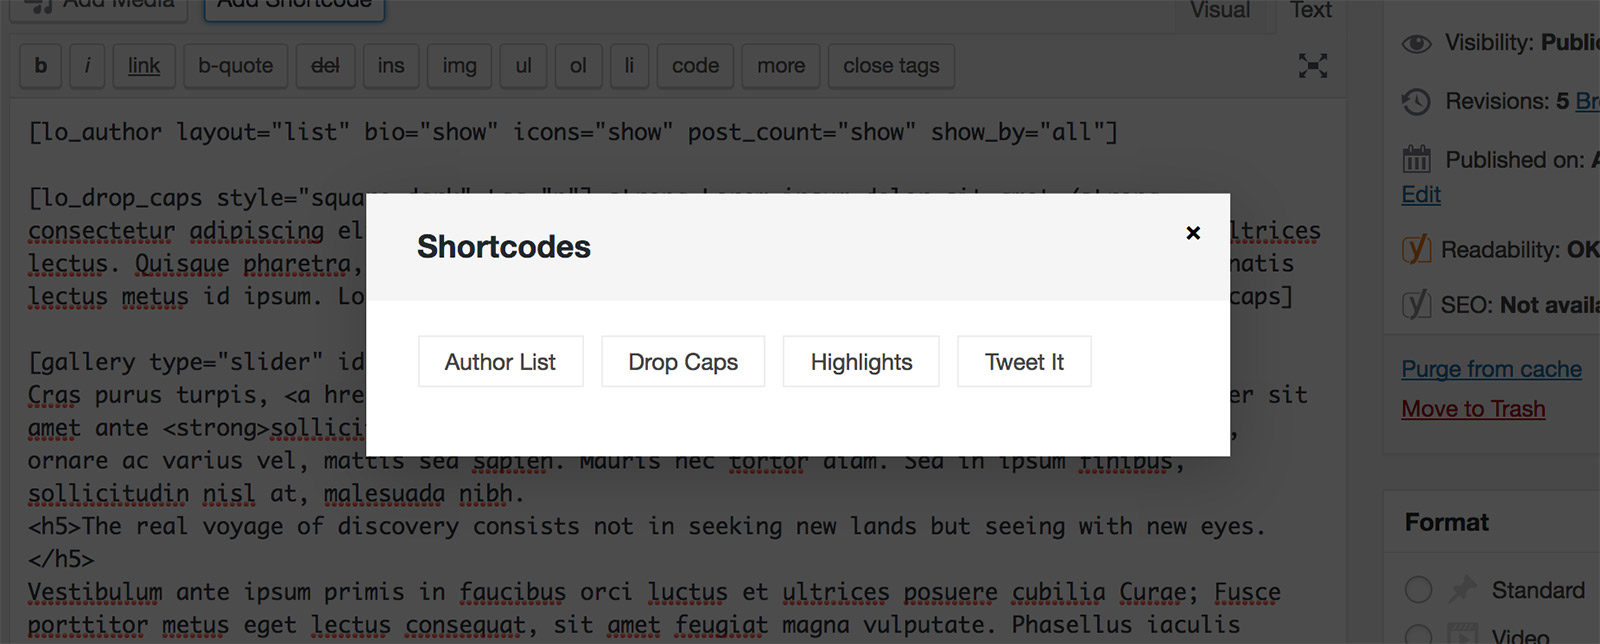
To add shortcodes into content, when edit a post or a page, click on the Add Shortcode button above the editor.
Add Shortcode Button
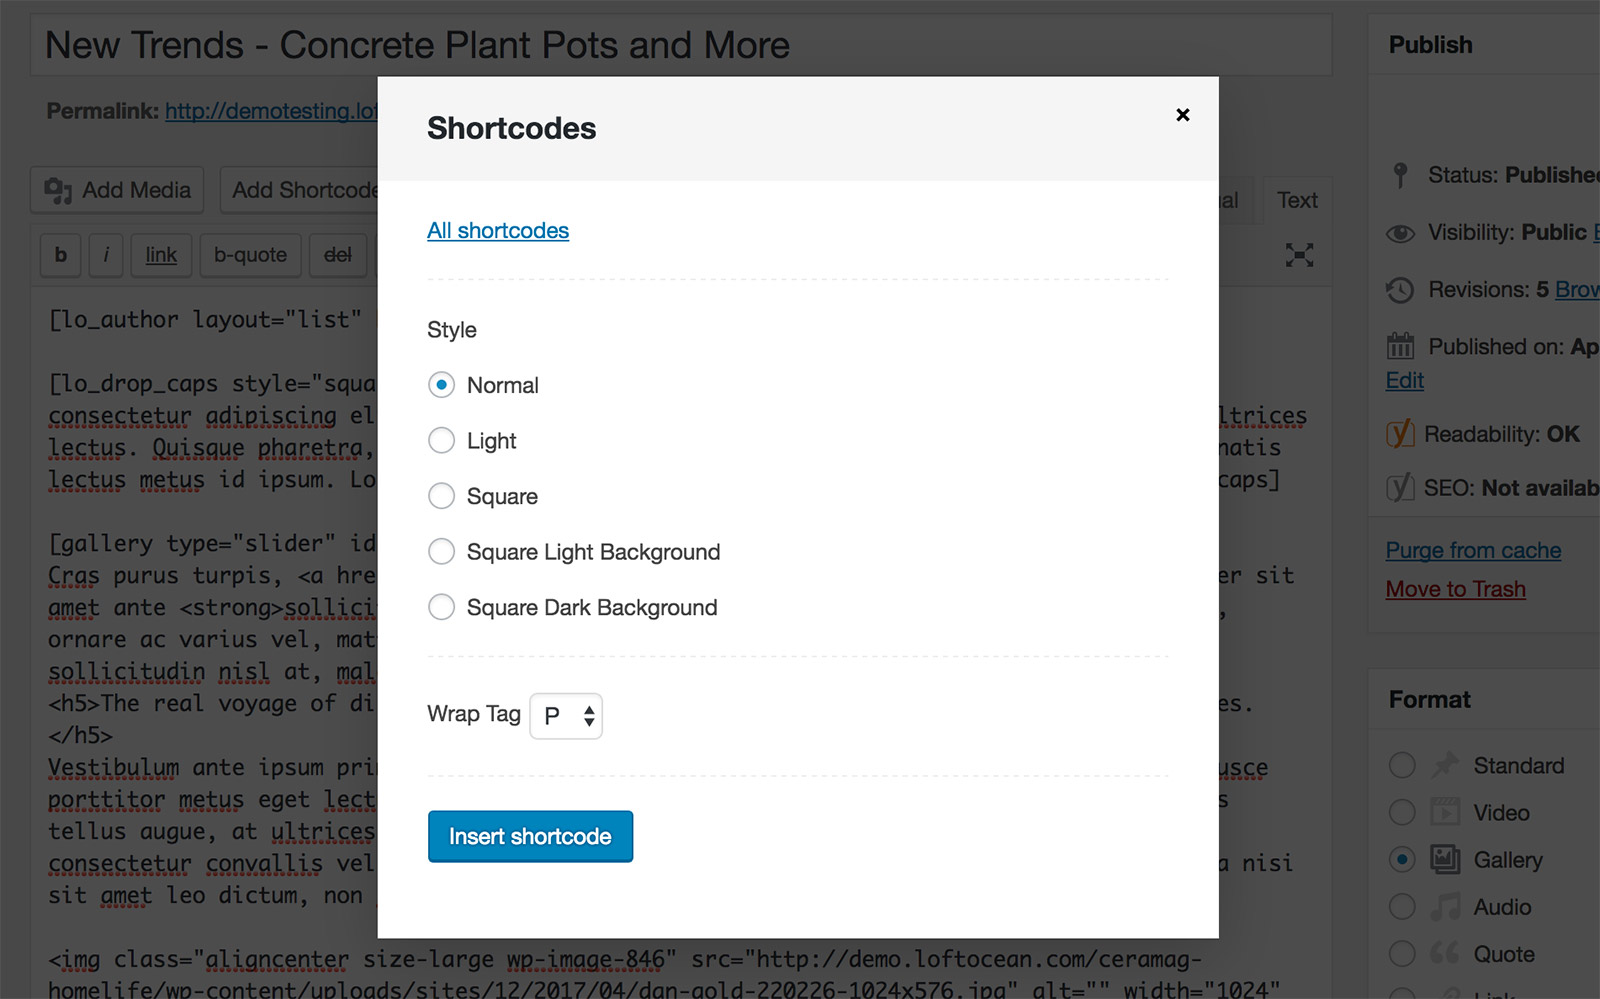
Then choose which shortcode you'd like to add in the popup panel, then choose which style of this shortcode you want to use.
Shortcode PanelShortcode Settings for Drop Caps
For style some text in the post/page, you can select those content then click on the Add Shortcode button to wrap those content with shortcode.
The shortcode for drop caps will look similar to this:
Shortcode for Drop Caps
Please note: most of the shortcodes have an opening tag and a close tag
and text content needs to be put between them. Please see below:
[lo_drop_caps] Content goes here. [/lo_drop_caps]
Or,
[lo_button size="large" url="#"] Contact Us [/lo_button]
The shortcodes for Author List and Divider Line don't have a close tag because you don't need to add any text content for these 2 shortcodes.
14. Background Video
CeraMag supports (looping and muted) background video for single page/post header and slideshow in the Top Slider since v1.1.2.
Please note:
Background video only works for desktop/laptop devices. On mobile/tablet devices background videos will be replaced by featured images (if set)
to prevent from using unwanted data.
Supports self-hosted videos, YouTube & Vimeo
Please always upload a featured image for the page/post, so it will show the featured image while the video is not ready to play.
Page Header Background Video
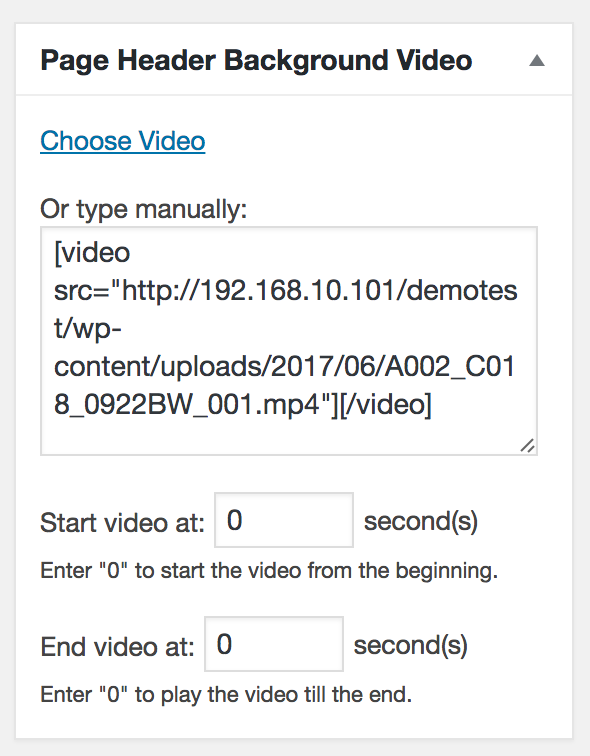
To add a header background video for a single page, when edit the page, please find the panel Page Header Background Video.
Then upload a video, or select one in the media library, or copy and paste video embed code (for an external video from YouTube or Vimeo).
And you can set a specific start and end point of the video, then the background video
will loop between set start and end time.
Page Header Background Video
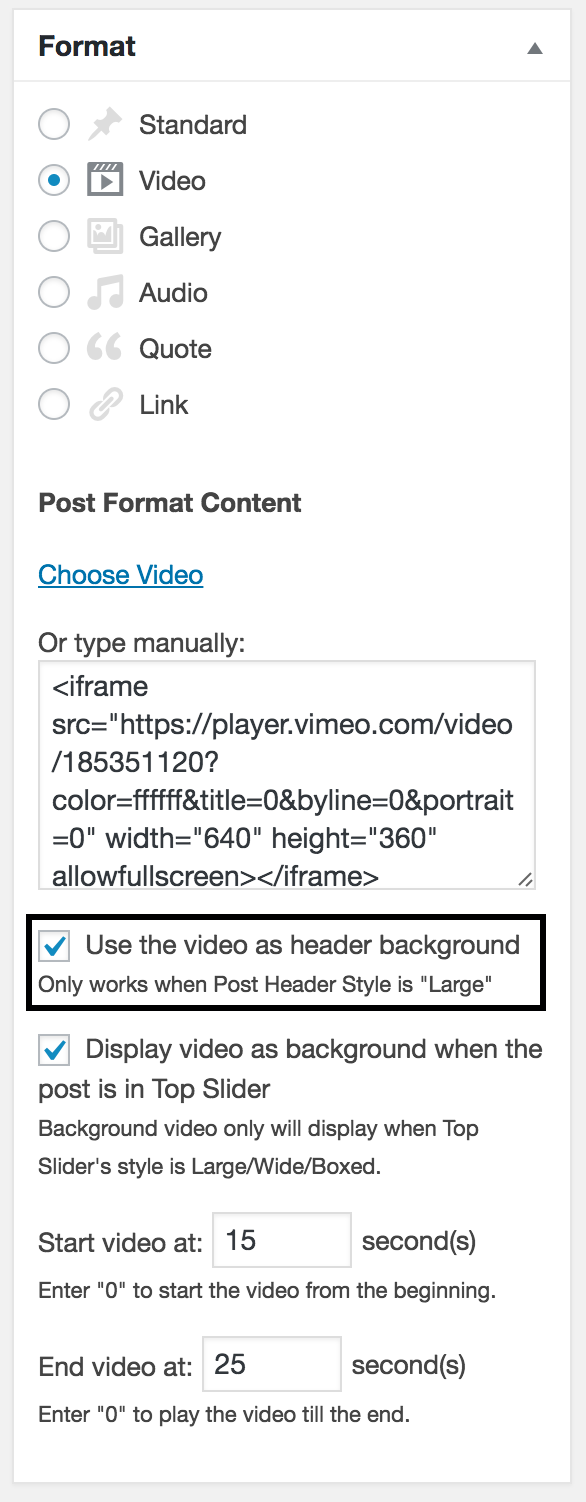
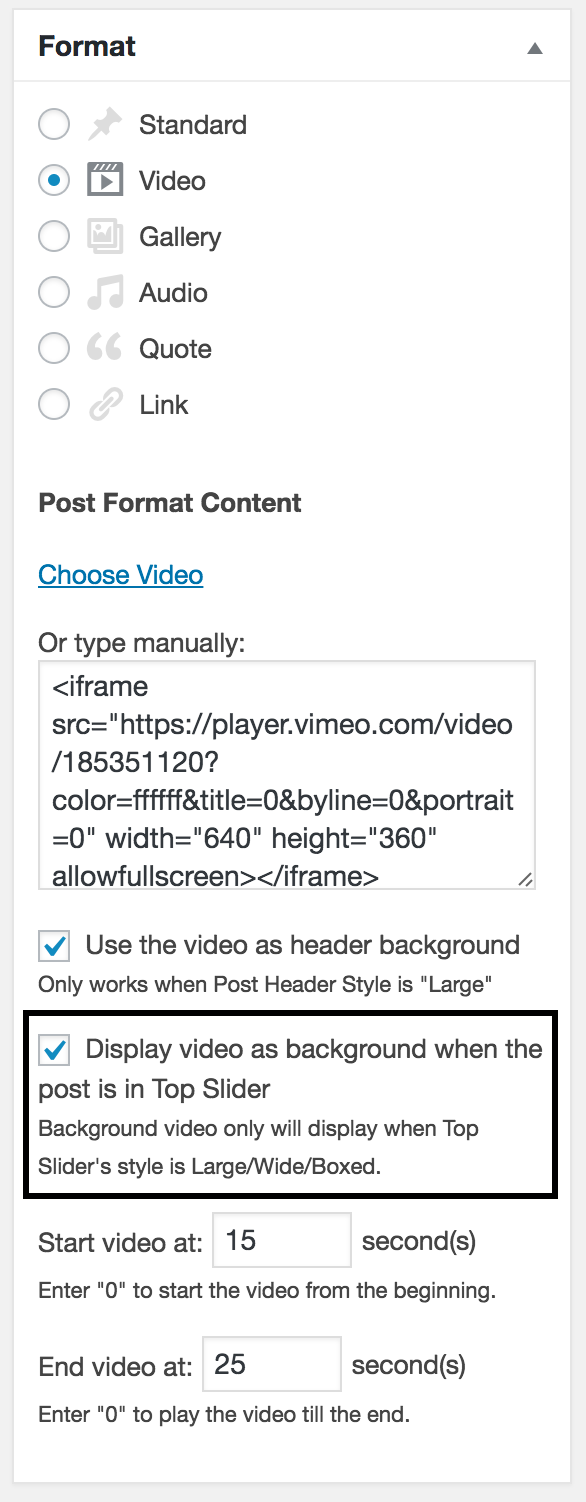
Post Header Background Video (Video Format Post Only)
To add a header background video for a single post, please note:
The post's format is Video.
The post's header style is set to "Large" (if it is set to "Default", then the default value should be "Large" in Customizer > Single Post > Default Header Style).
After add a video to a video format post, tick the box of option Use the video as header background. And you can set a specific start and end point of the video, then the background video
will loop between set start and end time.
Post Header Background Video
Background Video for Slideshow in Top Slider (Video Format Post Only)
To display background video for a post in the Top Slider, please note:
The post's format is Video.
The Top Slider's style is set to Large / Wide / Boxed.
After add a video to a video format post, tick the box of option Display video as background when the post is in Top Slider . And you can set a specific start and end point of the video, then the background video
will loop between set start and end time.
Display Background Video for a post in Top Slider
15. Gutenberg Ready
Gutenberg is the new editor of WordPress core.
If you are new to Gutenberg, you may like to read this doc first.
How to get Gutenberg?
Gutenberg will be added into WordPress core since WordPress 5.0. You can update your WordPress to the latest version.
If you are not going to update your WordPress, you can download and install Gutenberg Plugin version.
If you also want to keep the Classic Editor, you can download its plugin version.
Theme built-in features + Gutenberg
Because there are many differences from the Classic Editor, some theme built-in operations also change in the new editor.
Please continue reading for more details.
To get these new features and changes:
Please update CeraMag theme to v2.0;
Then update the required plugin "CeraMag Extension" to v2.0;
Make sure the the required plugin "CeraMag Extension" has been activated.
Please note: Gutenberg is still improving (fast and frequently), its code/logic may change in a newer version.
Therefore, sometimes new issues may arise after updates. We will pay close attention to it and we will be grateful for any problem report.
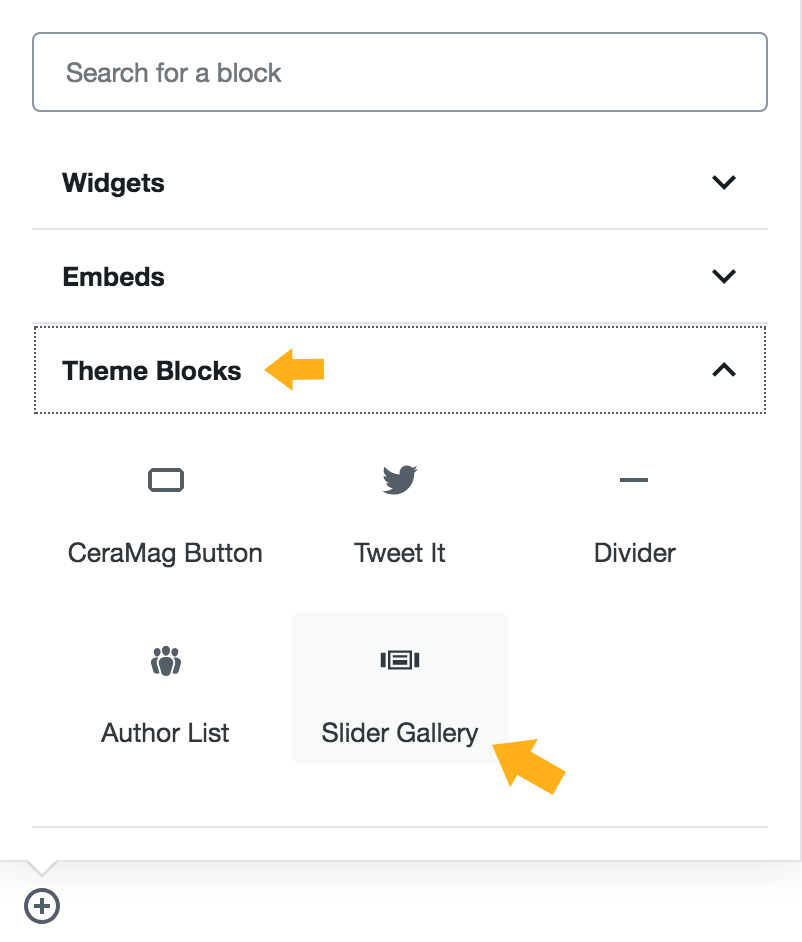
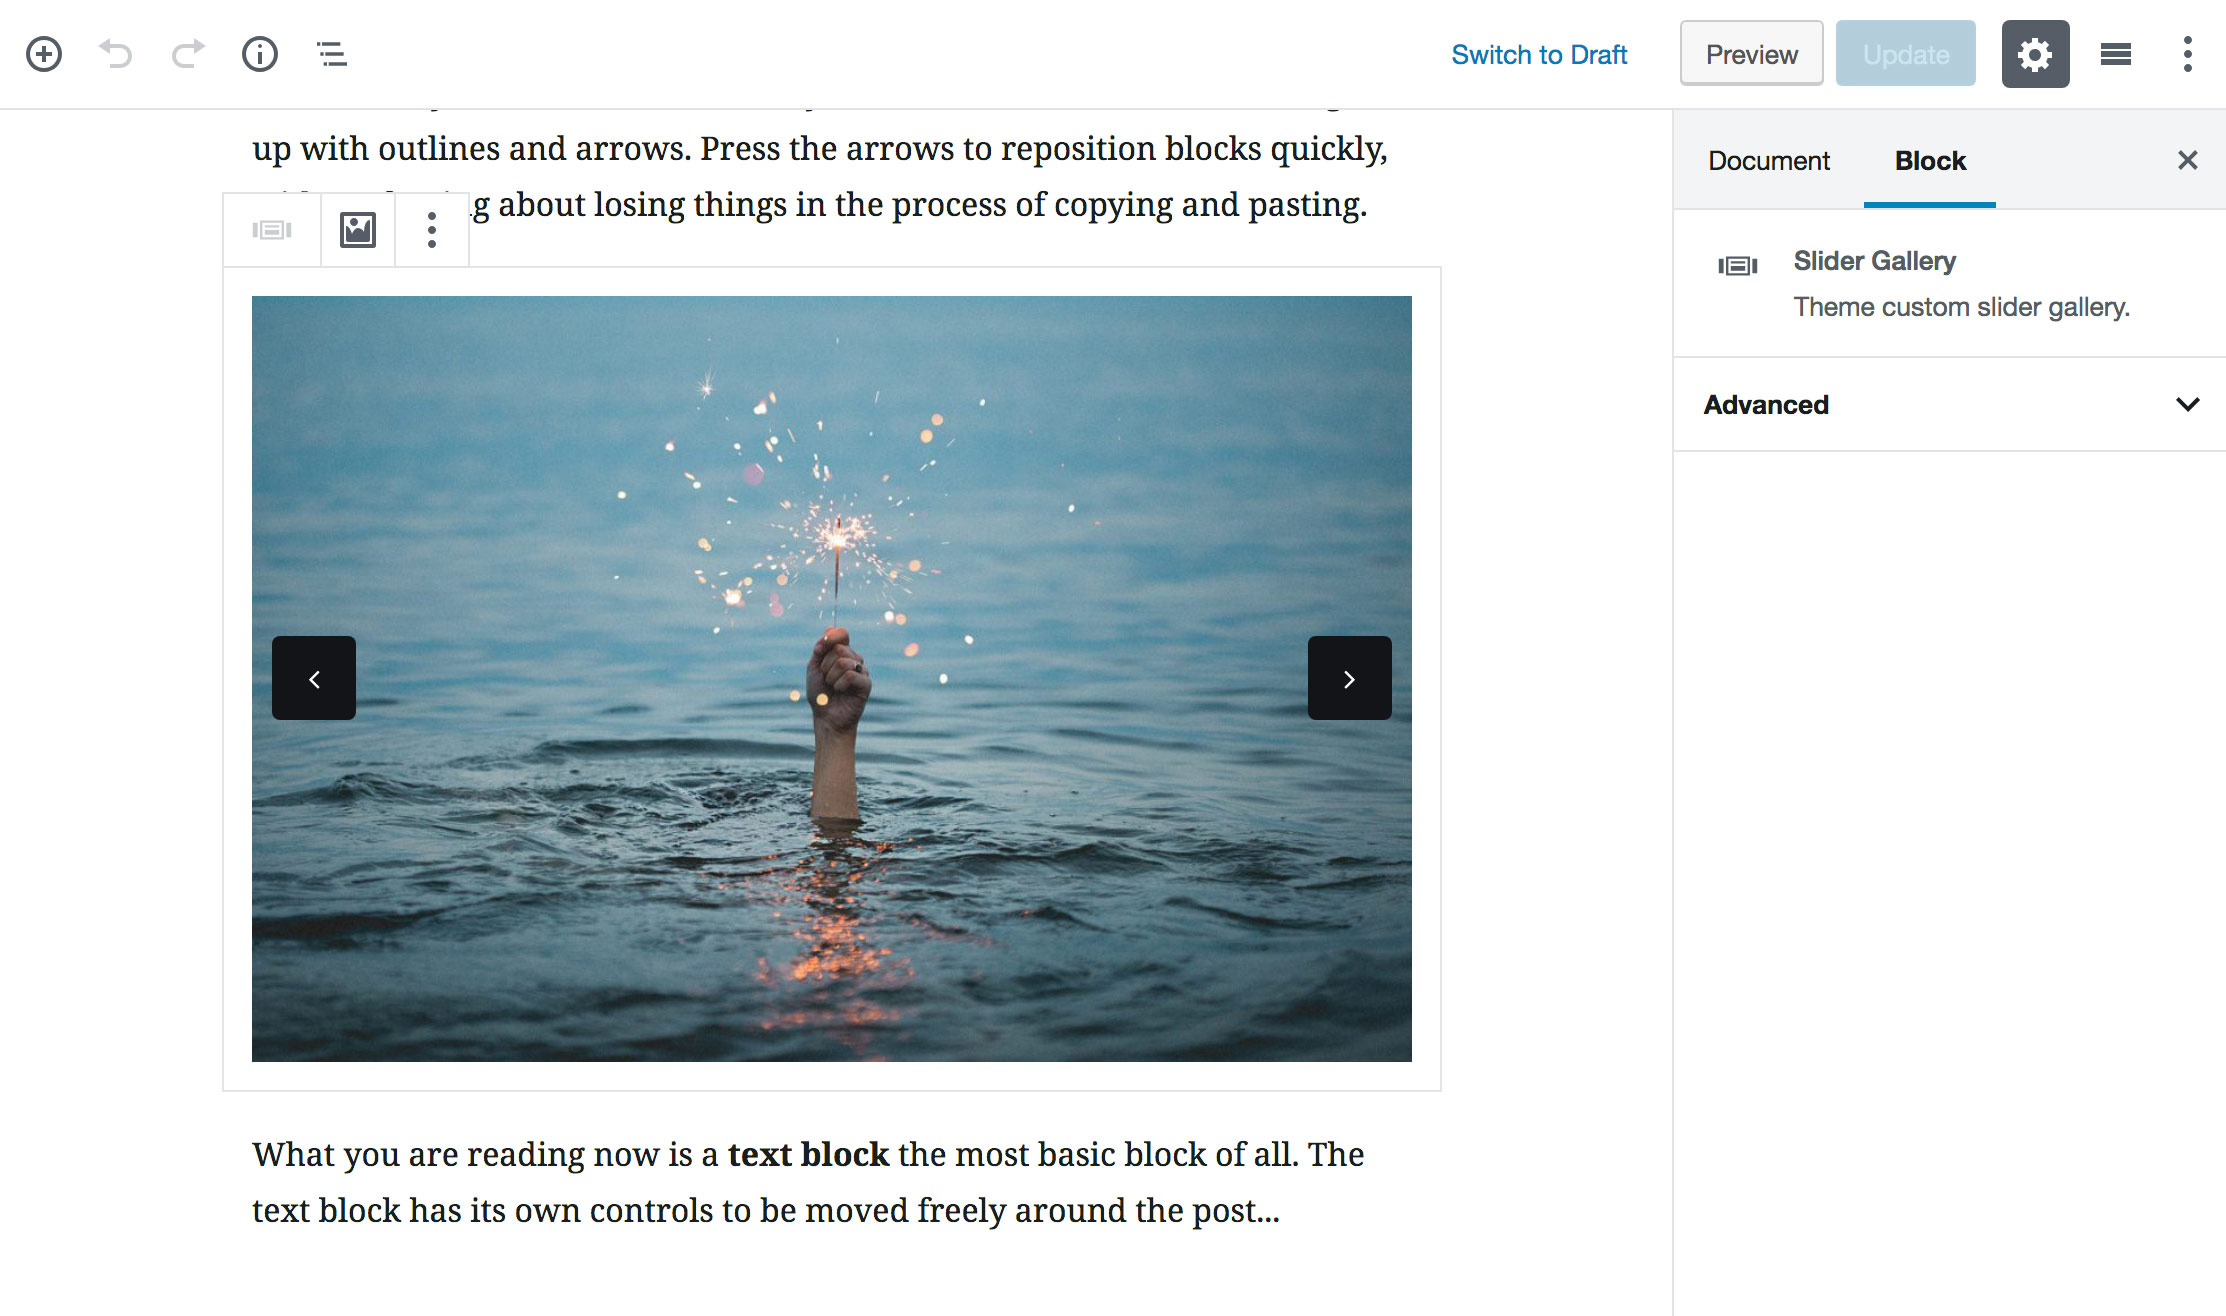
15.2 Theme Built-in Slider Gallery
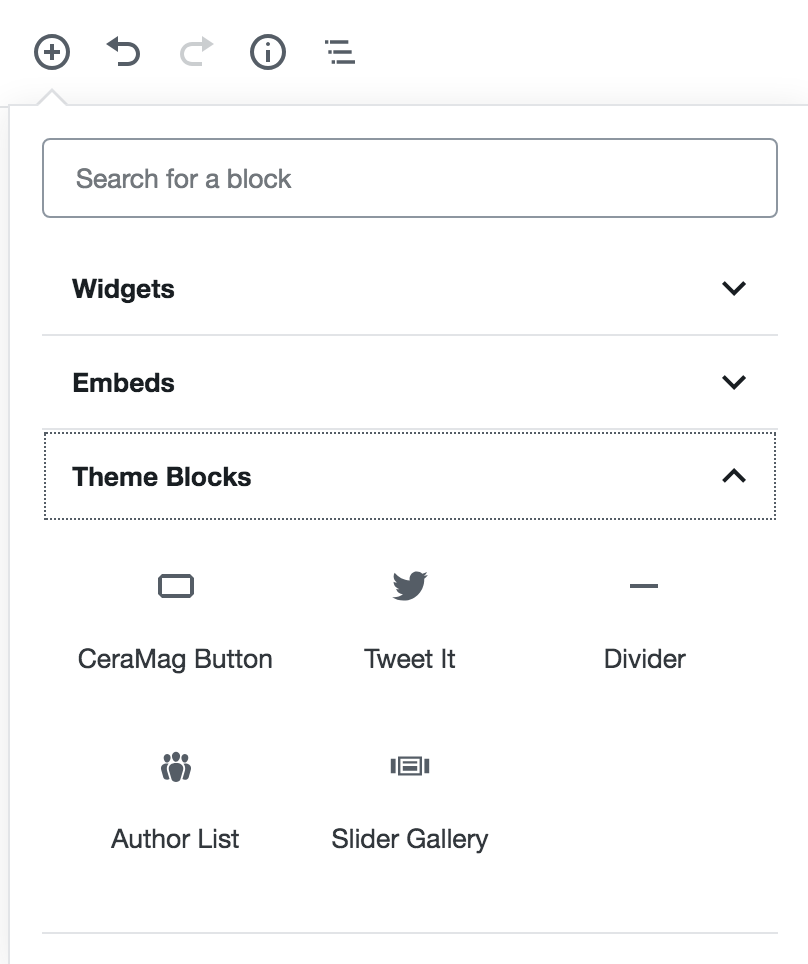
CeraMag theme built-in image Slider Gallery has been converted into Gutenberg Block.
Step 1 - When adding a block, find Theme Blocks, click the Slider Gallery to add it to the content area.
Theme built-in Slider Gallery Block in Gutenberg Editor
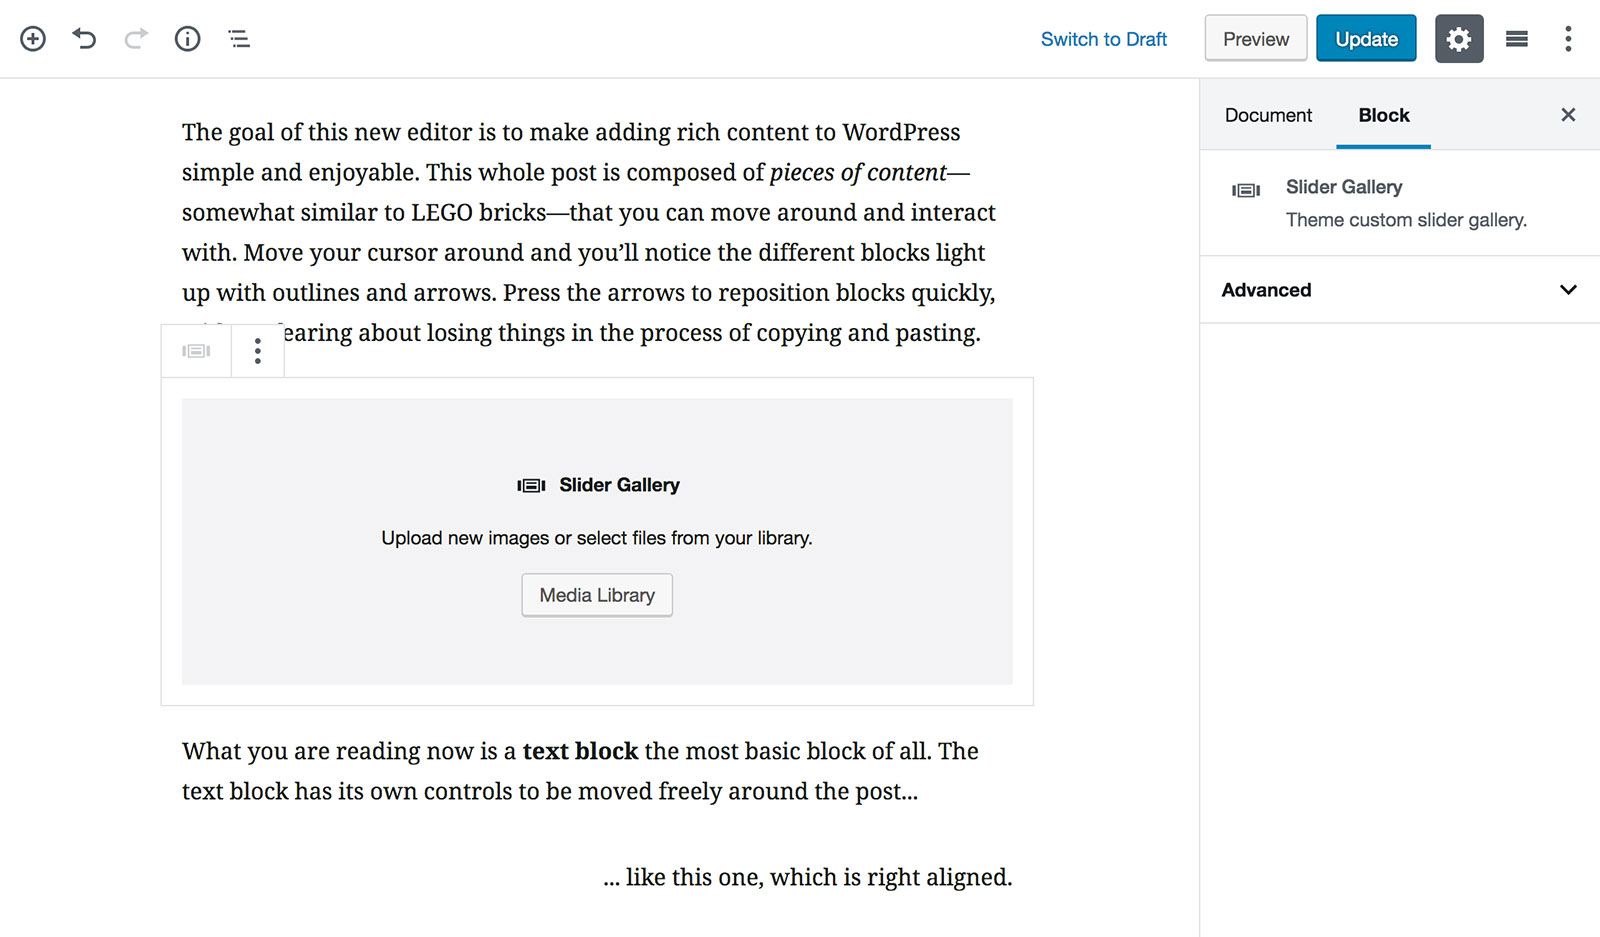
Step 2 - Then you will see the block has been added. When selecting this block. Click on the "Media Library" button
to open the Media Library where you can create a new gallery.
Slider Gallery Block Settings
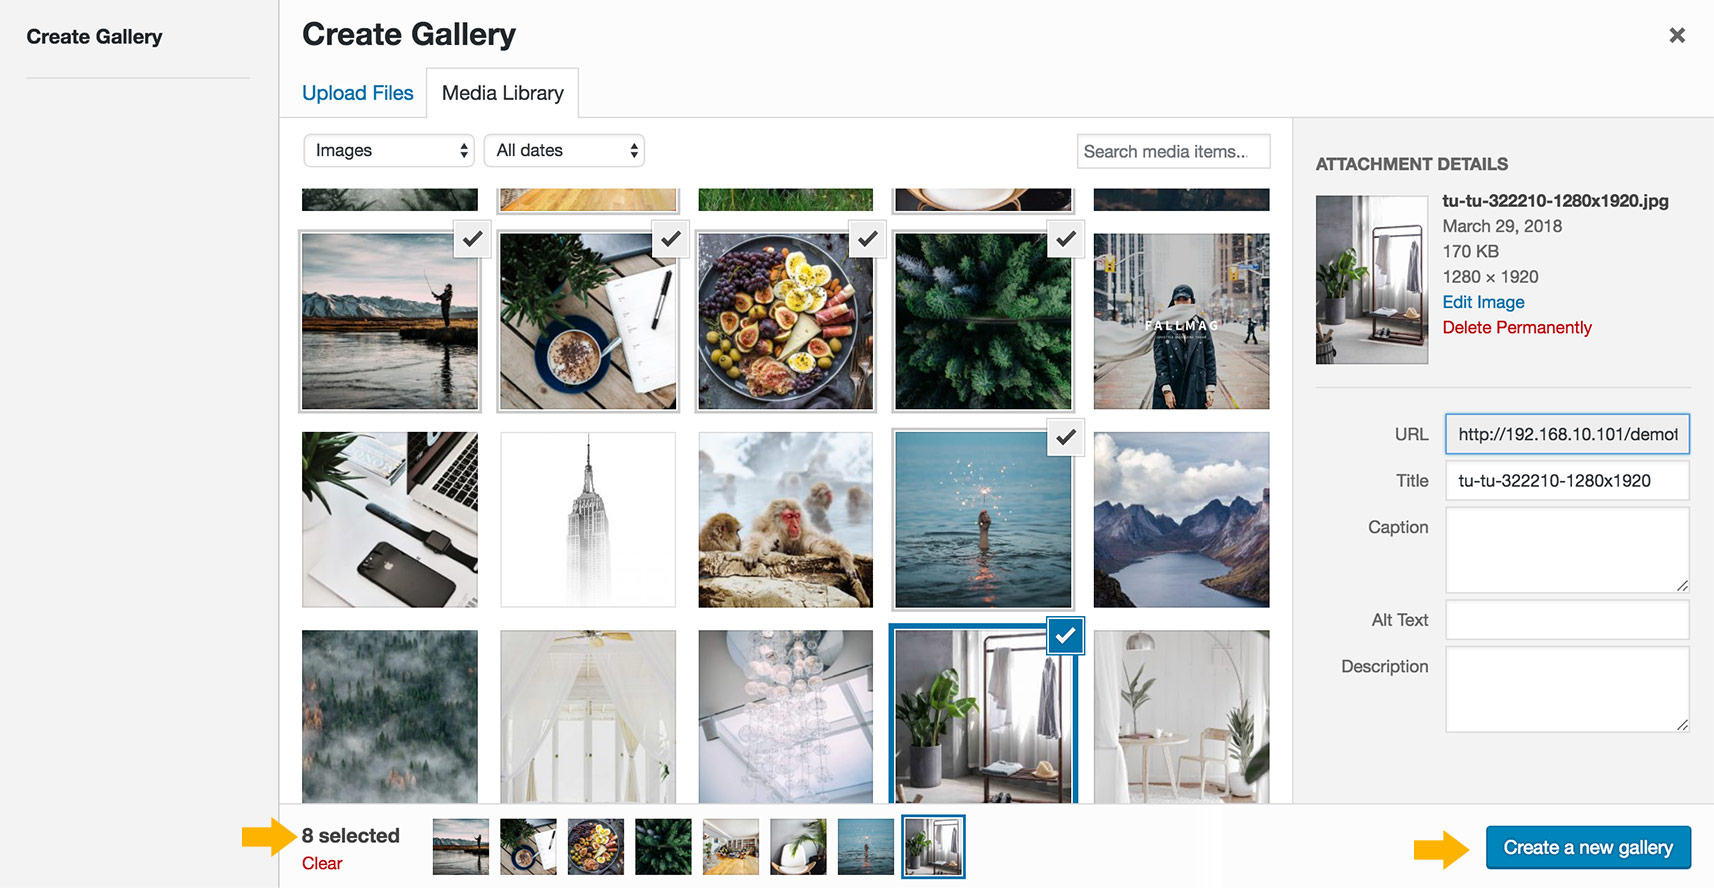
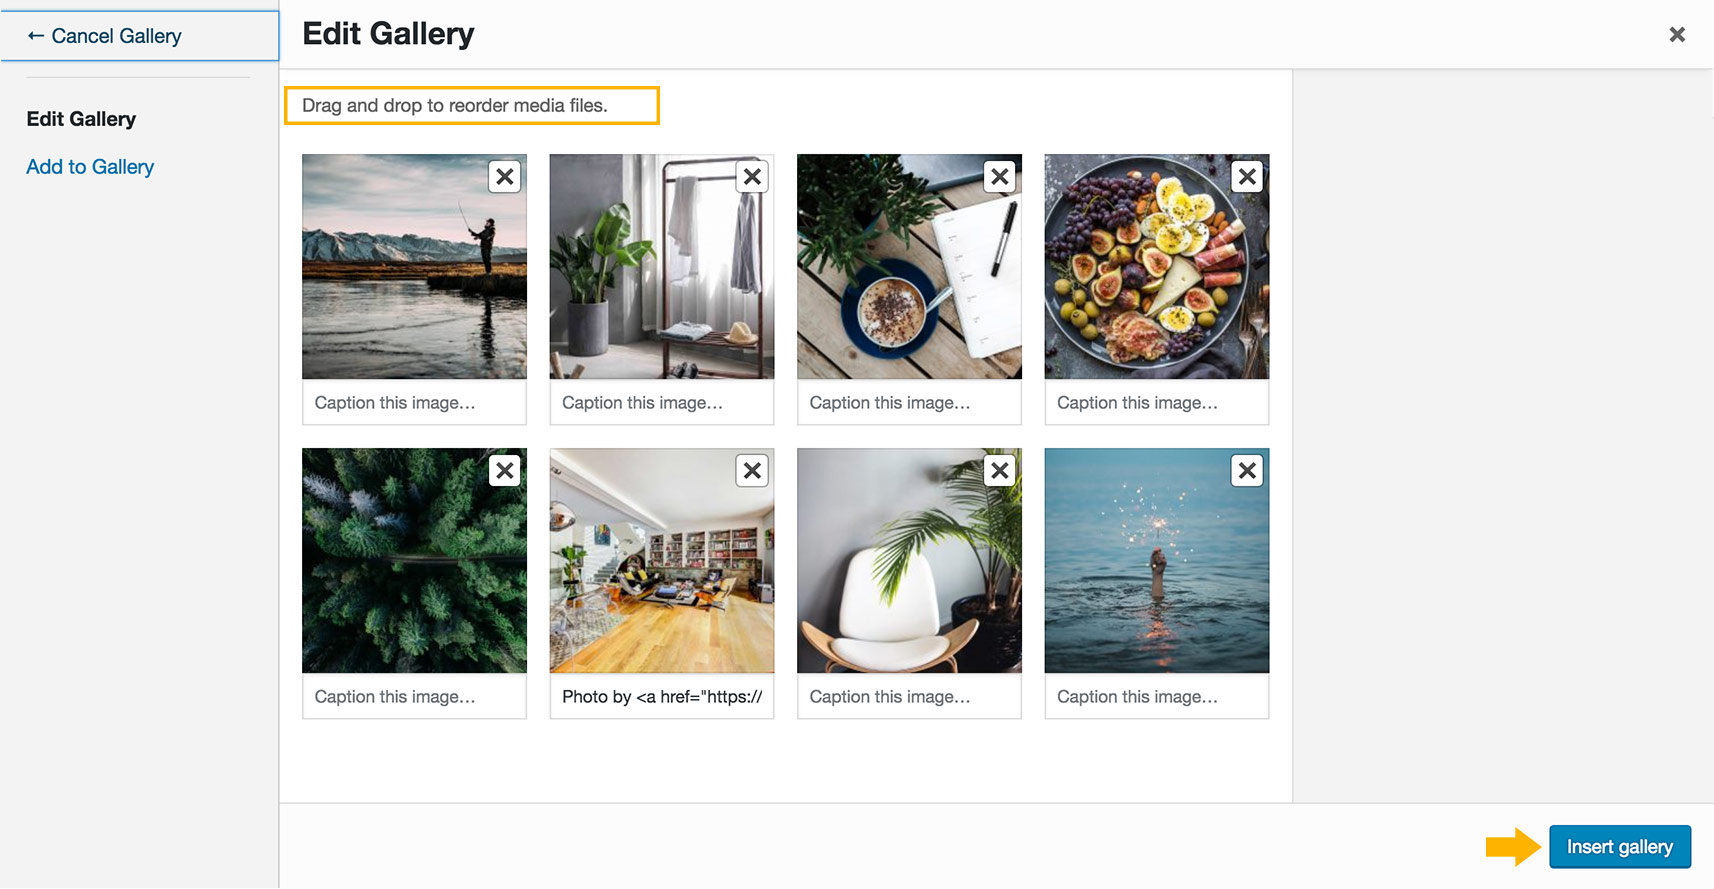
Step 3 - In the Media Library panel, you can upload new images, or select some existing images, and then click "Create a new gallery" button.
Select some images to create a gallery
Step 4 - Then you can edit this gallery: reorder images, remove images, add captions, add new images into this gallery. Then click "Insert gallery" button.
Edit a gallery
Step 5 - Now the gallery can be previewed in Gutenberg.
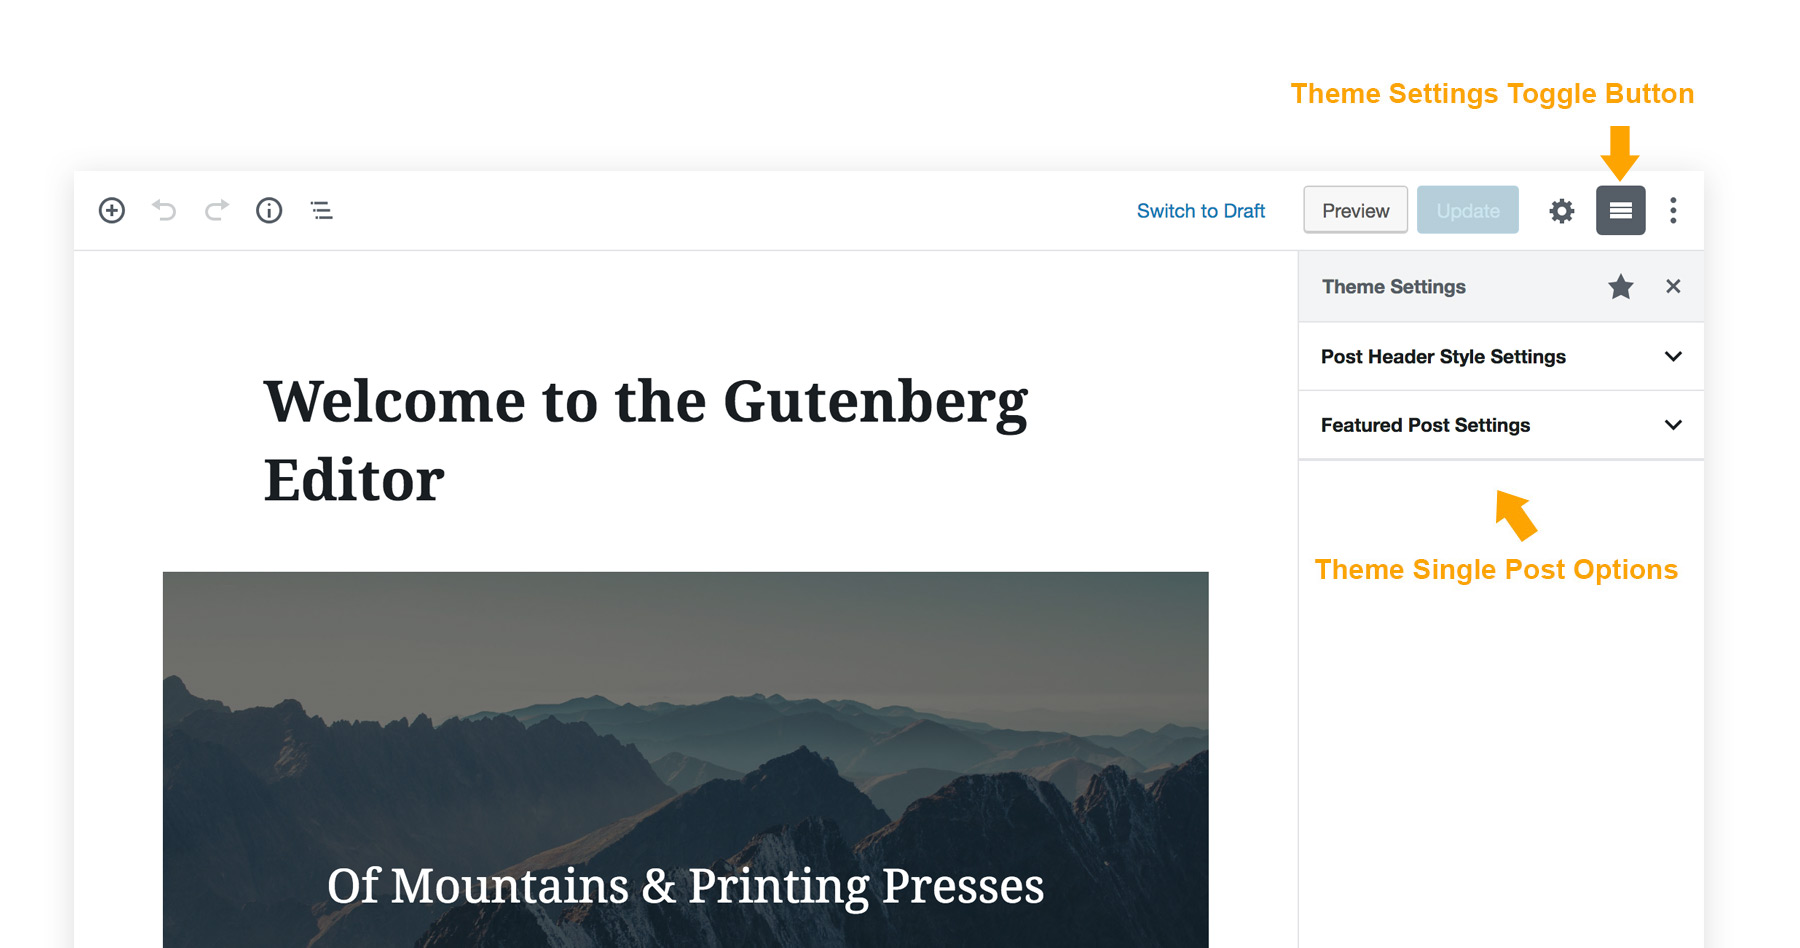
In the Classic Editor, CeraMag Single Post/Page Options are meta boxes which were displayed below the post editor. Since CeraMag v2.0, we redesigned these settings
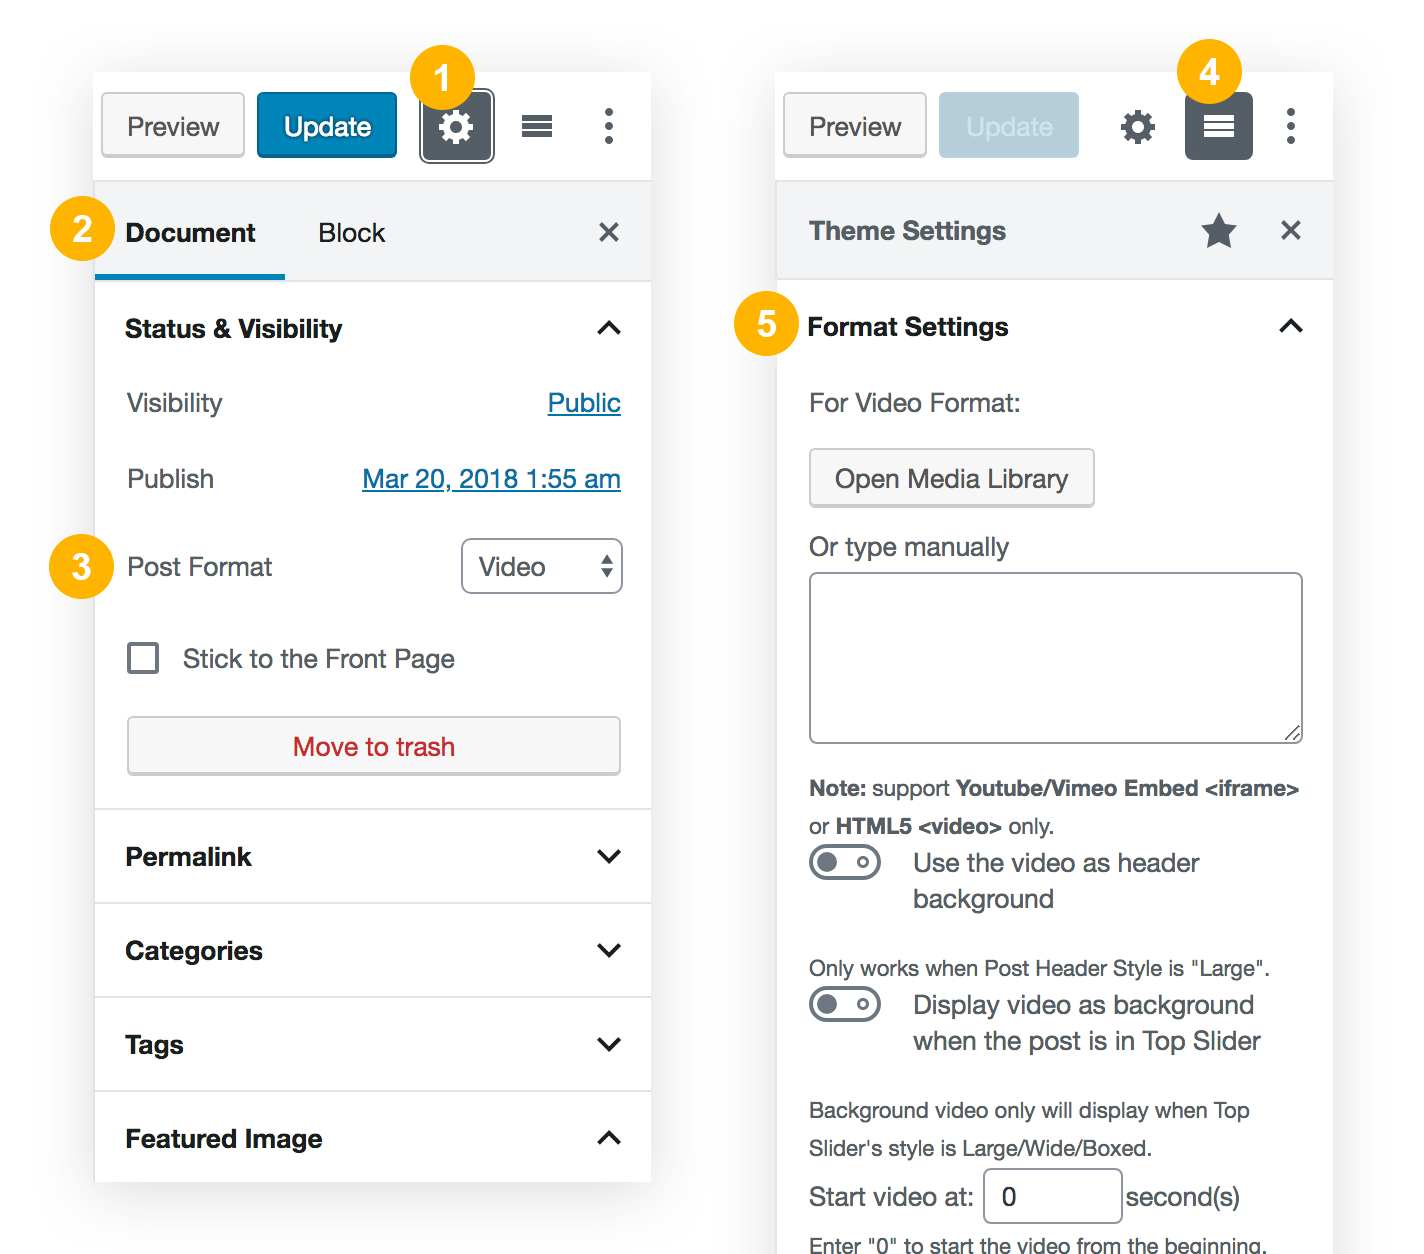
to fit in the Gutenberg UI - Sidebar. So, if you edit a post/page in Gutenberg, you can find the Single Post/Page Options in the editor sidebar.
For example, when editing a post in Gutenberg editor, please click on the "Theme Settings" toggle button to display the Single Post Options.
(When editing a Page, the "Theme Settings" will show Single Page Options.)
CeraMag theme Single Post/Page Options integrated to Gutenberg Sidebar
The options are organized into groups, click on each group heading to expand the group and show its settings.
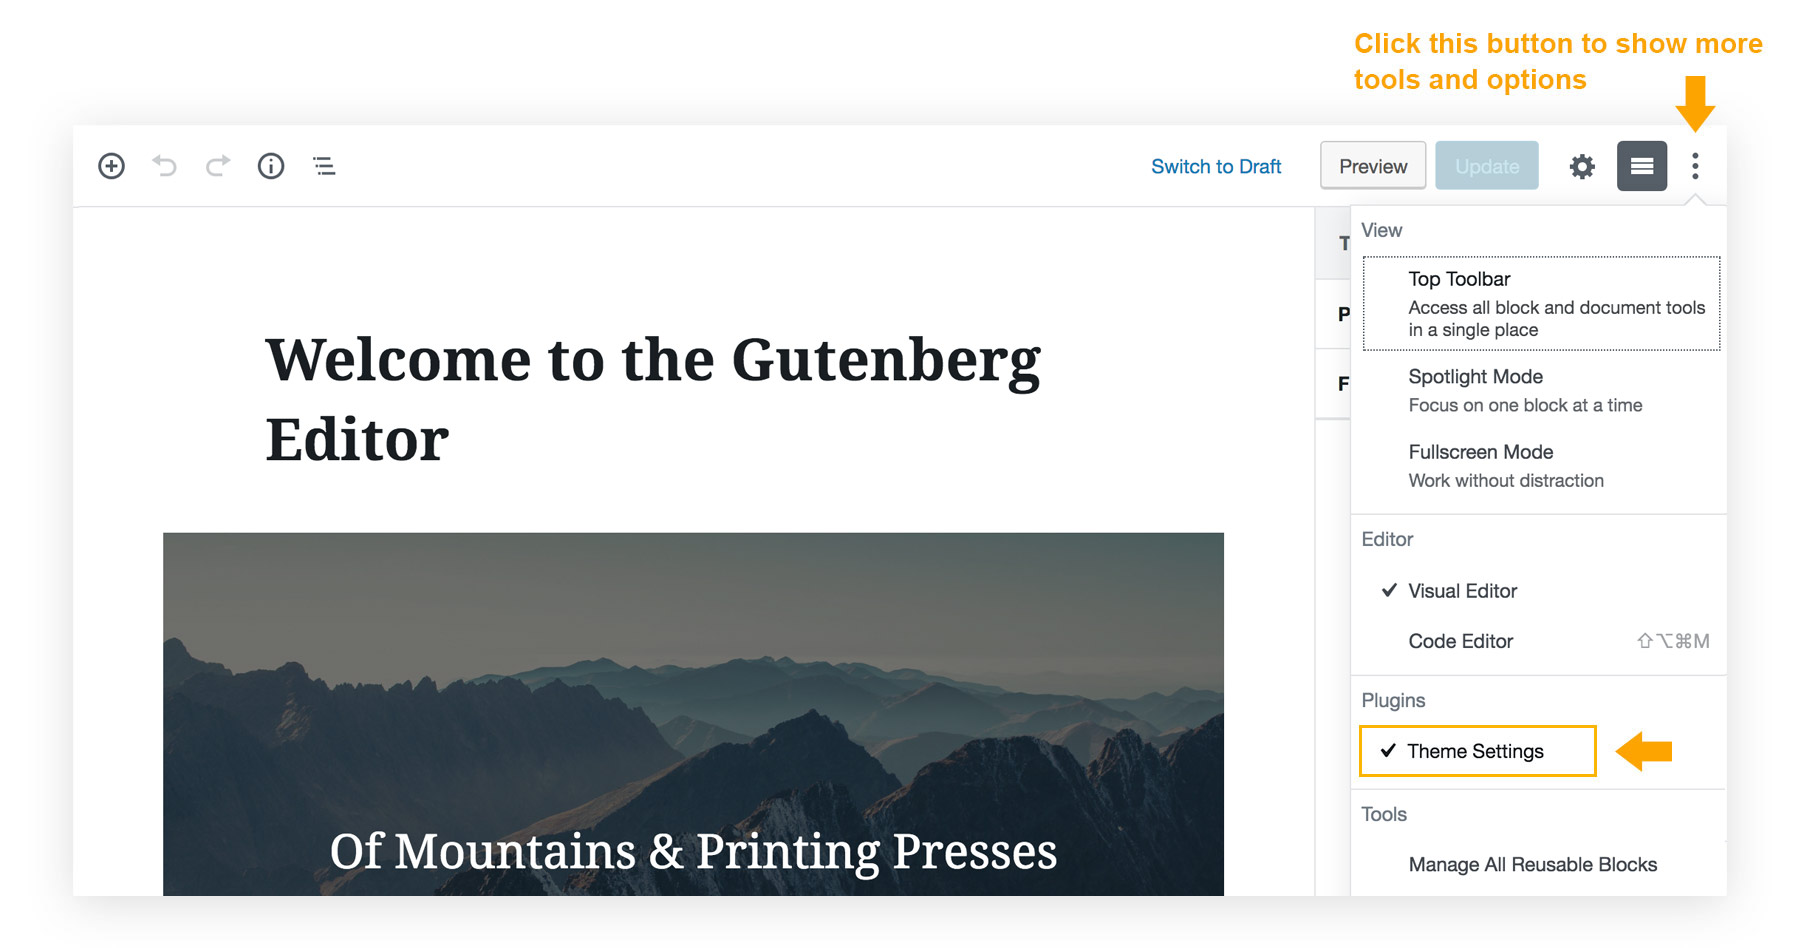
Please make sure the "star" icon is enabled to pin Theme Settings toggle button to Gutenberg Toolbar:
Theme Settings toggle button - Pin to Toolbar
If the "Theme Settings" is unpinned from the toolbar and you cannot find it, please click the "Show more tools and options" icon, then
you can find "Theme Settings" in "Plugins".
Theme Settings toggle button - Pin to Toolbar
15.5 Post Format Media
If the post format is Gallery / Video / Audio / Quote / Link, the media files (and quote/link content) can be set in Theme Settings section. Please
see the screenshot below as reference:
Set media for Post Format
15.5 Theme Shortcodes are converted to Blocks
The theme built-in shortcodes have been converted into Gutenberg Blocks (except for Accordions and Tabs).
15.5.1 The following 4 shortcodes can be founded in "Add Block" > "Theme Blocks".
Author List
Divider Line
CeraMag Button
Tweet It (paragraph)
Theme Shortcodes are converted to Gutenberg Blocks
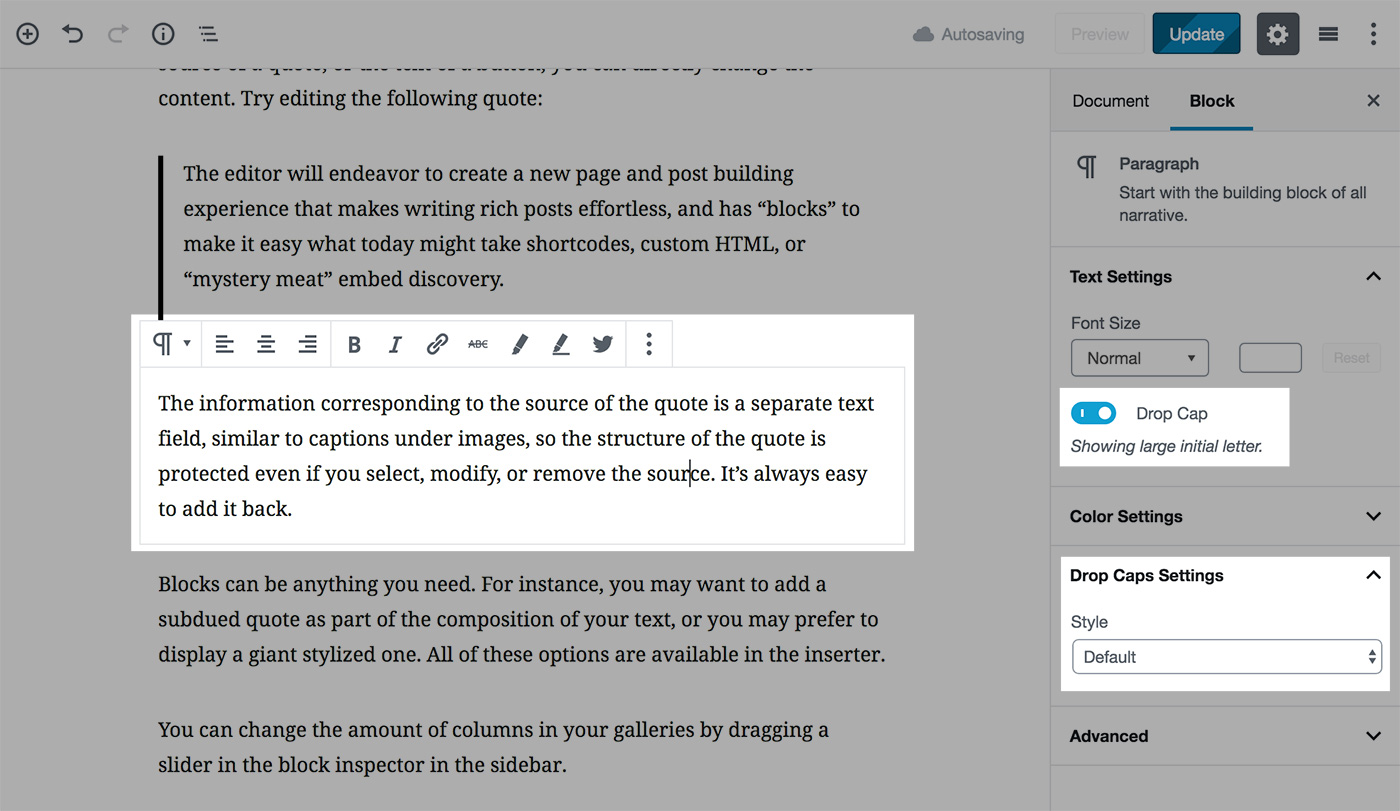
15.5.2 The following 3 shortcodes are integrated with Gutenberg built-in block: "Paragraph".
Drop Caps
Highlight
Tweet It (inline)
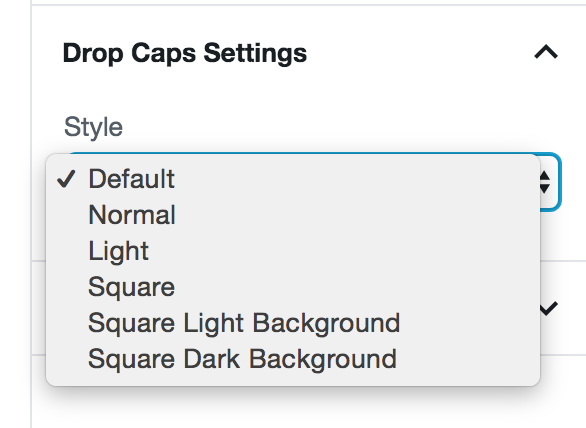
Drop Caps - when editing a paragraph, enable the "Drop Cap" option, then select a style from "Drop Caps Settings" drop down list.
Drop Caps shortcode in Gutenberg editorDrop Caps Settings
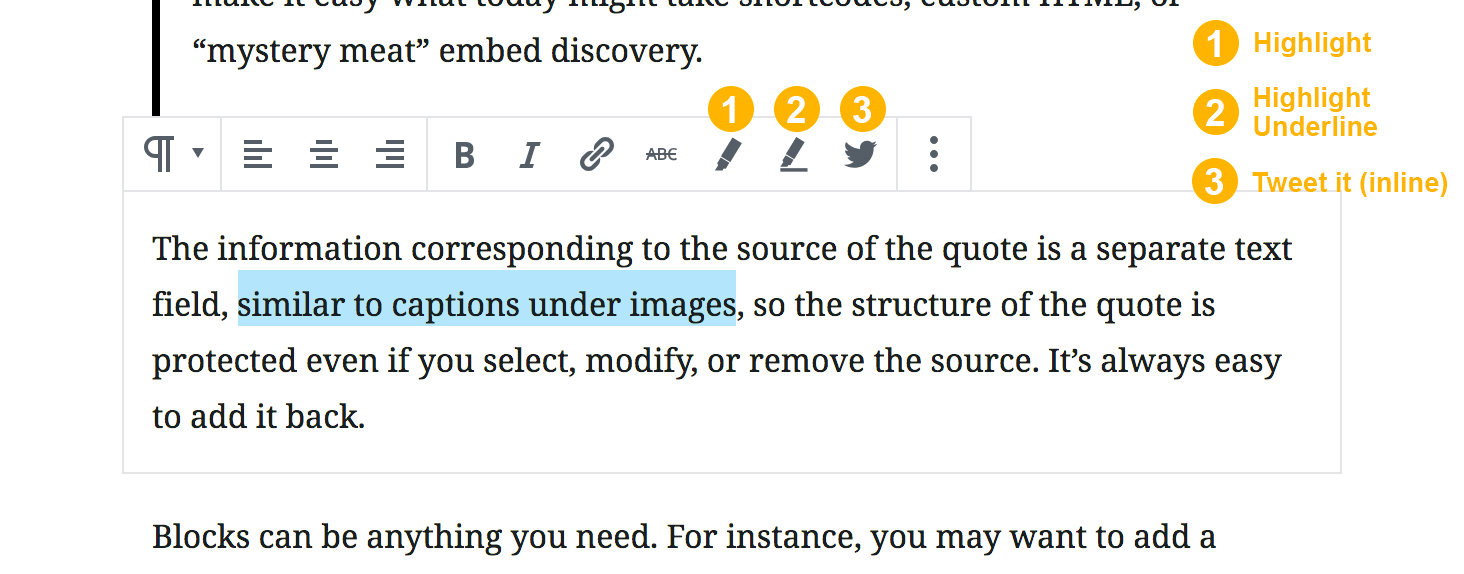
Highlight & Tweet It (inline):
Highlight & Tweet It (inline) shortcode in Gutenberg editor
16. GDPR Compliant
We have included tips and resources related to this topic in this how-to article:
When you purchasing products from Envato Market, a supported item includes item support for 6 months from the purchase date.
During those 6 months, we (as the author of the theme) are available to provide the item support services.
Please kindly note: The terms and conditions are set out by Envato exclusively, and every author must follow the rules.
These rules are the same for every author and every buyer and we cannot change them selectively. Thank you for understanding.
What you should do first before asking your question?
To speed along the support request, please check by following the guide below:
Make sure your site is running the latest version of WordPress.
Make sure that the CeraMag theme and the required plugin "CeraMag Extension" have been updated to the latest version. Some known issues may have been fixed in an update.
Update to the latest version of other plugins on your website.
Disable any other plugins and then check if it fix the issue.
If you still cannot find a solution, please open a support ticket at Loft.Ocean Help Center.
Submitting a support request
When submitting your support request, please include the following information in as much detail as possible so that we can get more clues about your questions/problems:
Your website URL
Which version of the theme you are using
Detailed description of the issue or the question
Screenshots of the problem
Any notices or error messages
Any other information that you find useful
Since we have multiple products, please indicate which product your question corresponds to
And please write in English. Thanks!
Need to renew your support?
If you have less than 6 months remaining on a support item you’re eligible to renew your support. For more information about Item Support renewals, please see
Extending and Renewing Item Support.